Easily make a stylish business card using only MS word
Easily Create A Stylish Printable Business Cards With Microsoft Word 2007 Or Later
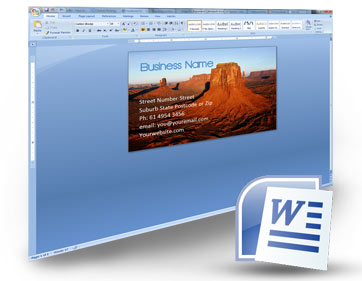
So you need a new business card and you don't want to use online templates or pay some graphic designer to do it for you or your just board and you just want to learn something new. Which ever your reason I'm going to take your through the process of creating a business card using only Microsoft word. Most people out there have Ms Word on their computer so this tutorial will enable you to be able to create your own business from scratch.
What you Will need:
A. Microsoft Word
B. A background image for your new stylish business card.
So Lets Get Started:
1. Open MS office ( yes this might sound a little obvious but we are taking it from the ground up)
2. At the far top left of the screen click on the round button. Then move your mouse over "Print" from the drop down menu and then click on "Print Preview" to the right of where you moused over "Print".
3. A new window will appear labeled "Print Preview". At the top of the page located in the ribbon ( the ribbon is the bar of options going across the top of your page ) click on "Size". Move your mouse to the bottom of the drop down menu that appeared under "Size" and click on "More Paper Sizes".
4. A window will appear labeled "Page Setup". In this window located towards the top left you will see two option boxes, one labeled "Width" and another below that labeled "Height". In these boxes place the width and height you want you business card to be. I will be using 90mm for my width and 55mm for my height but if you have a different size of business card you wish to create just enter it here and this will work fine as well.
5. At the top of the "Page Setup" window you will see three tabs ( Margins Paper Layout ), of these three tabs click on "Margins". At the top of window now you will see option boxes for 6 margins (Top Left Gutter Bottom Right and Gutter Position). Set the "Top" options box to 5mm then set the "Left" option box also to 5mm, do the same for "Bottom" and also "Right". ( don't change the "Gutter" Or " Gutter Position" settings). Now click "Ok located at the bottom of the window.
6.You are now back to the "Print Preview" window. Along the ribbon at the top of the page towards the middle you will see a red box with an X on it labeled " Close Print Preview". Click this now.
7. You are now back at the main MS Word screen. Now will be a good time to save your document just in case. Located at the top of the screen you will see a menu bar running across the screen above the ribbon ( Home Insert Page Layout Reference etc ) Click on "Insert"
8. Along the "Insert" ribbon now visible you will see towards the left a button labeled " Picture" click on this. An "Insert Picture" Browser window will appear, browse to the picture you wish to use for the background of your business card.
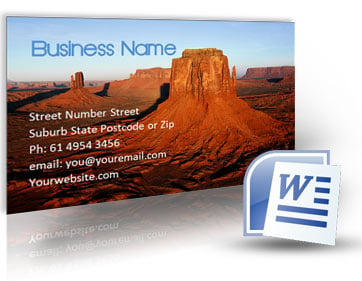
9. When choosing a picture make sure it is already the at least the size of your business card ( in my case 90mmx 55mm), it can be larger as you can scale a larger image down but IT CANNOT BE SMALLER. If the image you select is smaller then the size of your business card and you stretch it up to fit the size then your card will be pixelated, and will not look good. Another thing to take into consideration is you want an area of your image to be be clean and not busy so they you can place your text in this area and the text wont get lost in your image. An example would be if you had a picture of the beach with a blue sky you would use the area with the blue sky to place your text in. So try to choose a picture that is A. not very busy over all or B. has an area that you think your text will sit nicely and not clutter the image. For this lesson i am using the standard images that come with Windows 7, i will be using the picture of the desert.
10. Once you have carefully selected a great picture for the backdrop of your business card click on the "Insert" button located at the bottom of the screen. You can now see your image in the main MS word window.
11. Along the ribbon towards the right you will find a button labeled "Text Wrapping" click on this and in the drop down menu click on "Behind Text"
12. You can now move your picture into the position you want it to be in. If the picture is too large then simply scale it down using the small blue dots located on each corner of your background image.
13. Now that you have your business card background in place , on the menu located at the top of the screen ( above the ribbon) click on "Home". You can now Type in the details for your business card.
14. Start by typing in your business name and then below that your phone numbers, address and email and website all on separate lines ( Don't worry if the details go off the card we will fix this in the next step). Once you have all the information you want on your business card entered we can now go back and work on the layout and styling.
15. Highlight all of your text that you have just entered ( to select it all. hold down your mouse and pull over all of your text until a blue transparent highlight box is over all of your text). Now right click inside the highlighted area ("command" click if you are using a mac) In the drop down menu that appears click on "Paragraph".
16. A new window will appear labeled "Paragraph". halfway down this window you will see an area labeled "Spacing" and some option areas. In the option area for "After" type 1pt then to the right of that open the drop down menu labeled " Line spacing" and select single. When this is done click on "OK" at the bottom of the window.
17. Your text should be sitting in the card now but its all together up in the top left of your business card. Lets do some editing to correct this and make your business card more appealing. Highlight your business name ( like we did before ). Along the ribbon at the top of the screen towards the left you will see an area labeled "Font" and inside this area you will see two drop down menu's. In click in the left box and in the drop down menu scroll down and choose a font that you think would suit the business card background you have chosen. Once you have chosen your heading font then to the right of that box click on the other box and choose a font size. ( make it a little larger then the rest of your text so it stands out) . In the same "Font" area you will see a button with an "A" on it and a colour below, click this and select a colour for your business name. An easy way to select a colour that will look great is make it a shade darker or lighter then the colour of the background it will be sitting on.
18. Ok the business name is done and looks great, lets work on the rest of your info. Place the mouse at the end of your business name and click so that you have a flashing line just after the last letter in your business name. Now click enter a number of times until your address and phone number and other details move down your business card away from your title where it sits nicely.
19. Now that you are happy with the placement of your other details highlight them all and do the same as you did in "Step 17" and adjust your fonts until they look great.
20. OK almost done, you might find now that you are looking at your finished business card that the picture you chose doesn't work as well as you had hoped. If this is the case lets change it. Click on your picture in an area of your business card that has no text on it then click "delete" on your keyboard. Now on the menu at the top of the page above the ribbon click on "Insert" then click on "Picture" and choose a new picture and then click "OK". As we did in "Step 11" toward the right hand side of the ribbon click on "Text Wrapping" and from the drop down menu click "Behind Text" and you new picture is now in place.
21. You will more then likely have to realign your text and maybe even change the colour to match your new business card background. To do this just repeat "Step 17 and Step 18".
22. Lets print your new business card to see how it looks. Click on the round button at the top left of the screen and click "Print" then at the bottom of the window that pops up click "Ok"
You now have your new stylish business card and now you know how to do it for next time. I hope this has helped. Enjoy
______________________________________________________
If you would like to see how to make a professional business card using Adobe Photoshop and Adobe Illustrator check out my other hub here Make Business Card Using Photoshop and Illustrator.
Here are a couple of links to help you with inspiration for your business card
- Business card templates
this site has some great designs for you to go through and see if something sparks your creative bug and gets your new business card rolling. - Vistaprint
These guys have a way larger selection although the level of design isn't as high as the other site. But if your still lost for a layout or background feeling maybe you can find it here.
