DIY Craft: Vintage Inspired Handmade Tree with Paper Flowers - Great Idea for Wedding Décor!


Inspired by the vintage look of the home accessories available at Anthropologie and Pottery Barn, this charming tree is easy and fun to make. Using basic supplies found around your house, this colorful tree decoration would be a wonderful centerpiece for a wedding or bridal luncheon, a special baby shower, or for decorating your home!
This crafty tree is made from a basic cone structure wrapped with twine or yarn, then decorated with colorful paper flowers, some buttons, and an applique detail of your choice.

Materials for Vintage-Inspired Tree
- cone structure - size of your choice. This cone can be either paper, cardboard, or styrofoam
- tissue paper (optional) for wrapping around cone
- twine or yarn to wrap cone - if using yarn, I would suggest using a thicker yarn of aran or bulky weight
- shoelace (optional) for tree detail
- a bunch of magazine photos or decorative paper for flowers (thicker paper or cardstock is better)
- buttons, beads or sequin for the centers of your flowers

- applique of your choice (optional) - this can be a design of your choice, like a bird or butterfly, to add an extra detail. You can also just cut a shape out of paper.
- white craft glue that dries clear
- glue pen that dries clear
- scissors
- base for your tree (optional)

Directions for Making a Vintage-Inspired Tree with Paper Flowers
- I started by wrapping my cardboard cone with tissue paper. This step is not necessary if you are wrapping a cardboard cone with twine, but I would recommend wrapping any styrofoam cone so the foam does not show through your wraps.
- Starting at the top of your cone, use a paintbrush to coat the top inch or so of your cone with glue.
- Taking your twine or yarn, start to wrap your cone. Be careful to cover the very top point of your cone. As you are wrapping, use your fingernail to tighten up the wraps so none of your cone structure shows through.

4. Let your first 4 or 5 wraps dry before you continue wrapping your cone. This will avoid having your twine or yarn unravel from your cone.
5. Continue wrapping your cone, letting it dry a little after every couple of inches.
6. When you get to the bottom of your cone, make sure your bottom edge is even. Trim the end of your twine or yarn cleanly and glue in place. Then put your cone aside and start cutting out your flower pieces.

7. I used a simple shape to make a stencil for my flowers. You can use this flower template to make three different sized decorations for your tree.

7. I cut my flower shapes out of images from thicker magazine paper. I made a larger flower, about 1 1/2 inches in diameter, a medium sized flower, and a small flower - all using the same template.
8. Cut out enough flower shapes to make about 20 flowers (depending on the size of your cone), layering at least two sizes together to create some dimension to each flower. I mixed different colors together when layering my flowers, but this is a personal choice. You could also use all one color for all your flowers.
9. Then fold each of the petals towards the center of the flower so they stand out a little.
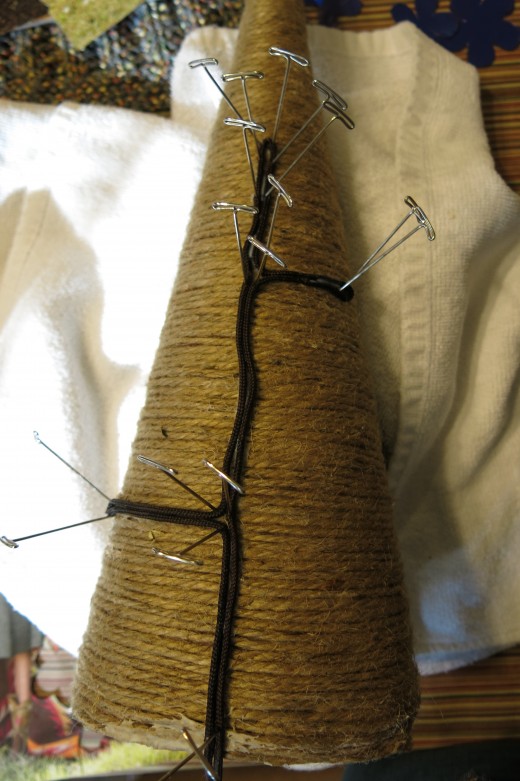
10. (Optional) Use a shoelace or some other yarn to create a basic tree shape on your cone. This tree will provide the branches to place your flowers on. A glue pen is great for gluing down your tree shape. Once you have your tree glued down, pin it in place while it dries.
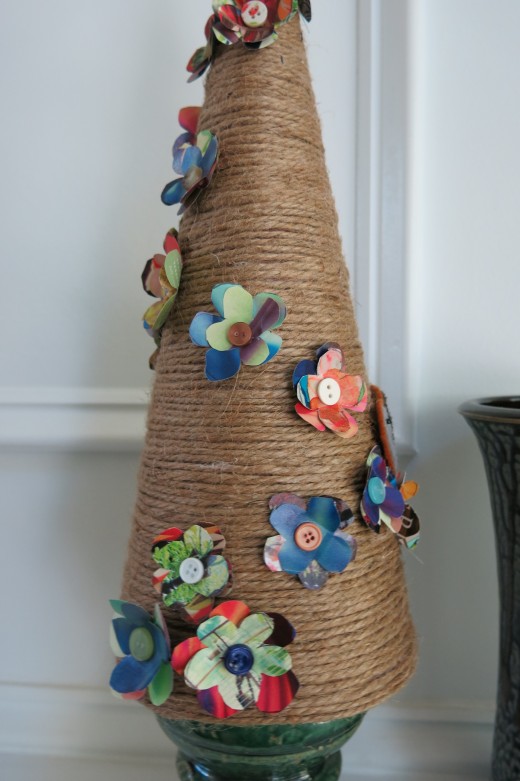
11. Once your tree is dry, start placing and gluing your flowers on your tree, or in the design you choose.

12. Continue decorating your tree with flowers, layering the sizes and colors as you choose. You can also use artificial flowers or leaves to embellish your tree.
13. Add in any other details you wish. I put a felt applique bird on one of my branches, then surrounded him with some of my paper flowers. I like the extra detail and texture he adds to my design.
14. You can also add a button, bead, or sequin to each flower center for more color and interest!

Ideas for Displaying Your Tree
You can add an interesting base to your tree to finish your design:
- I used a chunky candle holder for the base of my tree. I stuck one side of a piece of velcro to the candle base and the other side to the bottom of my cone so my tree would stay in place.
- You can use a small juice glass or bowl as a base. Turn it upside down and hot glue the bottom of your glass or bowl to the bottom of your tree.
- Perfect for bridal luncheons and baby showers - fill a small jar with some colorful buttons, beads, or pebbles. Then glue the top of the jar to the bottom of your cone. If you've used a styrofoam cone, embed the rim of your jar into the base of your cone.
Copyright © 2014 by Donna Herron. All rights reserved.
Looking for more craft and decorating ideas?
Check out my other tutorials and articles:
Free Holiday Craft Tutorials and Gift Ideas for Every Season
Garden-Inspired Wreath with Bird House and Flowers
Creative Bulletin Board or Jewelry Display Made from Garden Fence
How to Hang Your Artwork to Create an Interesting Arrangement
How to Make an Interesting Photo Collage
Hording Stuff: A Creative Crafter's Best Tool
Christmas Wall Hanging Using Vintage or Costume Jewelry
DIY Craft Project: Fall into the Holidays Wreath
How to Decorate for the Holidays with Basic Frames
Easy Christmas Ornaments Made with Oven Bake Clay
How to Make Christmas Ornaments From Recycled Greeting Cards
A Newbie's Guide to Needle Felting a Reindeer Christmas Ornament


