Natural vs Artificial Light for Beginners

Seeing the Light
Lighting is one of the most critical factors in photography of any kind, the word "photo" means light after all. But in the world of digital photography understanding natural -vs- artificial light can help a beginner take great digital pictures right from the start.
Most image makers realize that having too little light available can be overcome by firing off a little flash if the subject is within close range. But new photographer's may not know that too much light can bring even bigger problems that may require a little extra know-how.

For instance, things like nicely lit shade is better lighting than open sunshine, and that an overcast sky can be a digital photographers very best friend, or that when light levels are very low —at dusk or even at night— a long exposure can offer some very professional and dramatic looking effects.
Most importantly, if the beginner digital photographer can get to where he/she understands natural -vs- artificial light they may just start to capture the world of light one second at a time, which gives the beginner photographer an in to the magical world of digital image making right from the very start. Remember: If you can see the natural light no matter how bright or dark it may be, you have the ability to capture its beauty within your digital camera lens.
"Night Photography Basics" YouTube Video (1 minute 32 seconds)
Sunlight can be Friend and Foe for a Photographer

"Digital Photography Natural Light Techniques"
FACING THE SUN
On a bright sunny afternoon, it is not uncommon for a photographer to place their portrait subject facing the sun to assure that he or she is well illuminated. It would seem to make perfect sense. However, a couple of interesting draw backs occur in this natural lighting situation. Firstly, the subject is bound to have to squint, and second, the bright direct sunlight makes seriously hard looking light and creates deep harsh shadows on the subject's face. Nothing about this formula is good when shooting portraits in natural light.
DIFFUSING NATURES NATURAL LIGHTING
Although it may sound strange, an overcast day is so much better than direct sunlight for photographic images. The sunlight gets diffused (as nature intended) as it passes through the cloud base, giving everything a softer, more evenly illuminated light. The lighting may be better diffused, but these overcast gloomy clouds don't make for very interesting pictures because of the boring flat white and grey tones. Because of this, the digital photographers goal in this lighting condition is to keep as little of the sky in the picture as you can, getting close to your subject can help.

INSTEAD...
One solution that is also the easiest solution, is to place the subject in the "open shade." This is done by using a shaded space that is also open so the skylight reaches your portrait subject. This is also called indirect natural light, and it is a digital photographers very best friend.
Another solution would be to honor the natural light by taking advantage of the time of day you shoot the portrait. When the sun is low in the sky — either early morning or late afternoon — the sunlight is softer and angled lower against the earth creating less harsh light and much cooler and gentle shadows.
By properly arranging a reflector, you can create "catch lights" (the reflective glints of light spotted on a photographed subjects pupils) in your subjects eyes, this helps to bring the image to life and adds emotion to any picture. Images without these catch lights can have the "shark" or "dead eyed" appearance we photographers dread! So always look for those beautiful lively specs of light in your subjects eyes.
Click to See Either Image Full Size


LOW LIGHT TECHNIQUE
Forget about putting the camera away when the sun goes down, you have options! If you have a tripod (if you don't, improvise by resting the camera on top of a car, tree stump, or whatever works best for you) and some patience, you can achieve digital photography greatness. Steadying your camera is required because your exposure times —the time the camera shutter is open to take in enough light through the lens aperture— will be longer, so keeping the camera perfectly still will make or break your image outcome.
Rushing water, mist, and fog can add an etherreal feel to landscape images. The lighting is soft and diffused, bringing over-all good illumination when using a longer exposure time, but again, I recommend a tripod or similar tool.

A PHOTOGRAPHERS NATURAL LIGHTING TRICK
Once you have your portrait subject in the open shadows, you may wish to add some character and texture to the image. A photographer's trick is to use a reflective surface to shed "controlled diffused light" on the subject. This is done by holding a white piece of paper or reflective material (using colored paper of reflective materials will add tints and tones to the images, which can be really interesting) that will cast an extra reflection on the face of the portrait subject. The idea is to let this controlled light fall across one half of the subjects face, bringing depth, technique, and texture to an otherwise flatly lit portrait. You can buy a reflector designed specifically for this purpose online or at stores that carry photo equipment.
As you can see, indirect natural light gives off beautiful diffused light, absent of hard shadows, which results in much more aesthetically pleasing images.
2 Bonus Tips!
- Digital photography acts differently than film photography when it comes to light. Unlike film, the digital camera has a tendency to see the really bright aspects of an image quite well while having less ability to see the dark details of an image, only managing to capture the light between the two extremes more accurately. Because of this, in most consumer grade digital cameras, it is good to know that shooting an image that is a bit on the dark side will result in a better printed picture. An over exposed image is not a correction easily made even by experience editing software ninjas. It is much easier to overexpose a digital image than it ever was shooting with film. So, shoot on the slightly darker side of exposures and your printed results can be amazing.
- Be sure to view your image screen in the shade. The screen may give the illusion that a picture has lighting problems when it really doesn't. Some LCD viewing screens are pretty reflective, and what may be a great exposure can look washed out or way too dark. Looking at your viewing screen in a shady area gives you a clearer assessment of the images that appear on the display.
Photography Trivia
Edison made a filament for the first incondescent lightbulb out of a burned sewing thread. This created a light that wasn't as bright as the carbon arc light, later he used bamboo filaments.
"Digital Photography Artificial Light Techniques"
INDOOR LIGHTING
Edison created a wonderfully dynamic thing in the light bulb. But the light from this device is quite unlike the light from the sun. A light bulb emits a very narrow band of color from the visible spectrum. This more often then not, creates odd and unnatural coloration when taking pictures indoors.
FLUORESCENT and TUNGSTEN LIGHTING
For instance, fluorescent lighting gives an overall greenish hue to digital images, while a regular tungsten bulb will make everything look more yellow. In photographing food items the color of the images is most critical, as they are designed to create a craving; doubtful many people would wish to eat a green piece of carrot cake!
Photography Trivia
The first camera that was small and portable enough to make photography practical was built by Johann Zahn in 1685, though it took another 150 years for the technology to be used regularly.
COLOR ADJUSTING FILTERS
Color adjusting filters are made to fit over the end of a camera lens to cancel out the effects of fluorescent, tungsten, or other indoor lighting issues. When using these filters, it is important to keep in mind that they reduce the ability of the camera lens to take in as much light. So adjusting your aperture for the density of the filter is a must. Each filter will indicate what measure of difference it will have on the light intake.
GOOD OLD FASHION FLASH
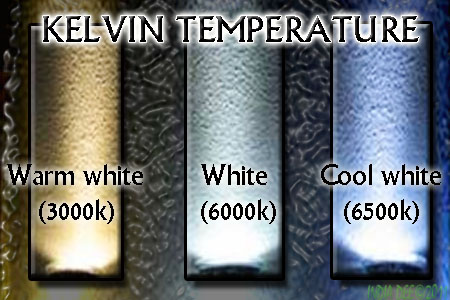
An easier way to mange artificial lighting situations is to use a burst of light, known as a camera flash. By pushing a burst of light that is the right kelvin temperature for a rooms lighting conditions, you can create perfectly natural daylight looking pictures.
"Kelvin," like Fahrenheit or Celsius, is the way we measure the temperature of light; how hot or cool a lighting source actually is. The perfect noon daylight temperature for photography is 5500°Kelvin, and is what a camera flash emits. 4800°Kelvin has warm yellowish tones, while 6000°Kelvin will cast bluish or cooler tones. Each temperature has its use when balancing indoor lighting with photography.
Another way to take on the artificial lighting color pallet, is to adjust the color later on by loading the image on to your computer and adjusting the colors with image editing software, but that is a topic for another time.

More Helpful Digital Photography Tips and Advice for Beginners
- An Easy to Understand Digital Photography Guide
- "Macro Mode" What is macro mode on Digital Cameras?
- Zooming; Should You Use Optical Zoom or Digital Zoom?
- PhotoShop for Beginners - How to Turn scary spider pictures into Digital Posters
- From Snapshots to Art - The Magic of Digital Images for Beginners


