Draw A Cartoon Bear In 7 Steps

What's On This Hub...
This is my first drawing tutorial type hub, this is actually only my second tutorial I have ever done so I really hope it helps!
This hub is on how to draw a cartoon bear in seven steps, from pencils to inking. Like I said this is my first instructional drawing hub so I hope I'm doing it right! ^_^
Note: If the pictures don't line up with the words try refreshing the page... especially if on Google Chrome.

Step One:
This is how I would start the first step of drawing something like this, however a lot of people would finish the circles and erase the unwanted lines later. I like to work without to much erasing so I only draw the parts of the shapes I need but often follow through on the shape with the pencil above the paper.
Right here you are working on the ears, the paws and the top of the head. make sure you are sketching lightly and using an erasable pencil.

Step Two:
In this step your just adding things like the neck tie, and the eye markings.
This little guy is a Panda Bear, and Panda Bears have those cute little black patches around their eyes... that's what we are doing in this step, not drawing the actual eyes yet.
Notice how we are only drawing the top part of the eyes marking, this is because we continue with the eye marking in the next step.
Your also adding the nose, he has a cute big nose! Almost all the cartoon bears I have seen have big adorable noses like this, but still, remember to play around a little and draw in your own style.

Step Three:
Now you start putting a bit of proportion to the bears face. The downward curved lines under the darkened eye patches, and next to the nose... those are lines that show where the bears cheeks are, like he's smiling.
Also I added a curved line to him showing where you would see that part of his back. Also at this point finish the outline of his face, cute poofy cheeks like panda bears have. :)

Step Four:
Now we start adding even more of the details, adding the eyes now, the buttons to show the shirt, I added a couple of lines to show wrinkles in the fabric. I left a highlight in the eyes, makes them look more real and filled in the rest lightly with pencil.
Added some details to the ears, and a pocket to his shirt. This is still done lightly in erasable pencil... so make sure you are sketching lightly or it will leave shadow lines after you ink and erase!

Step Five:
Now you finish up the last few details, finishing up his eyes, adding a cute zig-zag kind of lines to the tie, add whisker spot to the cheeks, like with a cat.. just no whiskers!
Shadowing some areas and darkening some areas that are just a darkened color. In this case every other line on the tie, shadowing the buttons on his shirt, the eye patches are darkened.. I mean he's a panda! Next darken his nose. The eyes are the only thing I colored with solid color the rest are shadowed and darkened with diagonal lines, that way it doesn't look to solid and gives him more of a shadowed look.

Step 6:
Now to inking, What I've done here is I just took a Sharpie pen and inked over the existing pencil lines... I use Sharpies as my inking tool, you might use something else and that's fine too... it's just best for me.
You darken all the lines and finish up with final shadowing. Then earased the pencil lines from underneath.
On To The Final Step...
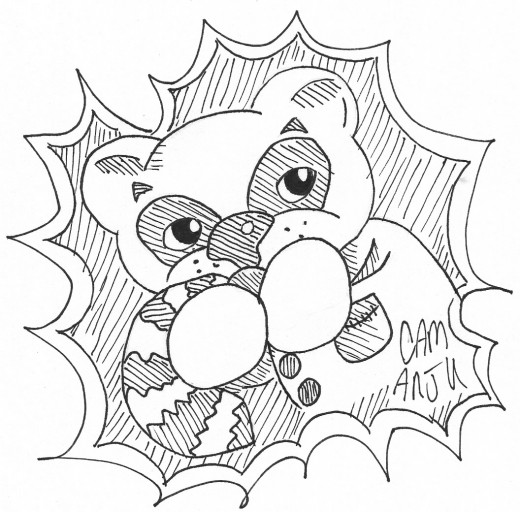
Step Seven:
Final step for this, Sign it and I like to put on border and shadow the inside... Just a personal preference.
Well, this is the final step and I hope this little tutorial attempt of mine helps! ^_~


Care To Vote?
This hub is running in the HubNuggets wanna-be's! I would be totally honored if you could go take a look at this current running of HubNugget wanna-be's from Shirley Anderson and vote! While I'd love the vote, make sure you read the other contestants too ok?!
Thanks, Cammi


