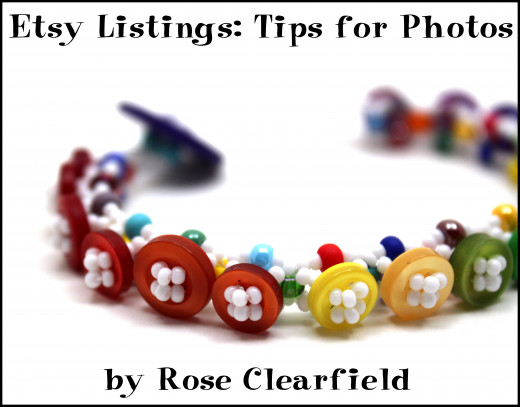
Etsy Listings: Tips for Photos

- Tips for Taking Stunning Jewelry and Other Small Item Product Photos
This article is about how to take stunning jewelry and other small item product photos. I include tips about equipment, camera settings, lighting, editing, backgrounds, tips for Etsy, and more. - Backgrounds and Props for Product Photography
This article is an offshoot of my product photography article that focuses on backgrounds and props for product photography. I include over 20 different aspects to consider with photo examples for each.
I have been selling on Etsy since late 2008. During this time, I have actually learned more about photography and marketing than I have about making jewelry. If you don't have any experience or have just started with product photography, this article may be a little overwhelming. Take a step back and first focus on your general product photography skills and your backgrounds and props before you worry about pulling together polished Etsy listings.
Take a step back and focus first on your general product photography skills and your backgrounds and props before you worry about creating listings. When you're ready, come back to this hub. You will be able to pull all of your newly acquired skills together to create amazing Etsy listings.
As I've already written a couple articles on this topic, I did my best not to repeat too much of the same information here. If you can't find what you are looking for in any of my photography articles, don't be afraid to contact me. I'm happy to help in any way that I can.


Different Poses and Angles
If at all possible, show your products from different angles and in different poses. If you have no idea where to start, search similar listings for inspiration. Don't be afraid to do a lot of experimentation, especially when you are first starting out. It can take a while to figure out what works well and what you want your signature look to be for your shop. As you develop standard poses and angles, the photography process will go more quickly.

Different Backgrounds
Providing several different backgrounds for a piece within an Etsy listing can make a listing more interesting. Many people like to feature one or two backgrounds in their top listing photos. This can give a shop a more consistent look as people browse the thumbnails. However, there is no reason you can't use additional backgrounds within the listings. Currently with each listing I include dark or light gray, sheet music, and white backgrounds. There is no limit to the backgrounds and props that you can use.
How to Shoot on a Pure White Background
Product Photography Books


Modeling And/or Size Comparison
People can't see items in person so everything that they can get to judge the size and scale of the pictured items will be helpful. It is also important for people to see how jewelry fits and how clothes will hang. It is important to include measurements and sizes in your listing descriptions, but people generally need more than that to get an accurate idea of size. Photos with modeling and/or size comparison can make a big difference.

Clarity
Please don't post pictures that are blurry. It is better to have 3 great photos in a listing than to have 2 great photos and 2 not so good photos. If you're struggling to shoot 5 great photos for all of your listings, don't get stressed out. Start with what you can and build from there. If you aren't using a tripod and/or the self-timer on your camera, these are great places to start for getting crisp photos.

Use All 5 Slots
With the above being said about not using all of the slots if you can't, it is still ideal to use all 5 photo slots whenever possible. The shot that works well for one person might not work as well for another person and vice versa. If you are still struggling to come up with ideas for different photos after reading my photo hubs, continue to search similar listings on Etsy for inspiration. It's important to keep in mind that something should be different about each photo. Don't post multiple shots of essentially the same photo. Make the most of your five photo slots.

Variations
For made to order items, patterns, or signature lines in your shop, show other possible color combinations or other variations for pieces. If there are other versions currently available, include a link in the listing description. People may like a design but not like an element of the piece such as the color combination, clasp, or size. Providing some variations will get their minds thinking about customization options.

Macro
If you are not already shooting in program mode, please start doing so with your next photo session. Among other things, it will allow you to turn on the macro setting yourself. Close up shots are essential for Etsy listings. Let people appreciate the fine handiwork that goes into your products as well as the materials and techniques that are used.
Macro Photography Tips For Beginners


First Listing Shot
Consider what will the first photo in all of your listings. As you become more comfortable with photographing your products, pick out one or two poses and backgrounds that work well for many of your items. Using these for the majority of your first photos in your listings will create a consistent look for your shop.
- Product Photography: How to Tips for Cropping Photos
This article is about how to tips for cropping photos for product photography. It includes before/after photo examples for concepts such as too much space, how to display hanging items, and how to crop for models and mannequins.
Cropping and Editing
I cannot stress cropping and editing enough. Even the best photos will most likely need some more editing work before they're ready for a listing. Generally I crop first. Keep in mind that the first photo people will see of your item is a thumbnail. You want people to see some of the detail in your item from that thumbnail. Cropping will make this happen for you.
You do not need Photoshop or a wealth of editing knowledge to do some basic light adjustments or other simple techniques such as straightening. Using Picasa, I usually do an auto light adjustment and then manually tweak the light settings a little more. Some photos require more tweaking than others. Most programs will save original copies of your work so you can always start over if you aren't happy with the results.

Stick With It
I did not develop my photography skills overnight. It took me the better part of two years to feel confident about my product photography skills and to start producing consistently good product photos. I still learn new things and continue to improve my skills every month. Take lots of photos and continue to work on your technique. It may not seem like you're making a lot of progress from week to week, but once you've started progressing, you'll be shocked when you go back and look at your photos from even a few months ago.

Guide on how to do product photography on the cheap
More Product Photography Resources
- Tips for Taking Stunning Jewelry and Other Small Item Product Photos
This article is about how to take stunning jewelry and other small item product photos. I include tips about equipment, camera settings, lighting, editing, backgrounds, tips for Etsy, and more. - The Quick-Start Guide to Selling on Etsy | The Etsy Blog
- Product Photography
- Packshot Photography - product photography at its best
Packshot photography is a style in photography which is solely aimed at product, commercial photography