- HubPages»
- Arts and Design»
- Crafts & Handiwork»
- Paper Creations
How to Design a Christmas Card using Tree Ornaments as Inspiration


Finding inspiration for handmade Christmas cards.
It's not always easy to come up with designs for handmade Christmas cards. Sometimes if I'm really in a crafty mood, I can draft several designs at the same time. Other times, it's hard to find the creativity within that's needed to produce just one.
I'm not sure if it was the warm cup of tea I was sipping on in front of the Christmas tree after my children decorated it, or if it was red and green glittered Christmas ornaments hanging from the evergreen branches. Something struck me at that moment, and I decided this year's Christmas card would be designed around a Christmas ornament.

First, figure out the supplies you'll need for your design.
I'm always finding myself doing retakes. At first, I pick out several options which I think seem like a good idea for my card design. Ultimately, I usually end up making the card out of totally different supplies.
It's always a good idea to start with a clean work surface. As you pick out supplies that you think you might use in your project, place them in neat piles around the area, leaving a free spot to start your work.
What you will need for this project.
| How to prepare for the project.
|
|---|---|
Patterned cardstock size 12" x 12".
| Cut in half to 6". Fold. Set aside.
|
Solid color cardstock size 8 1/2" x 11".
| Trim to fit the die cuts or circle size you will be cutting out.
|
Pre-made inside sentiments.
| Purchase or make by hand.
|
Cupcake papers.
| Cut out small sections for adhering to the top of the ornament.
|
Embellishments.
| Buy or make.
|
Adhesives
| Glue dots and double-sided tape.
|
Die cuts or shapes.
| Die cut machines or shapes cut by hand.
|
Finished cards will be 6" x 6".
To cut circles by hand, you can use one of the following methods, depending on the size you need:
- Use a clean soup can (or coffee mug) for cutting out smaller circles. Draw around the can and then cut out.
- Use a foam bowl upside down to cut out medium circles. Trace around the bowl and cut out. (A coffee can will work as well.)
- Use a paper plate to draw large circles. Place paper plate upside down, trace around, and cut out.
Cut out shapes or die cuts first.
If your project requires shapes or die cuts that need to be cut out, do those first. That will save time when assembling the project later.
To make a round Christmas tree ornament shape, I chose a circle Sizzix die cut. There are machines that cut just circles, or you can cut a circle by hand as well.
For this project, I used a medium sized circle die cut called Sizzix Circle #1. This die cut is used with Sizzix BigKick.
How to cut out a circle using Sizzix die cuts.
- Choose your cardstock. For this project, I chose a red piece of cardstock in size 8 1/2" x 11".
- Measure the die cut to determine where to trim the cardstock. In this example, trim the cardstock to 4 1/2".
- You can cut two circles if you place the die cut carefully on the cardstock.
- Cut out as many circles as you need. I made six greeting cards for this tutorial, so I needed to cut out six circles. I got four circles out of one piece of cardstock. For this project, I used two red pieces of cardstock for the circles.
Cutting circles with a machine.
Click thumbnail to view full-size


There is no limit to your imagination. Use ribbon, glitter, rubber stamps and other supplies to add texture and design to your circle.
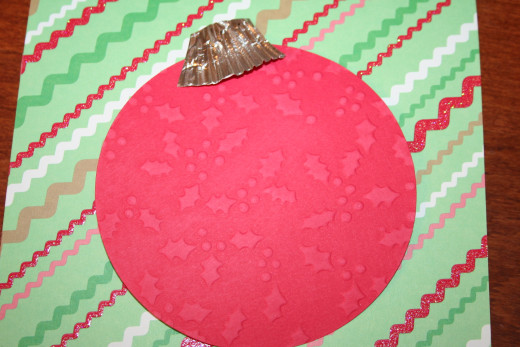
Decorating the circle.
In digging through my scrap stash, I found pre-made holly leaves and berries. That saved a lot of time from cutting them out individually. I decided to go ahead and emboss the circle with the same holly berry pattern.
Dry embossing your design.
Click thumbnail to view full-size


Adding finishing touches to the design.
Play around with your supplies until you are happy with the results.
Here, I chose to use pre-made holly leaves and berries. A little adhesive goes a long way on embellishments. I angled them where I wanted them and I was happy with the result.
I created the top of the ornament out of a mini paper baking cup. I cut out a small section and adhered it to the top of the card.
Paper baking cups come in all sizes, colors, shapes, designs, and foils.
Keep a stash of products on hand for when you get the urge to create a card.
|
|---|
Ribbons
|
Sewing Thread
|
Fibers
|
Buttons
|
Glue sticks
|
Glue dots
|
Pre-made embellishments
|
Other supplies: sanding block, bone folder, cardstock
|
Rubber stamps and ink pads
|

Inside sentiment.
For this tutorial, I used pre-bought cardstock sentiments. There is no limit to what you can say inside a greeting card. You can even leave it blank.
Here are some Christmas sentiments you may choose to use in your own projects:
- Happy Holidays
- Feliz Navidad
- Season's Greetings
- Wishing you blessings this holiday season and throughout the new year!
- May your home be filled with warmth and happiness during this holiday season.
- Good tidings to you at Christmas and the coming New Year!
- May you find joy and peace during this holiday season.
Set of six cards.

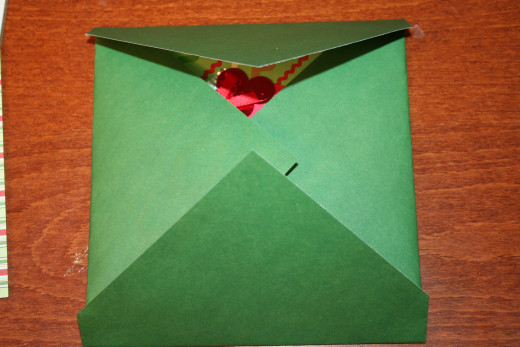
Learn how to make matching envelopes
- How to Make a Large Amount of Holiday Cards at the S...
Make your own Christmas, Valentine's, Easter, Thanksgiving, and other holiday cards in large amounts all at once! Make individual or all the same. Illustrative guide to making cards.
You can make as many or as little as you want.
There's no set rule when it comes to making greeting cards. You can make one or a hundred. It doesn't really matter as long as it suits your needs.
I made six matching greeting cards for this project because I had six of everything on hand already. I didn't have to purchase more supplies to make these.
Normally, I would go to the store and pick out matching supplies for the project I wanted to create.
I like browsing through a large selection of cardstock, both solid color and printed with patterns, to determine what creation I will make next.
Some of my favorite stores include Michael's Craft Store, AC Moore, Hobby Lobby, and Joanne Fabrics.
For the envelopes, trim a 12 x 12 paper to 10" on two sides.

Set your card in the middle of the cut paper to fold the envelope.

Adhere your envelope. The card is complete.
How many attempts do you try at something before giving up?
If at first you don't succeed, try again.
The main idea here is to create a design that you thought of through inspiration in your environment. For me, it was observing a Christmas tree when my mind was relaxed.
However, sometimes it takes several tries to get a design on paper that I'm thinking of in my mind. In fact, my first attempt at this card didn't look like a Christmas tree ornament at all.
This looks more like a party popper than an ornament.

Thank you for reading this today.
Thanks for stopping by and reading this tutorial. I hope you find inspiration to create lovely handmade greeting cards to share with your friends and loved ones.
Happy crafting!


")
