- HubPages»
- Arts and Design»
- Crafts & Handiwork»
- Paper Creations
Instructions for Folding a Paper Box
Making an Origami Paper Box
Use these instructions for folding a paper box to create an origami simple box using craft paper or any typical Japanese paper made for origami creations. In a pinch, any paper will do, but the paper that is made specifically for origami is lighter and easier to fold than traditional stock that you might use at the office.
Once you know how to fold paper into a box using this simple method, you may discover several fun ways to use them. They make great accessories on a wedding reception table or special event filled with mints or goodies, or they can just be used to store small things. With a typical 6" sheet of origami paper, you can expect a box about 2 inches wide. Naturally, if you want a box smaller or bigger than that, just adjust the size of the paper.

Paper Folding Tip!
Firmly slide your fingernail across the crease to get a clean fold line.

How to Fold a Paper Box
The first step to get the box started is to take your sheet of origami paper and place in on a flat surface with the printed side up so you can see it. With traditional printed origami paper, this means that the pattern will be facing you when you begin folding. For ordinary colored paper, it doesn't matter.
Now, fold the sheet of paper in half, being careful to line up the edges as perfectly as possible, as this will make the finished project more crisp. After folding the sheet in half, open it back up and fold it the other way, so that you end up with creases that divide the paper into four equal squares.
In the picture to the right the paper is shown face down, simply because it is easier to see the lines, but it was folded with the printed side up.

Folding the Corners of the Paper Box
The next step is pretty simple. With the sheet of paper pattern-side down, fold each of the pointed corners inward to the middle, aligning the sides with the creases that you made in the previous step. After each corner is aligned nicely, make a solid crease in the fold.
Continue working your way around the paper until you have folded all four corners. Once this step in the paper box instructions is completed, the paper will once again be in a square shape with the cut ends facing up.
Bring the Paper Box Sides In
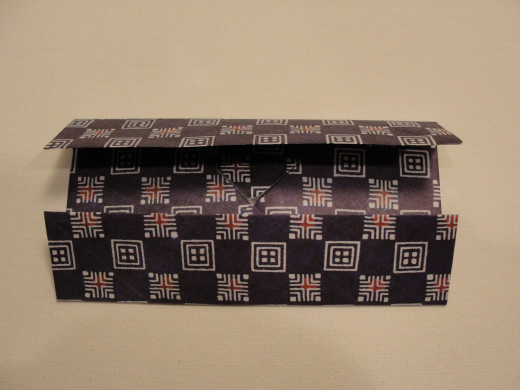
Now it's time to make the final creases that will be used to finish the paper box origami project. With the paper still facing you as in the last step, fold one flat end into the middle until it reaches the mid-point and make a crease. Then, spin the paper around, leaving the same side face-up, and repeat this step on the opposite side.
After this step the paper will be in the shape of a rectangle with two long horizontal shapes facing up.
Next, rotate the paper ninety degrees, so that one of the shorter ends is nearest you, and fold the bottom to the middle, making a fine crease. As before, repeat this process on the opposite side. After this step, the origami paper will once again be in a perfect square shape.


The Trick to Fold a Box From Paper
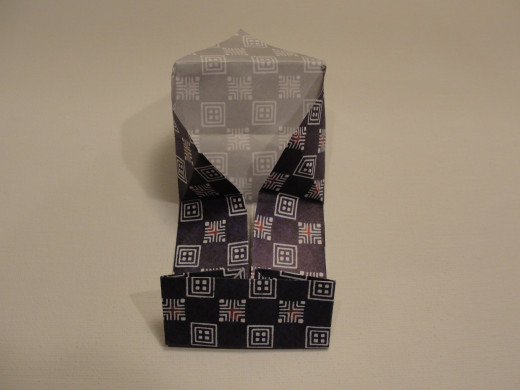
Now it's time for the most difficult step, but don't worry - it's not that hard. In this step, unfold one end of the paper so that the pointed tip is completely exposed. Once you do this correctly, the corner will look like the picture here.
Then, repeat this step on the opposite end, so that it is unfolded as well. Be careful not to rip the paper on this step, and try to keep the left and right sides folded as much as possible.
Now that the inside of the paper box is exposed, start with one corner and fold the paper that will end up in the inside corner of the box inward. Repeat this step on the other corner of that same box side.
Now it's time to fold that entire side over and insert it into the box. This is the step that will actually make your origami paper box project start to look like the finished product. Simply press the paper down and gently work the corners to make them line up nice and square.
Once you have finished that side of the box, repeat the process on the opposite side for form the box. Congratulations! Your paper box is now finished. You may wish to use a small piece of two-sided tape under the flaps to hold them down, depending on how you plan to use the finished project.

How Do You Make a Paper Box?
As you can see, the steps to make a paper box are not that difficult. With a little bit of practice, you will remember this simple origami project on how to make a paper square box and be able to reproduce it whenever you like.
The only thing to do now is to figure out how you want to use your new creation. Enjoy!


