Recycled Paper Towel Rolls: Tube Toy

Tunnel Toy
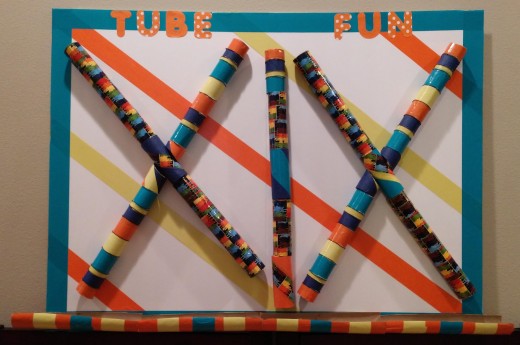
We recycle daily but I often look at the items in the bins and wonder if I could repurpose any of them. So now, I save a few cardboard boxes, plastic bottles and lately paper tubes from paper towel, toilet roll, and aluminum. The tube toy idea came to me after a conversation with my mom. Since it was partly her idea we decided to make it together. It was fun and I was able to spend quality crafting time with my mom. The same can be said if you decide to make this with your child or friend. Playtime starts the moment construction of this toy begins.
You Will Need:
Paper towel and toilet roll tubes
You could also use paper rolls from plastic wrap or aluminum foil
Wide decorative tape, paint, stickers or markers to decorate the tubes and foam board.
Foam board
You’ll need two 20 inch x 30 inch (51 cm x 75 cm) sized foam boards in any color. If you don’t have foam board you could use a recycled cardboard box. Just make sure the board is thick enough to hold the weight of the tubes.
Strong adhesive
I chose a tacky type glue because it grips to the tape. Wood glue or any other white runny glue doesn’t work well.
Scissors or craft knife
Your scissors or craft knife might get really sticky if you use it to cut the tape because the glue from the tape tends to leave a residue. I clean it off with a bit of acetone (nail polish remover) every so often.
Large paper poster letters
Small balls (wood, plastic or foam etc).
I chose little wooden balls, but small plastic or foam would work great too.
Instructions
Place the two foam boards side by side and tape them together with wide clear tape on both sides.
This is when you can have fun with decorating the foam boards. Either draw pictures on it or just tape patterns on it with tape. There are no rules here.
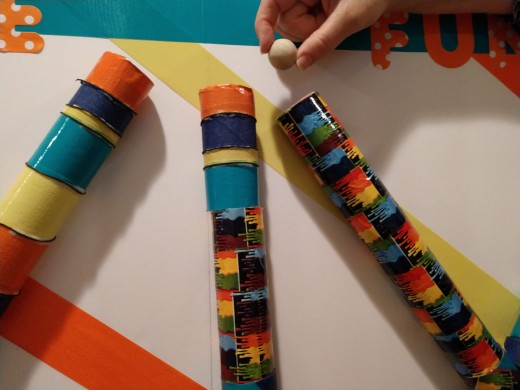
Decorate your tubes with tape, markers or stickers. I used tape here. Just remember that you still have to glue the tubes to the foam board. So don’t make them bulky or heavy.
Decide on a pattern for your tunnels. Place your tubes on the foam board to create tunnels for the balls to run through. You can have rows next to each other or have the rows cross one another. The cross is a little more difficult to make. See further instructions below.
Glue the tubes to the board in the pattern of your choice.
Cut away about an inch from four paper towel rolls. These will act as the troughs at the bottom of the board to catch your ball.
Glue the troughs to the bottom of the foam boards where they can catch the balls falling out of the tubes.
Finish off the project by giving it a name and pasting large poster letters to the top of the board.


How to Make the Join of the Cross Layout
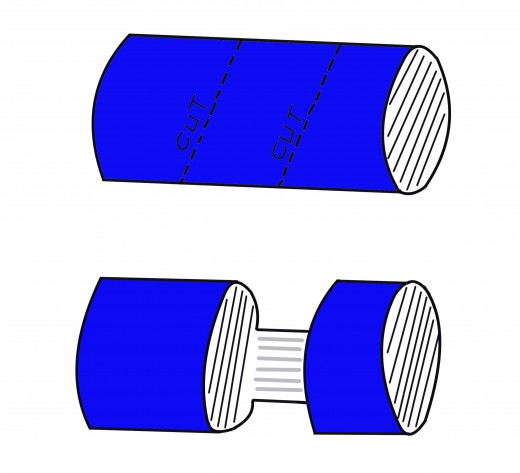
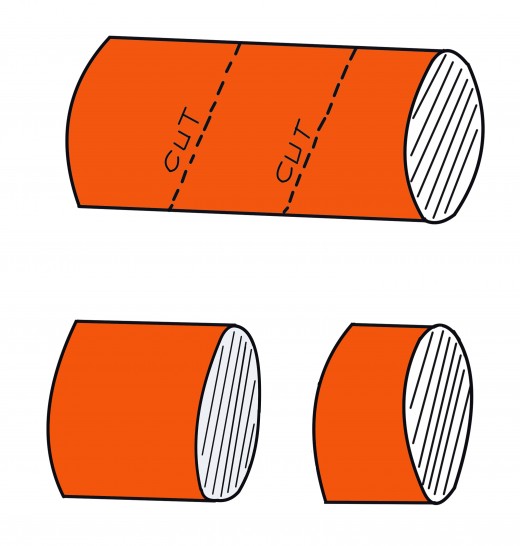
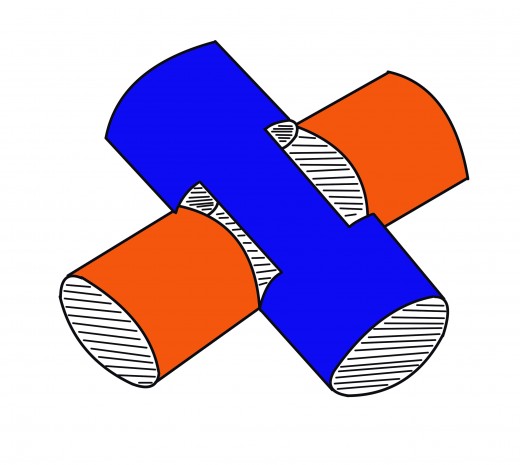
To make a join that intercepts a cross path. Take two toilet roll tubes and cut them in half diagonally.
Take another two toilet rolls and cut a diagonal hole as wide as a roll in the middle of the tube. Leave about enough of the roll behind to act as a roof to the tunnel. These four tubes will act as the join if you decide to do the cross paths on your foam board. See picture below


Time to Play
In this design, there are five paths for a little ball to travel through. Enough for multiple players to play at the same time.
Drop a Small Round Object Into the Tube Tunnel
Tips
Kiddos can roll any round object through the tube as long as it fits the hole of course. However, consider what the object is falling on. Glass marbles, for instance, may not be a great idea if they are going to land on a tile floor. They might chip and break. I prefer bouncy balls or little wooden ones that I picked up at the craft store. Large plastic beads or foam balls are great too.
If you decide to do the cross design, it’s a good idea to FIRST glue the two toilet rolls that act as the join in the center of the cross. By doing this you determine the angle that your larger cross will have.
Lay your design on the board first before gluing anything down. That way you can iron out any angle or space problems before you commit to the design.


