GIMP - Watermark : How to create a customized watermark to copyright protect your photos


When you need to watermark images you can make the watermark yourself with GIMP
This is another episode of GypsyOwl's GIMP Tutorials! If you have ever wanted to post an image online, perhaps your photos or artwork, but you thought it wouldn't be safe from being used without your permission, then you might have considered a watermark. This tutorial will show you how to create a watermark for your images that you can add time and time again.
Create this once and then overlay it on as many images as you want.
GIMP is a free image program (software). You can download and use it free. GypsyOwl has created several tutorials about using GIMP for you to learn how to use specific features. This page will focus on creating a watermark.
Photo Copyright (c) 2011 GypsyOwl Graphic Design Gallery Thank you to each reader who has let me know about their experience using this GIMP tutorial. I appreciate your feedback and am so delighted it is helpful.
What you will learn in this tutorial
This tutorial page is going to help you download the GIMP program (it is free from gimp.org).
- Download and Install the GIMP for MAC OS X or Windows PC.
- Create your watermark
- Apply your watermark transparency (png) image as a layer to your photos.
Download The GIMP Program Online
- GIMP -- The GNU Image Manipulation Program
Download the newest version of GIMP for MAC OS X or Windows PC
Step One
Begin template
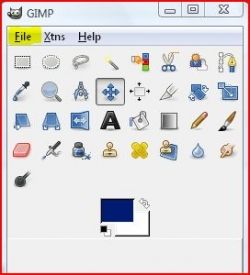
Open GIMP
Click on "file"
On the top left of the GIMP dashboard you will see the word "file"
Click on that word.
A drop down menu appears.
Scroll to "new"
Click on new...

Step Two
Select size of your canvas
Now, a new screen will pop up and you will see an image size option.
Select the width
Select the height
Select the type of measurement
Click OK
If you do not know the size you need for the watermark, start out with a 3500 x 3500 Pixel canvas (that is the average size of the largest photo you would need for online use -- for designing a tee shirt for example it is approximately equal to 10 x 10 inches).
Other examples:
The average sidebar is between 200 and 300 pixels wide.
The average image for a blog post (the span of the content area) will be approx 500 pixels wide.
If you are unsure than create the largest example.
This is always a good rule when creating images. The larger original will resize down a lot easier and look best. When ever you try to resize larger there can be problems with pixelation (which means the dots will spread out and create holes in the image. It will look as if the ink was running out when you printed it).
Step Three
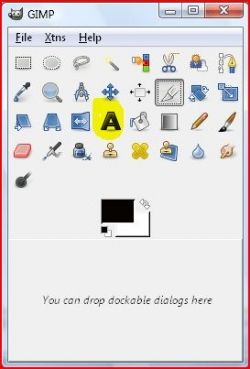
Select the letter "A" on the GIMP dashboard
DOUBLEClick on the letter "A" to open the text tool and the tool options screen.
A new popup will appear.
Select the font. Select the size of the font.
(see next section for the color selection screenshot)
Step Four
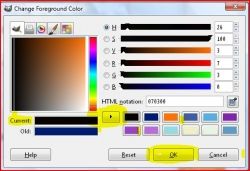
Change Color: Use the change color foreground tool to change your font color.
Click on the color section (a new pop up screen with all the colors will appear). Slide the x around until you see the color you want in the "current" color display (this is referring to the current color you have under the selector). Notice in the example the selector is way up in the left hand top corner (which is almost black) and the "current" color is that almost black color.
Click on the arrow, and then select the color you would like the font to be (be sure to click on "OK" in the change color popup before you continue).

Step Five
Enter the text for the watermark.
When you click on the canvas yet another screen will appear where you will type in your watermark words.
Type one line of your watermark text.
The example (to the right) says "GypsyOwl Graphic Design Gallery"
Decide what you would like your watermark to say... type that.

Step Six - Would you like the text to be at a 45 degree angle?
Rotate the text 45%
From the GIMP dashboard, Click on the "rotate" button (you will see it highlighted in the graphic to the right).
Click on the image (the canvas) and the rotate tool options will pop up. type in "45" into the "Angle" section.
Next, click on the "rotate" button.
The text will rotate.
Do You Know "Copyright" Law? - Anytime we discuss images and content I want to give people resources to help them stay out of trouble...
The follow books and DVD are helpful to different levels of students. Read my description by each of them to determine which one will be best for you. I highly recommend at least one. If you are a serious student I have suggested you buy the Paralegal text and the Vasst Training DVD.
Note: they are each from different authors so there may be some differences in the interpretation. Unfortunately that is the real confusion about law. And why we need court systems to interpret it all for us. But learning as much as you can will give you a distinct advantage if you are ever on one side or the other of an issue.

Step Seven
Saving your watermark...
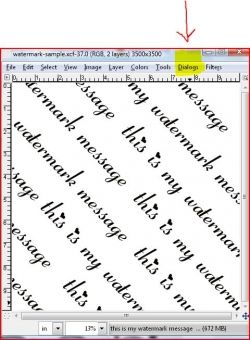
Now you will want to adjust the alignment, make copies of the text layer (see layers dialog below), move each new layer until you have a few lines and make sure most of the canvas area is covered.
You are going to next open the "layers" dialog box.
From the GIMP dashboard , Click on "dialog" (see example highlighted in the image to the right)
A drop down menu appears. Scroll to and select "Layers" This will open the Layers Dialog (a popup with each of the layers on your canvas showing).
At this point you have two types of layers.
The background and the watermark text layers.
You are going to click the "eye icon" next to the background layer. This will make the background layer invisible.
NEXT:
From the CANVAS ... look at the top left corner of the canvas and find "FILE"
Click on "FILE"
The Drop Down menu appears.
Scroll to and select "SAVE AS"
A new screen opens which will allow you to select a name for your file and where you will save it to.
I suggest you save it to your desktop to start.
Enter this into the file name area "WATERMARK_TRANSPARENCY.PNG"
(WITHOUT THE QUOTATION MARKS -- ALL CAPS IS OPTIONAL)
Click the enter button... go to step eight.
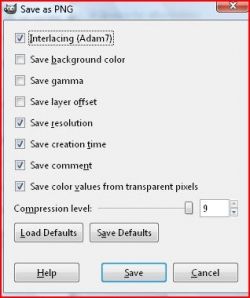
Step Eight
PNG Settings: Selecting your default settings
This could be a long tutorial section but why not keep it really simple?
Look at the image to the right...
Set your PNG settings to match that image.
Click Save.
Congratulations You Have a Watermark
Now you can use it over and over again...
Now you have a watermark you have created with your GIMP program. Save it in a place you can find it often. Every time you need to use it you will refer to the next section "Apply My Watermark"
Start Apply My Watermark
This section begins the process of applying your watermark to your photos or other digital images. You will repeat this step for each image.

Open Your Image
Edit your image with GIMP
Open GIMP
On the GIMP dashboard...Click on the "FILE" tab and select "OPEN" from the drop down menu
Find and select your image (the image you want to apply the watermark to).
On the image canvas... Click on the "FILE" tab and select "OPEN AS LAYERS" from the drop down menu
Find and select your watermark PNG file
Now you should see your watermark overlay on the image. Notice it is perhaps too dark? We will adjust it for each image because the colors and transparency can be adjusted to best suit the image colors and hue saturation.
In other words... we are going to make the watermark lighter and perhaps adjust the color if needed.
To make the watermark lighter...
Open the Layers Dialog (you did this in step seven above)
Click on the watermark layer.
Look above the layer list and find the slider... slide to the left to make the image lighter (more transparent) and to the right to make it darker (less transparent). Adjust until you can still read the watermark but it isn't hiding the beauty of your image. You decide what is appropriate here. With the right hue and transparency your watermark is a beautiful addition to the image.
GIMP manuals - If you want to become more proficient with GIMP...

Poll and Discussion
We would love to hear how this tutorial was helpful to you. And, please participate in the poll and discussion so we can continue to learn from each other.
- Answer the question in the following poll and
- Leave a note below to share what device you are using (MAC, PC, etc.) and why you prefer the software you use.
GIMP Poll
What is your favorite digital image editor?
© 2011 Deb Bryan


