Restoring Drawers in an Old Sideboard to Make Them Run Smoothly Again

How to Guide to Restoring Sideboard Drawers
I do not know whether it is an antique or whether it had any value, what I do know is that the drawers did not open or close properly and as a functional piece of furniture that had to be fixed; even at the expense of the sideboard losing its antique value; if it had any.
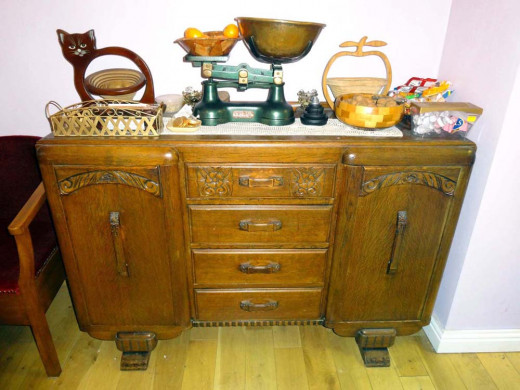
This is an old sideboard which has been in the family for a long time, maybe up to a hundred years, which we inherited. A grand piece of furniture (solid wood) which is well made and is a useful bit of furniture to have in the dining room; albeit after decades of use the drawers no longer run properly when you pull them out and you have to lift them slightly in order to put them back when you push the drawers in. And even then the drawers (especially the top one) slump slightly, goes back further than they should and sit at a slight angle.
On close inspection the problem was obvious in that years of constant use wood rubbing against wood had gradually worn the wood away at the bottom of the side supports of the drawers and on the wooden drawer runners that the drawers sat on. And for the top drawer, which was the cutlery drawer and used daily for decades, the wooden guide for the drawer on the right-hand side of the sideboard had worn down by over quarter of an inch; indicating the drawer had always been pulled out at an angle using the left hand, which my wife’s mother use to do even though she was right handed. The other problem was that the wooden stops had worn away, more so on the left-hand side so the drawers when pushed back went back further than they sold, and at a slight angle.
My goal in this project, using scrap wood in my workshop, was to renovate each drawer in turn, starting from the top and working down, to make them fit (millimetre perfect) so that they opened and closed properly without sticking or jamming and when closed would sit perfectly as they once did when the sideboard was new.
Time required: 1 day
Difficulty: medium
Cost: $10
Materials:
- Plywood
- Timber offcuts
Tools:
- Chisel
- Mallet
- Sander
- Belt Sander
- Sandpaper
- Wood Glue
- Panel pins
- Tape Measure
- Pencil
- Square
- Saw
Instructions:
1. Although it may not be so obvious from a photo you may just make out the gap in the top of the second drawer down where the drawer slumps when pushed back, and the top drawer goes back further, at an angle, on the left side; likewise with the third drawer down, where it is not quite straight. The aim of this project is to get the drawers to sit properly and pull in and out without sicking.
2. As maybe evident from the slight curve in the side support of this drawer the wood, and the wooden runner supports, for each drawer have over the decades of use worn down. The top drawer (the cutlery drawer) having the most use and therefore the most damage and the bottom drawer the least. As the amount of wood worn away is less for each drawer down each one had to be carefully examined and dealt with slightly differently, albeit the principle is the same in each case.

3. At the very front of the drawer, where the wood has not worn away the depth of the side panel below the base of the drawer is 6mm (quarter of an inch). Placing a 6mm piece of plywood on the base, as shown in this photo, reveals the extent to which the wood curves where it has worn away.

4. And towards the back of the drawer, there is little of the original wood left; it should be the same height as the 6mm plywood butted against it, as shown in this photo.

5. Therefore the first step toward restoration was to carefully chisel out the remaining wood with a sharp chisel to make the side support level with the base.

6. Do this for both sides, and finish with fine sandpaper to make smooth.

7. Then cut the plywood into 1 inch strips, making each one the same length as the drawer sides, and then simply glue and pin these strips to the bottom edges of each drawer. I only needed to do this for the top drawers as the wood worn away on the bottom two drawers were less and therefore needed less drastic measures to correct. I was also fortunate in that the depth of wood which needed to be replaced was the same depth as the spare piece of plywood which I had in my workshop. If this is not the case, one solution is to use wood which is slightly thicker and to plane it down to the correct thickness, or to carefully use a belt sander to achieve the correct thickness of wood.

8. The other adjustments I had to make on the top two drawers was replacing the drawer runners and side drawer guides in the sideboard, which had worn away through decades of constant use. Again it was a case of finding scrap wood the correct thickness, or sanding them down to the correct thickness using a belt sander. For the top two drawers the runners in the sideboard had worn down by up to 6mm at the back so gluing a 6mm piece of plywood on top of the old drawer runner to lift the drawer up at the backend and level it off did the trick. Also, as you may just make out from the shadows in the photo, the side support in the sideboard at the backend had also worn away significantly through decades of constant use (for the top two drawers); so placing a new piece of plywood (at the correct thickness) just above the old side support ensures the drawers go in and out straight (as they should do) and not at an angle when used. Finally, the top edge of the old drawer stop for the top two drawers had worn away just a few millimetres so the drawers glided over them and went back too far. Therefore I fitted a new piece of plywood (at the correct thickness) to catch the under-lip at the front of the drawer and stop the drawer at the correct position when closed.

9. The only fault with the bottom drawer was that it was just a couple of millimetres too low and although not catching it was rubbing on the front of the sideboard when closing. Therefore to raise the drawer just that couple of millimetres to make it fit properly and run smoothly I glued a piece of Contiboard iron-on edging tape to the sideboard drawer runner.
This was all that was needed; it worked a charm. With all the drawer runners in the sideboard renovated we now have a fully functional sideboard that should give good performance for many decades to come.
Renovating Furniture


This content is accurate and true to the best of the author’s knowledge and is not meant to substitute for formal and individualized advice from a qualified professional.
© 2014 Arthur Russ
Related

How to Make an HDD Storage Rack From Wood for External Hard Drives

How to Build a Winter Roosting Box: DIY Barn Wood Project for the Birds

How to Make a Wooden Bathroom Wall Cabinet

How-to Make Side Cupboard Extension to Built-in Corner Unit
Add-on Pocket to Bespoke Wooden Remote Control Holder to Hold More Remotes