Make A Butterfly Wreath


Summer Wreath For Home Or Wedding Décor
Have you ever created a wreath for your home ? Are you planning a Spring or Summer wedding ? It is not difficult to create a stunning wreath for your use or a special occasion. Anyone without ever having any experience can create something special with their own special touches. This wreath adapts itself to your home use. But with a change in color to all pink or blue, this wreath makes a nice touch to a baby shower. In white or your wedding colors, this is a perfect addition to your butterfly or summer wedding.
Nothing says Spring /Summer more than butterflies and daisies.
After the long winter, the butterfly reminds me that Spring and summer are here. Those captivating colorful insects bring joy and wonder to our days. For me, the colors of the daisy and blue flowers of any kind, are the bright and joyful colors Nothing of the season. So I chose the yellow butterfly and tones of blue to bring the summer to this project. Add daisies with their yellow centers and you have a joyful décor piece for your front door.
When I designed this wreath, I used some flowers that I had available in my stash. If you are creating this wreath and need supplies, buy the silk flowers by the bunch. Look for end of season or beginning of season sales. because I love to design wreaths, I keep a seasonal supply of silk flowers on hand in my craft room
When you are using the glue gun, always keep a glass of cold water nearby to dip your fingers into in case you get some of the hot glue on your fingers
Butterfly/Daisy Wreath Supply List
Time required: About 2-3 hours
Difficulty: medium
Cost: Varies
Materials:
- Moss wreath in the size of your choice
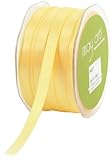
- May Arts Butterfly Ribbon
- May Arts Blue Ribbon Flowers
- Silk Daisy Flowers
- Silk Blue Flowers
- Thin Floral Wire
- Glitter glue in Blue
- Glitter glue in gold
- Glitter glue in silver
- Small pearl beads
- Clear glue gun sticks
Tools:
- Scissors
- Glue gun
- Wooden toothpicks
- Floral wire cutter
Different Butterfly Options
Instead of using the May Arts Ribbon Butterflies, you can substitute a feather type of butterfly or a paper punched decorated butterfly
Daisy/Butterfly Wreath Directions
Instructions:
1. Gather all your materials and tools. Cover your work area with newspaper or a plastic craft mat
2. Separate flowers from their stems with the wire cutter. You will want the flower heads only. Throw away the stems, but not the leaves. Cut the leaves from the bunch and set them aside
3. Design the layout of your wreath. Determine the amount of flowers and butterflies that you will need
4. Take the May Arts butterfly ribbon and cut the butterflies off the roll, leaving a very small amount of ribbon behind the butterflies on some of the butterflies- about an inch or so on each end. Cut some of the ribbon completely off some of the others.
5. Carefully using the wooden toothpick, design the wings of the butterfly using the glitter glue. Add the colors one at a time allowing to dry between applications
6. Using the glue gun, glue three pearl beads to form the head and body on the butterflies. Allow to dry.
7. Fold the ribbon around the butterflies with the ribbon remnants and use the floral wire to make a tail for several of the butterflies.
8. Make loops with any remaining ribbon and secure with the floral wire.
9. Now place the wreath on top of the plastic sheets or newspapers. Arrange the leaves around the wreath as a base for your design. Using the glue gun, arrange the leaves, leaving 12 or so as fillers in your design.
10. Arrange the larger flowers on your wreath, placing them equal distances from one another. Glue them onto the wreath with the glue gun
11. Fill in the other spaces of the flowers adding the remaining daises and leaves. Glue them onto the wreath form. Save a couple of the daisies and a couple of the butterflies for the wreath bow
12. Next, arrange the smaller daisies on each side of the larger flowers. I like to place at least three of the smaller flowers around the larger. Add a two to three leaves around each of these mini arrangements. Once you are satisfied with the results, glue each flower and leaf.
13. Decorate flat blue ribbon flowers with a dab of blue glitter glue. Set aside till dry
14. Add the loops of ribbon from the butterfly roll and the glitter glue butterflies interspaced between the flowers and leaves. As you work around the arrangement, glue each piece onto the wreath form with the glue gun.
15. Make the wreath ribbon by looping the larger and the thinner ribbon together. Fix in the center with the floral wire. Glue onto the wreath. Add a couple of the remaining daisies and the butterflies for a nice accent with the glue
More Project Photos
Click thumbnail to view full-size


You can use any combination of flowers and colors. What ever combo you chose, make sure that one of the flower colors are larger than the other.
More Supplies For The Butterfly Wreath
More Butterfly Wreath Tips
There are lots of ways to change around this project. You could vary the colors and the flowers of course. If you are thinking about doing a butterfly wedding,you could wrap the wreath in tulle before adding the flowers and the butterflies.
You can vary the ribbons with more than one color and width.Theme the ribbon to a season.
Get a butterfly punch or die and create your own butterflies. Punches are reasonably priced. There are so many beautiful papers and glitter papers, you can get crazy selecting the right one for your project. If you have an electronic cutting machine, you can create lots of butterflies from your program. Creating your own embellishment for this project is fun and budget friendly.
Finally, you can add butterflies to any wreath that you already have.

More Butterfly Wreath Ideas
More Butterfly Wreath Ideas
- how to make a butterfly wreath – The Blue Monkey Restaurant & Pizzeria
- Origami Butterfly Wreath | So Much To Make
This origami butterfly wreath will add lots of personality to your decor - Paper Butterfly Wreath - Jennifer Maker
Learn how to make a super easy Paper Butterfly Wreath for Spring and Summer -- makes a great birthday or Mother's Day gift, too! Includes all the free files and directions you need to make a wreath in an hour or two!
© 2014 Linda F Correa


