Making a Pot of Roses

How to Make an Everlasting Bouquet of Roses
Here's a way to give the gift of flowers that need never be watered or planted, and won't ever wilt away! If you can do basic crochet and use a glue gun, you can make this lovely pot of roses. There are only a few materials needed, and it can be easily customised.
Materials
These are the materials you will need to make this project.
- The Yarn: For the flowers I made for this project, I used a medium weight, acrylic. You will need a small amount of yarn in green, plus whatever colour you choose for your flowers. The colours I chose had special significance to the person I had in mind when I was making them.
- The Hook: For the yarn I chose, I used a 5.00mm hook. You may which to change it up, if you choose different yarn weights for different parts of the flowers.
- The Needle: A blunt tipped needle will be needed to sew your roses closed and finish off the yarn ends. These are sold as yarn needles or, in the embroidery department, crewel or tapestry needles. Yarn needles have much larger eyes and rounded tips, though some are available with one rounded and one sharp each. I like having a sharp tipped needle for those less frequent times I actually want to sew through yarn strands. The blunt type is used more often, making it easier to finish your yarn ends by weaving them around strands.
- The Star shaped Foundation: One 3 inch star shaped plastic canvas shape is needed to hold the flowers in position. The star shape is just big enough to fit inside the bouquet holder (below), and small enough to be completely hidden by the flowers, once they are attached.
- The Bouquet Holder: Visit the wedding section of your favourite crafts store to find a bouquet holder. It serves both a decorative and practical purpose, holding your flowers in place, while the lace edge serves as a pretty cover.
- The Pot: A small, decorative plant pot, about 5 inches across. Make sure that the diameter of the plant pot is slightly smaller than the diameter of your bouquet holder.
- The Ribbon: Choose a ribbon to match your pot and flowers. It should be wide enough to cover the joining seam, but not so wide that it won't lie flat against the top of the pot when glued in place.
Tools:
- Bobby pins
- Glue gun
- All purpose glue sticks
Choose Your Flower Pattern
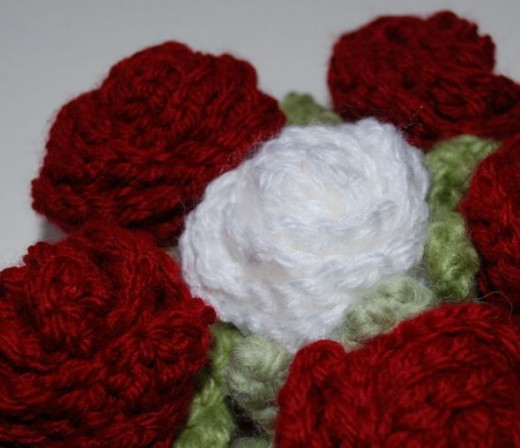
There are a great many flower patterns to choose from. For this project, I used a pattern from one of my favourite designers, June Gilbank of Plant June. You will be making a total of six flowers, and they need to be large enough to completely hide the plastic canvas base they will be attached to. If the pattern you use does not have a calyx in it (the green part at the bottom of a blossom), choose one that has a leaf or two, or add them yourself.
Here are links to the pattern I used, plus more to choose.
Planet June Basic Rose (donationware - it's free to use, but I recommend making a donation if you can - it's worth it!)
SkaMama's Bone Hook Picot Flower
Domestic Bliss Squared The Loopy Flower
Very Berry Handmade A Frothy Flower
Lion Brand Crochet Flowers (registration required, which is free)
Katty's Cosy Cover Beautiful Crochet Flower Accessory
Crochet Spot Crochet Rose
Fine Craft Guild Easy Crochet Flowers
Wind Rose Fiber Studio Zinnia Flower
Once you've made your choice of pattern, it's time to work up your bouquet!
Important
Make 6 of the flower of your choice, making sure to leave long tails - about 18 inches.
Remember, you can always trim off the extra, but you can't add more if it's too short!
Adding the Base - Attach your flowers to the plastic canvas star
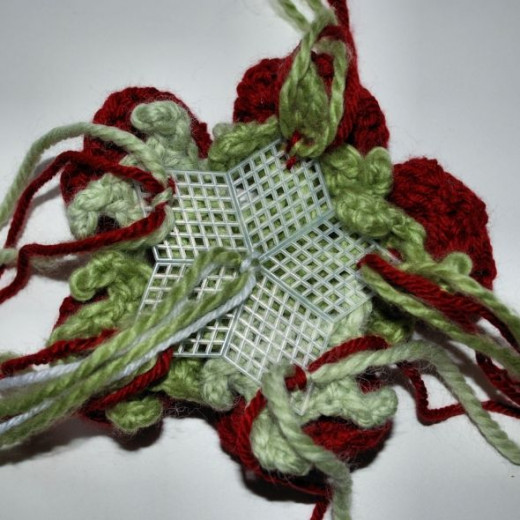
Once you have made your six flowers, it's time to attach them to your star shaped plastic canvas base.
One flower will be added to the centre of the star, then each of the remaining five flowers will be attached to the points of the star. If you have a crochet hook small enough to fit through the mesh, you can use that to draw the tail ends through. Otherwise, thread a tail onto your yarn needle and draw it through the mesh. Do this with each tail end going through a different mesh opening. My flowers each had four tail ends, so I drew them through four neighbouring mesh openings. By spreading them out a bit like this, your flowers will have less "wobble" after they are fastened.
When you have all the ends pulled through for a flower, divide them into two groups, then tie the flower snug to the mesh.
Once attached, pull up and position any green parts that may be hidden under the petals.

Create a handle - Weaving the ends into a single stem
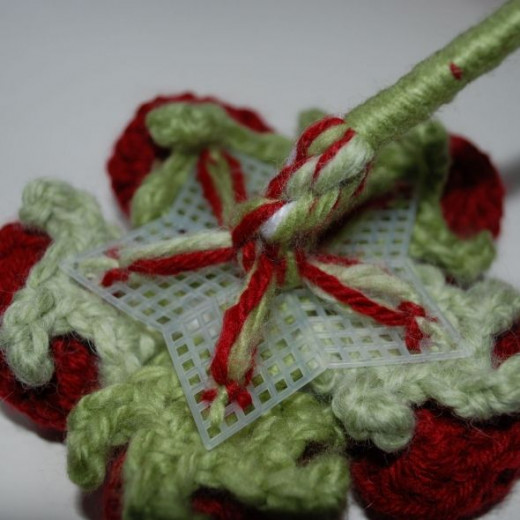
Bring the yarn ends together and wrap or twist them together to form a "handle" in the centre. Leaving a few inches of twisted strands uncovered, wrap a strand of green yarn tightly around the ends until it's about ten inches long.
Using the green yarn, wrap the twisted yarn ends tightly, leaving a few inches near the plastic canvas unwrapped. Wrap until about eight inches of stem is formed, then tie the yarn ends together into a knot to anchor firmly. Trim yarn ends to about an inch from the knot.
Now it's time to break out the lace bouquet holder

Fastening the Base - Attaching the flowers to the bouquet holder
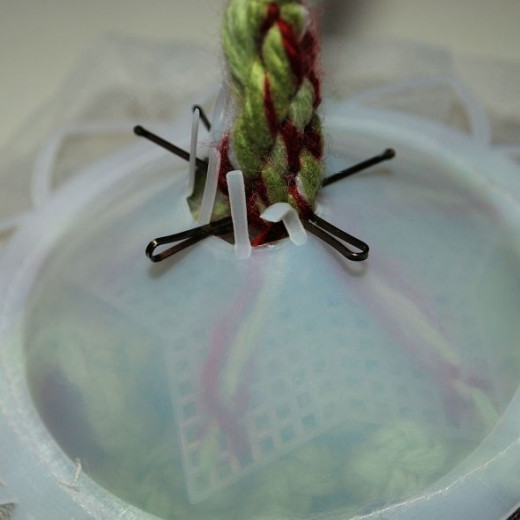
Draw the stem handle you created through the opening of the bouquet holder. Pull on the stem to bend the plastic canvas slightly. This will draw the flowers closer together, but be careful not to pull too tightly, or it will distort the bouquet.
Once you are satisfied with how snug the base has been pulled into the holder, push the bobby pins through the twisted strands in a + formation, making sure they are close to the holder and in between the plastic "fingers" surrounding the opening. The pins will hold the flower base in position, and the plastic fingers will prevent the bouquet from rotating.
The flowers are now firmly positioned and ready to set into the pot

Preparing to Glue
Now it's time to glue the bouquet to the decorative pot.
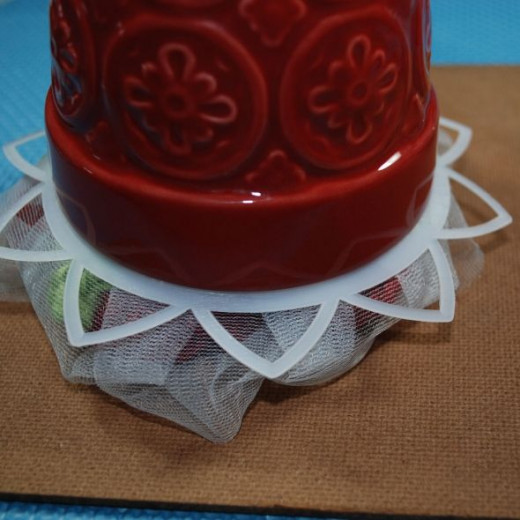
First, cover your work space. Turning your bouquet upside down, tuck the lace under the flowers to protect it from the hot glue. Position the plant pot upside down over the bouquet holder. You will likely need to bend the stem handle into a spiral so it will fit inside the pot.
Gluing the Bouquet to the Pot
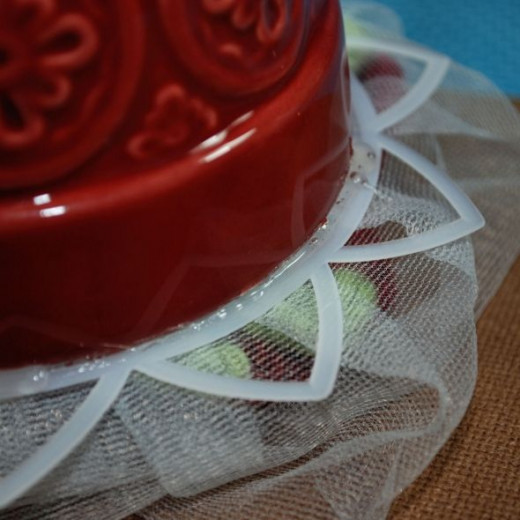
Once you are satisfied the pot is centered over the bouquet holder, use a hot glue gun to attach the pieces together. Take care when turning the bouquet and pot as you work, so as not to damage the lace or have the pot slip out of position.
Almost Done!

Adding the Ribbon
Once the pot and bouquet are attached, it's time to add a decorative ribbon to hide the bead of hot glue. Cut a strip of ribbon long enough to go around the edge of the pot with a slight overlap.
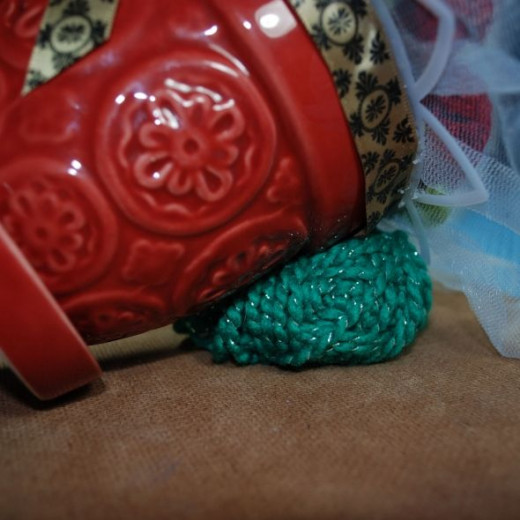
In order to hold the pot in position without damaging the bouquet holder, use something soft, such as the loosely wrapped ball of leftover yarn pictured above, to lean the pot against.
To attach the ribbon, draw a bead of hot glue around the pot near the top, carefully covering it with the ribbon as you go.
Attaching the Bow
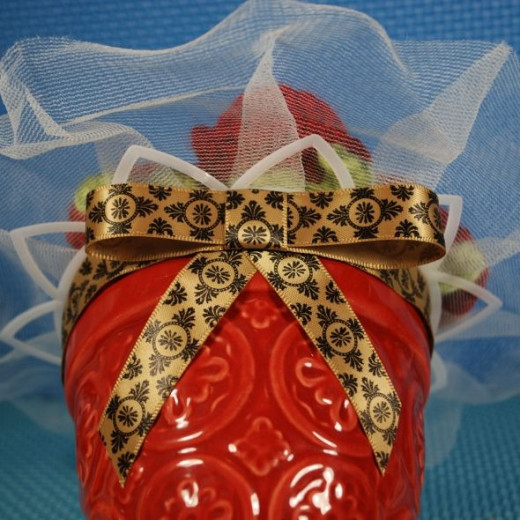
Cover the overlapping seam of the ribbon by making a bow and gluing it into place.
To make the bow, cut a length of ribbon twice as long as you want the bow length to be, plus overlap. Glue the ends together into a loop. Positioning the overlap in the centre of the loop, glue the top and bottom of the loop at the centre.
Cut another length of ribbon long enough to cover the front of the bow and overlap in the back. Wrap this around the centre of the bow loop and glue the ends together at the back (you may need to glue one end to the back of the bow loop first to hold it in place).
To make the bottom strips of the bow, determine how long you want them to be, then cut a strip of ribbon to twice that length, plus about one inch. Fold the strip in the middle at an angle. If your ribbon has a pattern on it, fold it into a looped point, so that the pattern is facing up on both sides.
Glue the folded point to the centre back of the bow loop, then glue the completed bow to the pot, covering the overlapping ribbon seam.
Trim the lengths hanging down at an angle to finish.
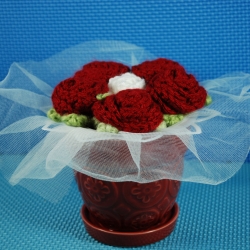
The Completed Pot of Roses

A Gift of Roses
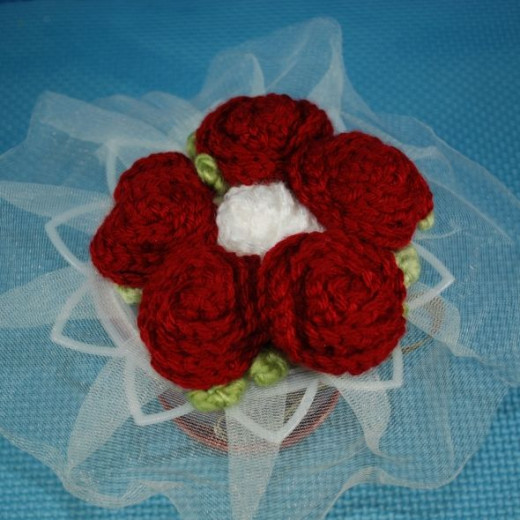
This pot of roses that I made was given as a gift to one of my neighbours in memory of his wife, who succumbed to MS a short time ago. Roses held a special meaning for her and her husband. In this bouquet, she is the single white rose in the middle, surrounded by red roses of love. She was the most openly loving and kind person I've known and she drew out the best in everyone around her. She was a shining light in our community. Her gentle presence and beaming smile is sorely missed. I am blessed to have known her.
Do you enjoy giving hand made gifts? Have you received a special hand made gift? Feel free to tell us about it here!


