The Importance of Light and Shadow in Black and White Photography

The Importance of Light and Shadow in Black and White Photography
This article describes the crucial role light and shadow play when shooting with black and white photographic film. Light and shadow, used in the correct way, can transform your ordinary shots. They can turn them into something quite breathtaking.
By knowing how to use your handheld light meter, and understanding about how light meters work - and about aperture and shutter speeds in order to give you a basis for a correctly-exposed shot - you can produce black and white photography of quality.
The role of light and shadow within this genre of photography cannot be overstated enough. I hope this article will help the budding amateur photographer to understand just a little how to use light and shadow to produce quality photographs.
The Importance of Light and Shadow in Black and White Photography
Light and shadow play the most crucial roll of all in black and white photography. Because of the complete lack of color, then light and shadow come to the fore, even more so than they would within color shots.
By knowing the following information - in reference to f-stops and shutter speeds, and how they combine with each other - you can create wonderful, artistic black and white shots that will really stand out.
By learning about how light can be manipulated - especially within black and white photography, using a combination of shutter speed and aperture settings - it will give you a head start over the rest.
Having a basic understanding of f-stops and shutter speeds is crucial in any genre of photography - especially so in black and white - to create those wonderful, atmospheric pictures we all love to gaze upon.
However, for those who are inexperienced in shooting with black and white film, then taking any shot for them, has dangers. The dangers being that many times their photographs will either be too dark [ underexposed, not enough light] or washed-out [overexposed, too much light].
The trick to black and white photography is being able to choose the right light conditions you need for your shot. This can only come with practice - which, in turn, will give you experience. Furthermore, taking different shots of the same subject at different aperture and shutter settings will produce different effects - as well as taking shots at different times of the day or evening.
When taking black and white shots with a film camera, always carry with you a handheld light meter. This will measure and give you a reading as to what aperture and shutter speed you can use.
When taking pictures of bright subjects like snow, or very dark or black subjects, then the light meter will not compensate for this. Instead, what tends to happen is that if you are taking pictures of snow, the light meter will give you what it believes is the correct light meter reading.
Going by the light meter's reading alone when taking snow pictures, this will tend to underexpose your pictures. So whatever light meter reading you get from your meter, when taking pictures of snow, always go one stop over what your meter has recorded This then will give you the correct exposure for that shot.
Likewise for taking shots which are very dark or black in color. For example, you want to take a picture of a lump of coal. You take a light meter reading from the coal, and the meter gives you a reading of what it believes to be the correct reading.
However, because the subject is black, the light meter will try to overcompensate by giving you a reading that would mean you overexposing your shot. So, in this case, take the reading as normal, take note of what the light meter has read and recorded, and then go one stop UNDER what the meter recommends.
This then will give you a correct exposure for your coal subject. That is how you overcome the problem of taking shots of subjects like snow, or coal - or any other subject that is very light or very dark. So now, let us take a look at f-stops, as many people who first start out in photography, have trouble understanding them.
An f-stop is connected to the aperture of the lens. Depending upon how small or how wide the aperture is, will depend on how much light enters the lens. In turn, the opening or closing of the aperture is controlled by f-stops.
When you purchase an SLR camera you will see on the lens a series of f-stop numbers. These can go up and down in range from say, f/2, to f/22. Now, f/2 would be a wide aperture [with the smallest number] and f/22 would be a very narrow aperture opening, with the largest number. So the largest aperture number would have the narrowest aperture opening and the smallest f-number would have the largest aperture opening.
So then the numbers will go up in sequence. From f/2, or f/2.8 through too f/4, f/5.6, f/8, f/11, f/16, f/22. The higher the f-number the narrower the opening of the lens - allowing less light in. Some larger lenses go past f/22 and continue on to f/32, f/45 - or even a massive, f/64.
So what we have is that each f-stop allows twice as much light into the camera as the next higher f-stop. Meaning that each f-stop will also let in half as much light as the next lower f-stop. So when you are taking your pictures you can adjust your exposure in such a way that the film will get the correct amount of light hitting it.
F/5.6 at 500th of a second will have the same exposure of light. F/11, at 125th of a second will have the same exposure of light, and f/8 at 250th of a second will have the same exposure of light. Each combination that I have just put down, all have the same exposure of light entering the camera.
A combination of f-stops and shutter speeds, using the knowledge above, can help you. So the aperture goes hand in hand in conjunction with the shutter speed. They both work as a team. The shutter is the device that allows light to hit the film. How much light hits the film depends on the opening of the aperture - combined with the speed of the shutter.
You may have heard the term: 'fast lens'. This means that when a lens is described as 'fast' it will typically have a small f-stop number. Fast lenses would have an f-stop number such as f/1.8, f/1.4, or even as low as f/1.2.
Small f-numbers, such as f1.8 down to f/1.2 mean fast lenses, as stated above. This means that you then can use fast shutter speeds. So therefore 'fast lenses' will allow more light to enter. This is due to the large aperture opening enabling you to shoot your photographs even in low light, using a fast shutter speed. By knowing this information, it will help you to decide what combination of shutter speed and aperture to use when out in different light conditions.
Now we turn to the problem of light meters. All light meters - whether they are electronic or not - work on the same basis. They all measure light around the subject and the surrounding area. From the readings they record, [in other words, they will record what aperture and shutter setting you should use] you can then take your shot.
However, with any type of light meter - whether it is handheld or within the camera itself - is that its reading will be an 'average' of what it believes to be the correct exposure. It calculates a single brightness value and takes its reading from that.
This then tells the meter what shutter speed and aperture settings you should use. However, the meter does not compensate for either too much light entering the lens, or too little light. Instead, what tends to happen is that the meter will record what it believes is the correct exposure settings - whether the scene or subject is too dark, or too bright.
So if you go by your meter readings, when taking a picture of a dark subject, or in dark surroundings, you will overexpose your photograph. This will happen if you are taking a shot in which the subject, the surrounding area, or both, are dark.
Likewise if the subject is very bright, the surrounding area is very bright, or both are. If you go by your light meter readings, you will underexpose your shot. or it under compensates - meaning underexposing your shot if there is too much light hitting your subject.
As I have explained, take the light meter reading as normal. Note what the meter has recorded and then go either a half, or one stop above what the meter has suggested - or a half stop or one stop below what the meter suggests. By doing this, you will then ensure that your photographs are correctly exposed.
As for myself, I always use the 'Zone System' when taking meter readings for my black and white shots. The Zone System was developed by Ansel Adams many years ago, and it is one of the more simple ways to work out exposure of the subject. This means that the value of brightness within or around your subject is given a grade - or zone rating.
What this means is that if you split the subject into grades [meaning that 0 would be black, and 10 would be white], then 5 would be in between - which would be middle grey. By using this method, you can then work out the correct exposure for your shots, every single time.
One final tip, when taking any type of shot always try and use a tripod.and a shutter or cable release. I find that they are indispensable. Tripods cut out 'camera shake' so often, the curse of the photographer. .And a shutter release, connects to your shutter via a cable in which one end connects to your camera, while you hold the other end.
When you are ready to take your shot simply press the shutter release button. However, with today's photography, they have wireless release shutters. But, because this article is based on mechanical, SLR 35mm film cameras, you will need a cable or shutter release that will connect to your camera.
Tone, composition, texture, light and shadow, all play their part in black and white photography. I would say that light and shadow play the most important parts of all. It it imperative that you understand - especially when shooting with black and white - how light and shadow works, and the different ways you can expose correctly.
By understanding this, then you can create wonderful black and white imagery. An understanding of shutter speeds and aperture will go a long way in helping you achieve beautiful black and white shots.
Tripods
Tripods within any genre of photography are paramount. They are basically used to stop camera shake. And as we all know, camera shake can ruin the best laid plans for a wonderful shot. So having a good sturdy, strong, and steady tripod is a must if you wish to mount your camera. The tripod featured here is the one I use myself, in my photography. I would not be without it.

The Importance of Light and Shadow Within Black and White Photography
This is a list of the things you have to remember when taking your black and white shots
- 1: Have some understanding as to how light and shadows work in black and white photography
2: Take a light meter reading from the subject, using a hand-held meter
3: If the subject is dark, then underexpose your shot by half to one stop, depending on your light meter reading
4: If the subject is bright then overexpose your subject by half to one stop, depending on your light meter reading.
5: Take shots of the same subject using different exposure and shutter settings. Experiment.
6:. Take shots of the same subject at different times of the day or evening. This will give your subject a whole new 'feel'.
7: Record your exposure and shutter settings for future use.
8: Use a tripod
9: Use a shutter release cable
The Importance of Light and Shadow Within Black and White Photography
Due to the lack of color within black and white photography, then light and shadow play a crucial role. This is were the budding amateur photographer needs to know a little about light meters, and how they work. This then will enable you to take wonderful black and white shots, in a creative way, time and again, by using light, and shadows.
The Importance of Light and Shadow in Black and White Photography
USE LIGHT AND SHADOW CREATIVELY
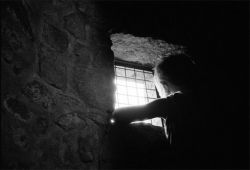
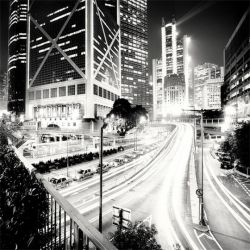
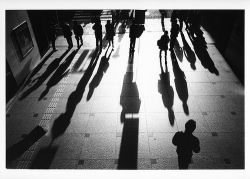
People, Shadows and Lights
Light, shadows and elements
Examples of light, shadow and contrast, in black and white. Take along the Norwegian shoreline.

You see how important light is within black and white photographs? Make the light work for you when taking shots. However, correct exposure is absolutely crucial when capturing detail in your subjects in black and white.


")