How To get Quick and Easy AdSense approval for your Hubpages
AdSense, Hubpages, and You!
How To Get Google AdSense for Hubpages
Many Hubpage writers would like to include AdSense on their articles to generate income.
The process for 'hubbers' to incorporate AdSense into their Hubpages can be lengthy and arduous for authors that do not already have an AdSense account.
This How To article will help Hubpage authors get an AdSense account in a few weeks or less, as opposed to the sometimes six month or longer wait that is typical of authors whose only real web presence is on Hubpages or similar sites.
Table of Content
Hubpages Revenue with AdSense
Google AdSense is a way for Hubpage authors to make revenue from their articles.
AdSense shows advertisements to the readers of your articles that are relevant to the viewers search history, as well as advertisements that may be relative to the content of the authors articles.
The income potential is entirely dependent on the number of views and clicks on those advertisements.
The greater number of quality Hubpage articles, the more potential your AdSense account has of making money for you.
Simply put, the greater number of daily visitors to your articles, the greater the potential for income from AdSense.
To maximize your traffic, follow these guidelines:
- Create engaging articles
- Be prolific in your hubpage writing
- Use good SEO practices for your articles to rank well in search engines
This guide will help you receive your AdSense account approval quickly. While there may be a small expenditure to do so, AdSense should pay off that small cost quickly, and if done correctly, can begin to generate some income in a short time, especially for prolific and talented writers.
Getting Started with Google AdSense
To acquire a Google AdSense account, you must have a Google Account.
If you already have a Gmail account, you already have a Google account and can skip this step.
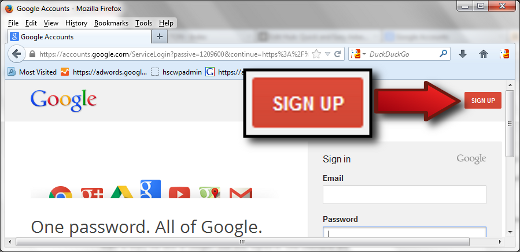
To create a Google account, open a browser window and go to http://accounts.google.com, and click the red "sign up" button in the top right hand corner.
See image below for "SIGN UP" button location.
Screen shot for creating a Google Account
Now that you have a Google Account...
A Google Account will give you access to a gmail account, webmastering tools, a Google+ account, photo and document sharing, Google Adwords, and most importantly for our task-at-hand,
Google AdSense.
Do not sign up for Adsense until we've completed the tasks below.
Web Hosting and Web Sites.
Do you already have a web hosting account or Domain?
Sign Up With a Web Host and Buy a Domain
The next step is to get a domain and hosting.
This step will give you a personal website from which to apply from for an AdSense account.
There are many hosts and domain registrars to choose from, with a variety of prices and features. It's up to you to choose that which will best suit your needs.
There are 'free websites' which do support Google AdSense, but many that do not. If you choose to go the route of a free website, be sure to research before signing up to make sure that AdSense is supported.
You will, in most cases, be required to purchase a domain, even if the website hosting itself is free. Some of the lesser used domain extensions, such as .info, .org and similar cost less than the more common .com and .net extensions.
It may make sense to purchase real hosting so that you have access to advanced web building tools, such as a mysql database for using web authoring tools such as wordpress or joomla.
Whatever you decide, the site must have some content before applying for an AdSense account.
The content can be whatever you like, as long as it falls within the Google Adsense terms and requirements.
Consider a personal blog, perhaps articles that do not fit into Hubpages 'best practices' guidelines, information and how-to's regarding your hobbies, photo galleries with comments, poetry, or perhaps even material that supports your Hubpage articles.
Use Google's guidelines to build a site with at least one page of content and one static 'about' page or similar before applying for an AdSense account.
Once you've completed this, it's time to sign up for AdSense.
Signing up for Google Adsense
Now that you have a website with content (or perhaps already had one), it's time to setup your Google AdSense account.
Head over to the Google AdSense sign up page.
Be sure to read the Google AdSense Program Policies to make sure your new website meets the requirements before submitting it for approval.
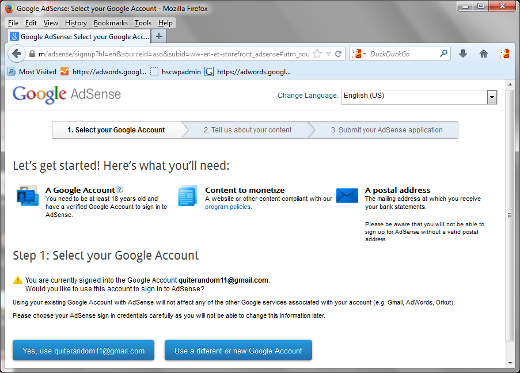
Screen shot for Google Adsense Sign Up Web Page

Signing Up
On the AdSense sign up entry page, notice the requirements:
- A Google Account (We created one in the first step.)
- Content to Monetize (The website we created in the second step.)
- A Postal Address (Hopefully you have a place that snail-mail goes to.)
Make sure you have all that information ready, and click on the button that says "Yes, use yourgmailaccount@gmail.com" (it will list the gmail account name that you set up in the first step.)
Screen shot for Google AdSense Content Page
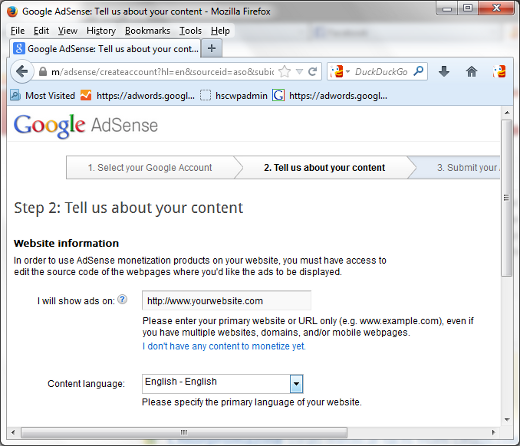
Telling AdSense about your content
In the image above, you see the next step for signing up for Google AdSense.
The first input field labeled "I will show ads on", is where you type the address of the website you've created.
Below that is a drop-down menu to select the language your sites will be in so that Google AdSense can target the correct language advertisements for your Hubpages and other websites on which you might use AdSense.
Once this is completed, move on to the next step.
Screen shot for Submitting your AdSense application
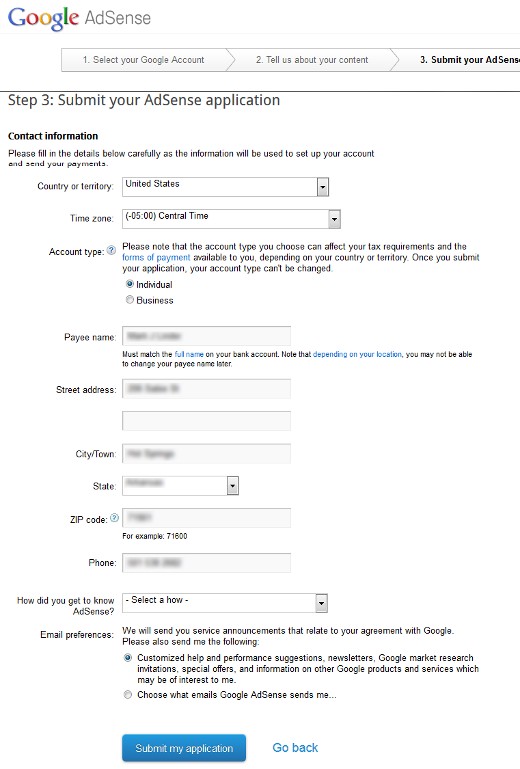
Submitting your Google Adsense Application
In the screen shot above, the 3rd and final step for your AdSense application can be seen. I have blurred out my own information in the input fields in this image.
Fill out this step carefully, and use your correct information. You wouldn't want your checks to be sent to the wrong address,
Once the application is submitted, Google will review the application and you should receive confirmation in a fairly short time, sometimes a matter of days, in contrast to the months it can take for approval when submitting an application that is based on your subdomain at Hubpages.
Now that your AdSense account has been approved...
After your AdSense account has been approved, let's put your first advertisement on the website you created.
The ad you create depends on your website. If you've chosen a free web host, or are using a wordpress theme or similar, your ad options are dependent on the host, theme, or other pre-defined parameters.
Check the documentation of your host or theme for proper AdSense integration.
I have paid hosting, and created a simple CSS webpage for this exercise, so I can place my AdSense location and size to my own specifications.
Screen Shot for AdSense web page code
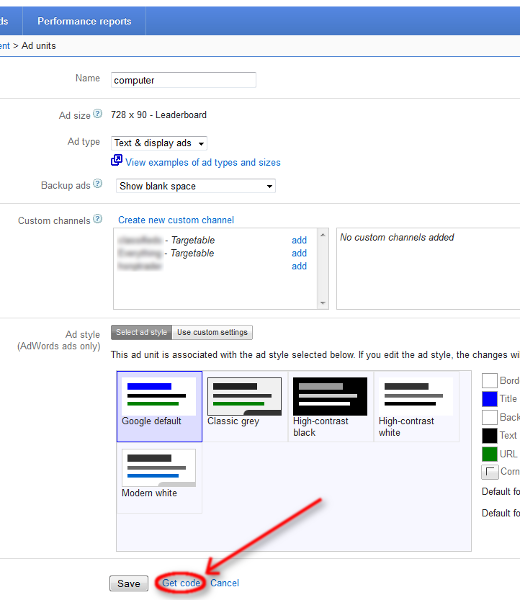
Incorporating the AdSense ad to your Website
In the screen shot above, you see the AdSense page that allows you to define the advertisement for the website we created earlier.
To get to this step, open your AdSense account, click on "My Ads" in the navigation bar near the top of the website, click the button labeled "+new ad unit".
Define ad size, color, custom channels, and anything else you like.
Remember, I am adding this to the code I created for a website, so if you use something like wordpress or joomla, or have your site on a free web hosting service that uses their own proprietary themes or systems for web site building, the process may be very different for you. Read the documentation regarding AdSense placement to learn how to place your AdSense advertisements if you fall into that category.
If, however, you have created your own website and/or have the ability to directly drop code into your HTML files, click on "save get code" on the bottom of the page.
The following dailogue box should appear:
Screen shot of ad code for your website
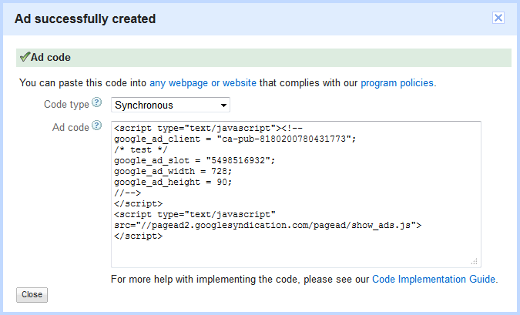
Insert the AdSense code to your website
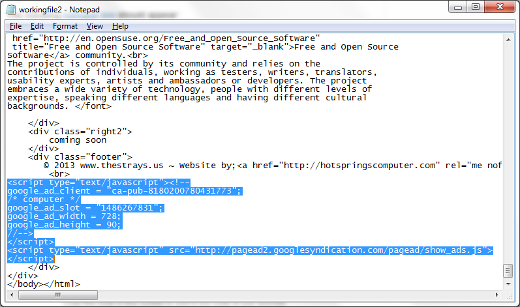
Screen shot of AdSense ad incorporated into website

Incorporating AdSense with your Hubpage articles
We've finally reached the step for incorporating AdSense to your Hubpage articles.
- Open www.hubpages.com in your browser.
- Hover over your user name.
- Click on "My Account" in the dropdown menu.
- Click on the "Earnings" button on your account page.
- In the "Affiliate Code" section, paste your AdSense Account number.
You're finished!
AdSense is now incorporated into your Hubpage articles, as well as the website you created to speed up the process of approval.
You can keep track of your impressions and earnings in your AdSense control panel, and see if changes you've made in your articles increase traffic or advertisement clicks.
Happy AdSense earning!
Final Thoughts
I know that part of the title of this article is "Quick and Easy", and that it may seem it is neither to a new-to-AdSense hubber.
It will, however, cut down on the time for AdSense approval by months.
Having a personal website for self promotion, as well as a place to submit material that may not be appropriate for Hubpages format can be extremely beneficial as well, and in this day and age, there is no reason for anyone attempting to generate income on the internet not to have their own website.
With all of that said, I hope some of our readers can share their experience with various hosts and services that can utilize AdSense.
Knowing which free hosts support AdSense easily could be invaluable to many hubbers that would like to expedite their Google AdSense account approval and increase their web presence.
If I've left something out of this article, or left something unclear, please let me know in the comments and I will do my best to rectify the issue.
Questions, answers and comments are welcome.

