How to Transfer Songs from your IPod to your Computer


If you own an ipod, I’m sure you are aware of how to get songs from your computer to your ipod through itunes. But what happens when you want to transfer songs from your ipod to your computer?
When you plug your ipod up to your computer, you’ll notice that Itunes automatically pops up and starts syncing. So, you’ll want to either uninstall Itunes, or make sure you are ready to click the exit button as soon as it pops up. I’ve had issues where itunes will still wipe out my music even if I exit out of it as soon as I see it. So, I just take the safe route and uninstall itunes.
If you have songs already in itunes that you want saved, just go into your itunes folder, select every song you want saved, and copy it into another folder.
What happens when you connect your Ipod to Itunes?
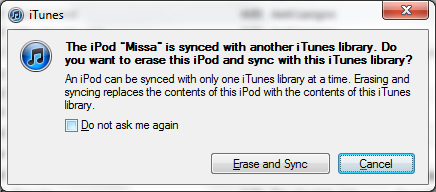
I, by no means, am a professional at using Itunes. However, if you have itunes set up on its default settings, AND your Ipod is synced to another itunes, which is most likely your case, you'll see this pop up (The picture at the right). Just make sure that you cancel out of Itunes.
So, when you plug your ipod to your computer, most of the time Itunes will automatically start up and will start “Syncing” its music to your ipod. This means that whatever music you have on your itunes will be put onto your ipod, and any music that you have on your ipod, which is NOT on your itunes, will be erased. This is a bad thing if you have a ton of music on your ipod that you want to keep.
Join us here on HubPages and write about the things YOU want and get paid to do it!
- Signup For HubPages
Would you like to get paid for writing articles on HubPages, just like me? It's very easy to sign up and it costs absolutely nothing to start writing. Just sign up, write your hubs and the community here is amazing at helping each other out. Join us!
Why do people need to transfer their music to their computer from the ipod anyways?
Some people might think that that only reason a person would want to upload ipod songs to the computer is so that people can illegally distribute the music. Which personally doesn’t make sense to me, but in my opinion, that’s why Apple made it so hard to do this.
In reality, there are many reasons that people would want to do this. So, what happens when your computer blows up and you can’t retrieve your songs? You had over 1,000 songs saved, what do you do? You seriously can’t expect apple to require you to re-download all of those songs again, right?
Well there is a simple way of transferring these songs without downloading any third party software on your new system.
How to do the transfer:
Okay, I’m sorry for all of the talking; let me get down to telling you how to actually do the transfer.
Step 1: If you haven’t already, un-install Itunes (after saving any music that might already be there). Or be prepared to exit out of itunes, or turn off auto-sync if you know how. Again… sorry I’m not a wizard with Itunes, heh.
Step 2: Plug your Ipod into your computer, this is when itunes would pop up, so be ready to exit out if its on your computer.

Step 3: Go into your Ipods drive. When you click Computer > it’ll be the drive titled of what you named your Ipod. For example, My Ipod is titled “Missa”. So I would just click on the drive titled Missa.
-When you first open your Ipod folder you might see a few folders like Calendars, Contacts, Music, Photos, Video, etc. This is the right folder, except you aren’t seeing all of the music that you would normally see if you were to listen to your ipod.
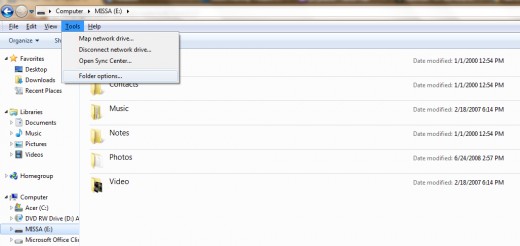
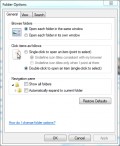
Step 4: Click “Tools” at the top of the screen. For those of you using the Windows 7, you may not see “Tools”, in order to see it press and release “Alt”. You should now see the Tools menu button.
Step 5: After clicking Tools, Click on Folder Options. You’ll see a pop up screen, at the top of it, you should see about 3 tabs, one of them titled “View”. Click on this tab.
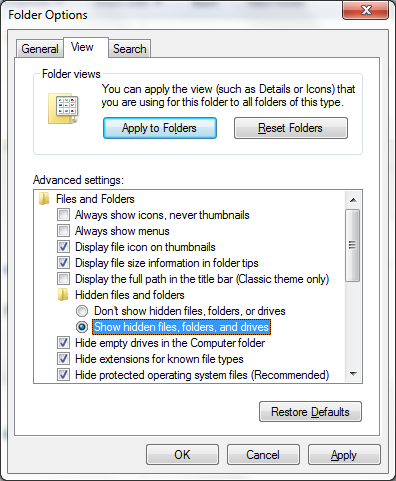
Step 6: Under “Advanced settings” you should see “Hidden files and folders” with 2 bubbled options below it.
You will want to make sure that you have selected “Show hidden files, folders, and drives”.
By selecting this, you will ensure that any and all folders are visible to you.
Step 7: After pressing OK, you should see a new folder titled “Ipod_control” or something similar.
Click on this folder and open it.

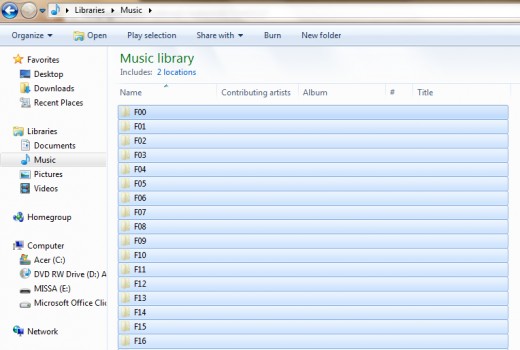
Step 8: You should now be presented with a few more folders. Folders titled Artwork, Device, Itunes, and Music. Click on the Music Folder and open it. You should see a bunch of folders titled “F00, F01, F02, and so on”. These folders contain all of your music.
Step 9: You will want to select every folder and then “Copy” them into a new folder. I typically just go with the computer default “Music” folder so it’s easy for me to remember where they are. You can choose any folder you wish, just be sure that you remember which one.
-Note: Since the system is copying the music and not just relocating it, this may take some time, depending on how many songs you have. I believe I had 300 something songs and it took 5 minutes to copy over. Slower systems may take longer, it all just depends.
Step 10: You are now free to eject your ipod from your computer, after your songs have been copied. At this time, if you have uninstalled Itunes, you can reinstall.
Step 11: Now, go into the folder where you copied your music. This is the most annoying part of the process. You will want to move your folders into Itunes. What makes this part so annoying, is that you can’t just copy and paste all of the folders at once into Itunes, the program wont recognize all of those F10 folders.
You have to go into each F folder individually and move the songs themselves. You will want to copy these songs directly into the first folder of itunes. Which means Computer> Program Files > Itunes Just that folder right there.
Step 12: Congratulations! All of your songs have been transferred into your itunes folder. It might also be worth mentioning that if you got some of your songs by any third party software, then you may have to go through and rename those songs.
If anyone knows of a way to retain the names of the songs let me know and I will update this hub.
Thank you for reading guys, Hope this helped!