How to make a Two Tier Hello Kitty Fondant Cake.


Introduction
I personally have been making fondant cakes for years. I recently had a request for making a Hello Kitty fondant cake, but couldn't find any information on the Internet on how to do such. I decided to make this article to help other mothers - or fathers out there that want to make such a cake but don't know how to do so. I have listed step by step instructions. It is honestly pretty easy to make, and working with Fondant or Gum paste is no different than playing with play dough, except you can eat the Fondant.

How to make the homemade fondant.
If you are going to make a cake covered with Fondant, or make a Fondant gum paste figure than you will need some Fondant. You can go to Michael's craft store and purchase a large box of Fondant or you can make your own for so much less. If you decide to purchase your fondant- than for this 2 tier cake than you will need 2 Large boxes. This can get expensive, so I have listed my own personal recipe for this. My recipe is so much better than store bought. It is so much softer and handles so much easier.
Ingredients:
8 Egg whites
2 bags of powdered sugar
12 teaspoons of Tylose (You purchase Tylose at a cake store).
3T water
Shortening
Things you will need:
1 Big Bowl
1 Kitchen aid mixer- or one good hand mixer.
1 teaspoon
This will make 6lbs of Fondant Gum paste
Directions:
Place your egg whites in your big mixer bowl, and mix just a few minutes to break up the egg whites. Reserve 1/2 of 1 bag of the powdered sugar and set aside.
Turn your mixer to low speed, and add in your powdered sugar slowly. Next add water and mix real well until the consistency will be of royal icing. Continue to mix till stiff peaks form. If need-be add more water if your fondant mix is really dry. Once your mix is shiny with stiff peaks- mix in your Tylose powder. You can mix this by hand if you need to.
Sprinkle your counter with the powdered sugar. Put some Crisco shortening in your hand, and start kneading your mixture on the remainder powdered sugar. Continue kneading till the dough is not sticky anymore. Separate the dough into 2 balls and put them in separate plastic zip lock bags. Place in the refrigerate to cure for 24 hours.
How to Ice your cake.
How to Dowel your tier cake.
Making the cake
Things needed:
- 3 cake mix boxes
- Butter cream icing
- 1 bag of plastic dowel rods.( you can get this at any cake store or Michael's)
- 1 10inch cardboard round piece.(you can get this at any cake store or Michael's)
- 1 8 inch cardboard round piece. (you can get this at any cake store or Michael's).
1) Since this cake can be a little time consuming with the Fondant and kitty figure. I honestly suggest you purchase box cake mix and follow the directions to make a 10 inch round cake, and a 8 inch round cake.
2)Once the cakes are made place each cake on its round cardboard center. Lightly coat both the cakes with butter cream icing. (you can get this recipe on Wilton.com). Apply one thin coat- (this is called the crumb coat because there will be crumbs in the thin layer of icing). After you have crumb iced both cakes let them sit for 30 min, then Ice your cake again but this time there will be no crumbs in the icing. (This is a secret).
3)Next you want to Insert one plastic dowel rod into the 10 inch cake. ( when you pull this out the cake will mark where you need to cut). Pull the dowel rod out and cut 8 pieces the exact same size to support the 8 inch cake on top.
4) Once the 10 inch cake has its dowel rods you want to ice the top of the cake covering the dowel rods and leveling the top.
Then place both the cakes in the freezer until you are ready to assemble the cake. Don't stack the cake on top of each other, and don't leave the cake uncovered for more than one day in the freezer. Freezing the cake makes it easy to place the top tier on top of the 10 inch round cake, and makes it easier to transport if you are delivering the cake.
How to cover your cake with fondant
Covering your cake with fondant.
Freezing your cake before you cover your cake with fondant gives your cake a more professional look giving you defined edges.
Tools needed:
- Big ball of Fondant your preferred color.
- Rolling pin
- Crisco shortening
- non stick mat
- Flower cookie cutter
- Pearl candy beads. (You can purchase these at a cake store).
Directions:
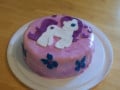
1)Take your cake out of the freezer and set aside. Lightly coat your mat and rolling pin with Crisco shortening. At this stage you will want to add color to your fondant. I used Pink color to make the Hello Kitty cake. Make a well in the fondant and add 2 drops of your food coloring. (You can purchase your food color at Michael's or any cake store). Make sure your hands are coated with Crisco and work in the color. Next Roll your fondant out to a somewhat thin consistency and in a large circle on your non stick mat. Roll the fondant on the rolling pin gently and start unrolling on the cake.
2) Once the fondant is on the cake and rolled out, start lifting the bottom and smoothing out the edges.
Start on the other cake and do the same steps till both cakes are covered with fondant.
3) Now stack your 8 inch round cake on top of the 10 inch round cake. (The dowel rods are already in the 10 inch for support). Next smooth out the edge where the 8 inch and the 10 inch meet on the cake.
4) Now you want to cut out your flower shapes and squares out of rolled fondant with a cookie cutter. I made the flowers a darker pink, and the squares I colored green.
5) Next you want to roll out some more fondant and make a bow on the cake. Apply the Bow, and cookie cutter flower shapes with a little water applied to the back of the shape. (The water will make the fondant pieces stick. Next add your green color block strips. I added pearl beads to the color strips for added decoration. Last make your yellow and pink balls and make them go around the cake.
Editors note:
(Food coloring colors are selected at Michael's or any cake store to change the color of your fondant). You only need 1-2 drops of color to one big ball of fondant to change its color. Do not use regular food coloring. This will not work.
Now you are ready to make the Fondant Hello Kitty Cake Figure.