Making a Sourdough Starter from Scratch: Part I


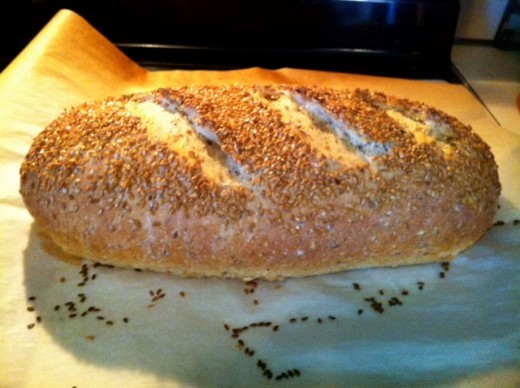
I am simply amazed that I was able to make the loaf above completely from scratch with my own homemade sourdough starter. This article walks you through the step-by-step directions to make your own sourdough starter from scratch. Believe it or not, you can make the bread pictured above in your own kitchen from scratch! I know I sound incredulous, and if you have read my article, "Pitfalls of Baking with Yeast," you know why I am so amazed that I was able to produce such a bakery-quality loaf of sourdough bread.
Making Sourdough Starter from Scratch
As many of you are aware, I am a teacher. One of the perks of this job is having extended breaks during the holiday season. I have decided to take advantage of this bit of time off to make a sourdough starter. I have been thinking of making sourdough bread for a while, and I even considered purchasing a sourdough starter kit from my favorite source, King Arthur Flour, but I thought what would be more fun than making my own sourdough starter from scratch with a recipe?! I want to be able to say that I made the bread from start to finish rather than relying on someone else to begin the process for me and then me reap all the rewards (you know I love to be praised for a job well done, and I just would not feel right taking credit for someone else’s work). However, I am taking advice from King Arthur Flour and using their recipe for sourdough starter. I am going to share with you how I am making a sourdough starter in a step-by-step guide with pictures and videos. If I fail, I will share that with you as well. This is a learning process for me, and I am a firm believer that we learn just as much, if not more, from our failures as from our successes. Here we go!

Preparing for the Task!
Making a sourdough starter from scratch takes some time and patience. It is important to think ahead a bit before beginning.
- Have a schedule with enough time allotted for the process. Sourdough starter takes about a week to create from start to finish. In the beginning, there is a once a day commitment of about 5 minutes, but after the first few days, the commitment increases to twice a day (5 minutes every 12 hours).
- Don’t start the process if you think you will be out of town during the next 7 days, unless you want to take the starter with you. I can just see it now…a sourdough starter strapped into a car seat or riding shotgun with a seatbelt. Not a good idea!
- Have all your recipe ingredients: 1 cup of whole-wheat flour (rye or pumpernickel work well, but any whole wheat flour will do), non-chlorinated water (I use a filter on my tap water to remove chlorine, but you could purchase bottled water if you like), unbleached all-purpose flour (at least 7 cups, but maybe more depending on how long it takes your starter to become active).
- You will need a 4-cup storage container to store your starter. Anything you can safely put food in works. I’m going to use my 4-cup measuring cup. *Note: the storage container you use will be out of commission for the duration of the project, so don’t pick something you need to use regularly.
- A warm, safe area to store the starter for a week, preferably out of reach of the kiddos and anyone else living in your home. My boyfriend is notorious for throwing away things he doesn’t recognize, so I will need to tell him the starter is not some sort of gross thing that needs to be disposed of.
- Sourdough starter needs a temperature of about 70 degrees to grow. I am putting mine in the pantry/water heater closet. It stays warmer in there than most other areas of the house. It is winter in West Virginia, so it gets pretty chilly here and I keep my thermostat on 58 degrees at night to save on the gas bill. Luckily, we have an electric blanket (thanks, Mom!), so we don’t get frost-bite, but the sourdough starter needs a warmer environment than 58 degrees, hence the pantry. Keep in mind throughout the process that yeast is a living creature. It has to stay warm to survive. If it gets too cold, yeast goes dormant (I do this too when it gets too cold outside). If it gets really cold, yeast dies (I haven’t done that yet, thanks to the electric blanket). King Arthur Flour suggests using a heating pad set on the lowest setting with a dish towel on top of it, then the starter in its container on top of that.
Once you have all that lined up, you are ready to begin!
Day #1: The Beginning
- Mix 4 oz. of whole wheat flour with 4 oz. of cool, non-chlorinated water in your designated sourdough starter storage container. Leave no dry flour. I needed to add just a tad bit more water to accomplish this. The mixture is very much like a thick paste.
- Loosely cover the starter, put it in your 70 degree (up to 80 degrees) area and wait 24 hours.
Step #1

Step #2
")
Step #3

Step #4

*Note
When I first published this article, I had my sourdough starter container covered with plastic wrap and secured with a tight rubber band. After doing some research, I found that most people suggest a "loose" wrapping and some people suggest no cover at all. I just can't stand the idea of no cover at all, but I did remove the rubber band to allow more oxygen circulation and to allow for some of the gases produced by the yeast to be released at the starter grows.
Part II: The 1st Feeding!
An update on Baby Starter is posted here. Part II details the first feeding after 24 hours with photos and videos.
Once I have finished, there will be a series of articles detailing the experience with tips and techniques, pictures and videos, and a recipe for sourdough bread.
Sourdough Pizza Crust
Since first beginning this starter, I have made many loaves of bread with it, but my favorite recipe is sourdough pizza crust. I have linked to it here, if you are interested. Enjoy!
© 2012 Leah Wells-Marshburn


")

