Dark Souls II Walkthrough, Part Seventeen: Huntsman's Copse - Executioner's Chariot


With the Skeleton Lords down, you've seen almost all there is to see of Huntsman's Copse... but not quite. There's one last area to see, one final challenge to take on, which you are probably strong enough to beat if you managed to take out the Lords. Optional, this, complete optional, but... hey, why not? Let's go after the Executioner's Chariot.
Huntsman's Copse
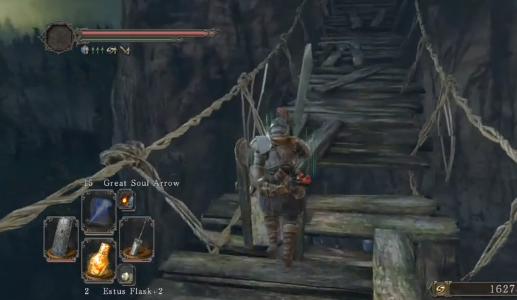
- To reach the area where you fight the boss, you must first travel through Huntsman's Copse. Zip back to the Bridge Approach Bonfire and make your way through the Copse until you reach the first arched bridge, leading into a wooded area.
- Head right from the bridge. You'll find another bridge, leading back over the gorge you just crossed. When you get to the other side you'll find two lumbering ghouls and one larger, much stronger creature with a lengthy bludgeoning weapon. This thing can leap deceptively far, so you're not safe even at a range. Pull it away from the others so you can concentrate on mashing it first.
- After defeating the enemies on the lower ground, go up onto the rise. Follow the path along the cliff's edge, taking out the single ghoul up here, and you'll find a corpse carrying a Notched Whip at the end of the path.
- Head back down the cliff. There's a pathway on your right leading into the surrounding rock. Follow it to a clearing, where you'll be attacked by another bludgeon-wielding foe. Retreat to the thin path to limit his range of movement. Avoid proceeding any further ahead while fighting, as a second creature - this with a whip - will leap down and also engage you. The whip-bearer is easier, but remain wary nevertheless.
- Continue down the path. Two more of these creatures will appear. Yeesh. Melee fighters can engage them on the thin path; I recommend ranged or magic users retreat to the ladder near the last Bonfire and hit from afar, assuming you aren't an expert at dodging.
- Further along this path you'll find the rickety bridge that spans a large section of this area. Pick your way across it as carefully as you can manage, as there are a few holes you'll want to avoid. At the end of this bridge is a new area, Undead Purgatory.
- Through the busted front door is a shining red knight. It's a standard melee opponent, but it hits very hard and has a long reach. Remain cautious when doling out damage, and be careful if you decide to back up along the bridge - it's easy to forget there are holes at your back.
- Beyond the red sentinel is a mist door, and by now you know what that means.
Executioner's Chariot
Oh joy. The Romans would be proud. This fight is not fun, regardless of your class, though it's a lot easier for anyone with decent amounts of HP, good armour, and best of all, a shield. Lightweights like pure sorcerers will not enjoy the Executioner's Chariot.
The first phase of this battle is a race, of sorts. The Chariot zips around a circular tunnel lined with shallow alcoves, crushing anything that gets in its way - namely, you. There are spikes on the Chariot's wheels, allowing it a bit of extra range, so if you're not firmly pressed into one of the alcoves along the edges of the tunnel you will get shredded. It's possible to roll under these blades, but it's very difficult.
This whole process wouldn't be so bad if not for the other problem: the tunnel is full of skeletons. Worse, there are two necromancers who here that are dead-set on keeping the skeletons up, and even though the Chariot will knock them all down each time it passes (usually, anyway) the necromancers will bring 'em right back up to bother you again. Irksome.
Pick your way from alcove to alcove, fighting off skeletons in your search for the necromancers. You must kill these things or the skeletons will never leave you alone. If you have a heavy shield, I recommend hunkering down in the alcoves as the chariot passes by and weathering any skeleton attacks; if you don't, try to zip into an alcove just before the Chariot passes. The less time you spend in the alcoves, the better. Once the necromancers are gone, hunt around for an overhead portcullis by a lit area - as well as an accompanying switch. Bring the porcullis down and the Chariot will smash to a halt. Be sure to heal up before doing this - once the skeletons are gone, the alcoves are perfectly safe.
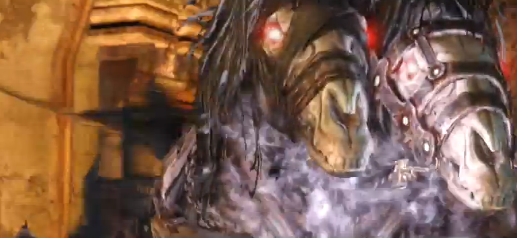
Phase two is simpler. The rider is gone, but the two horses are still together, acting as one creature. They will perform two general attacks: either they'll try to ram into you and trample you, sometimes with high, hoof-raised rearings, or they'll stop and breathe black gas in your direction. Neither attack is preferable, but they're also not that difficult to dodge. Keep your distance as a ranged fighter or stick right in as a melee fighter and whittle it down 'til it's done. Neither phase is especially difficult, but pulling off both without dying is a bit of a trick.
- Taking the Executioner's Chariot will earn you the Executioner's Chariot Soul. Hunt through the tunnel to find stairs; they lead upstairs to a Bonfire, Undead Purgatory, as well as the oddly-disturbing Tiny Gren, adherent of the Brotherhood of Blood covenant. Sounds... great.


