Resident Evil 2 Remake: Leon Walkthrough

Who Turns An Art Museum Into A Police Station
The opening sequences of Resident Evil 2 Remake stay pretty close to the source material in the 1998 release as we first see Leon Kennedy, rookie cop who's first day on the job is a living Hell.
Stopping at a nearby gas station where he sees an abandoned police car, Leon enters to find a store torn apart and a man holding his neck running out towards the register. Finding the police office who owns the car outside being attacked by another zombie, Leon only has about six bullets at this point in his clip so dodge the zombies the best you can reaching the furthest room near the freezers to get a key off the desk.
After getting your hands on they key, back track then to the entrance of the gas station where Leon will come into contract with Claire Redfield for the first time, the college age sister of the S.T.A.R.S. member, Chris Redfield from the first game. With too many zombies to fight, Claire and Leon make a run for the squad car closer than his jeep and head into Raccoon City where they are soon surrounded by cars parked haphazardly among the zombie filled streets.
A truck from the opening credits, soon crashes and Claire and Leon bail out of the squad now separated by a wall of fire. Promising to meet up again at the police station, Leon must rush down the street muscling zombies out of the way until he reaches an alleyway that will backtrack to the police station. Sliding the bolts on the gates, the monsters outside will stay put for the moment.
The redesigned main hall has changed some of the artwork, puzzles, and the location of the first typewriter and item box in the game to a more convenient location as the main hall will be traversed many times in the game play. Near the back of the room is the Goddess statue, a staircase, and several locked doors, as well as fire shutters closing off wings of the station.
There are any number of ways to go around the police station, but be aware of the few locations of item boxes and typewriters. With little supplies, especially health, picking the route that will open as many doors on the first try that don't need the keys is the best bet.
Under the fire shutter, the hallways have become flooded, and Leon will search these rooms finding ammo,boards to close up windows, and few health items. Take notice of the fuse box missing the fuse, and the doors chained closed.
There is also a opened window that Leon can use to escape to a path on the second floor.
After retrieving the officers notebook, the main reason for the first pass of this wing, return through the shutters to the main hall to meet Marvin.

Marvin doesn't look so good but he insists, like the original Resident Evil 2 that Leon move along without him. Using his bloodied hands to study the notebook he advises Leon to how to open the Goddess puzzle from the sketches inside. He warns Leon that the most important thing is finding a way out and escorting any survivors that remain in the police station. Marvin also gives Leon his first combat knife in the game which can be used as a defensive weapon but be aware of its gauge.
First Objectives
The main part of the game takes place in the police station, so become familiar with where new doors open to.
As Leon makes the first passes through the east and west wing, pick up as many items as possible and make multiple runs back to the save box near the entrance. In your first runs, there will only be zombies, but we advised to the scratching on the walls and the sure signs of the Lickers on the prowl, which you won't see for the most part until reaching the third floor for the first time.
The main objective is to find the three medallions needed to open the Goddess path. Each art piece containing them will have a dial where three pictures must be input. Looking at the officers notebook, the solution to all three can be found. When Leon places all three in the statue next to Marvin, the doorway opens to the underground tunnel to the parking garage but don't rely on this passage more than once as it closes back up as you pass through.
Other main puzzles include several safes which the combinations can be found in memos, posters on the walls, and a white board which clearly states the combination to a locker near the women's shower room.
A statue with a missing arm and a red gem, later opens a puzzle that combines with a jewelry box to get the S.T.A.R.S. key card and a USB dongle needed to unlock the armory inside the S.T.A.R.S. office via a computer in the corner. Opening this rewards Leon with a new weapon and ammo.
The weapons locker downstairs near the Dark Room also has two rewards if Leon can find and figure out the two electronic personal safes. The objective is to keep all the lights lit until the box opens, so be patient and keep trying new ways to tap the eight buttons. They are pretty easy. Once they open two missing keys for the input terminal in the weapons locker have been opened. Bonus ammo, hip pack upgrade, and if you have the weapons locker key, the shotgun, can be obtained.
Upgrades to all the firearms can also be found in various locations around the police station.
Bonus safes, like the lockers also contain bonus items that aren't needed to progress the game but can give more weapons upgrades and ammo.
Be aware after the puzzle on the third floor to obtain the last medallion, the Lickers have now entered the building. One spawns instantly in the room you are trying to exit, while two more will return to the same room.
While sightless, the Lickers are far from harmless and much more aggressive than the first installment. Staying still only works for a moment and while they can be blasted with a few shotgun shells, the noise triggers the others.
The best bet is to lob a flash grenade at them long enough to stun them and run by but there are only a few in the game.
The Licker's seem to patrol the same hallways and as zombies keep pouring into the building, the Licker number doesn't seem to decrease but when needing to blast your way through a crowded zombie hallway rather than run, you may not be able to outrun the Licker so make your choices wisely when using weapons.

After the underground passage is opened, two new types of enemies will be found, the Tyrants, and the zombie dogs. A run in with a mutated Burkin can be ended quickly with a few shot gun blasts to the pulsing eye that comes out of his mutated side along the twisting corridors of a maintenance room. Once in the garage itself, Leon sees that he needs a key card to get opened the gates of the garage and come face to face with the first terrible dog once he passes into the underground area.

Garage Of Doom
Only two doors are unlocked in this area lit with green lights, the other two red, so follow around avoiding the dogs that will run through the first set of doors. One green door will lead to the jail area, the other the shooting range, and more maintenance rooms and office area.
Finding precious more ammo, a little health, and typewriter, Leon collects all he can before taking on the other side by the jail. Passing through the kennel and the morgue, Leon must avoid the dogs and the undead to get a key in the hands of one of the corpses and some electronic parts needed for the puzzle in the jail.
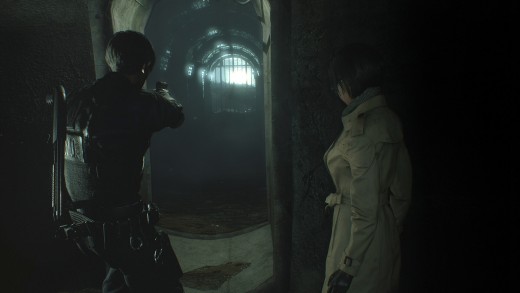
Meeting Ada for the first time, she lies to Leon that she is FBI and investiaging the Umbrella Corporation, and the naive rookie cop believes her. A journalist is locked away in one of the cells and he is offering to trade the key card to leave the garage for his freedom.
Only Leon's conversation is interrupted by Mr. X reaching through the wall and killing the man instantly, though he doesn't do much but throttle Leon as he passes through the police station unless Leon is backed into a corner.
Seeing that the remaining parts for the jail cell lock are in the clock tower, Leon works his way through the police station once again having now used the keys found along the way to get outside, put out the fire from the helicopter crash, and access new save areas, the lever needed to move the book cases in the library and a few more hip packs.
Mr. X is extremely loud as he stomps around in pursuit of Leon and whichever path is taken to get to the clock tower, be careful as more zombies flood the building as the crank is used to open more of the fire shutters.
If the Lickers are still alive in the building, this adds extra tension as the urge not to shoot and use the flash grenades only increases but will not stop the zombies.
After getting the parts from the clock tower, fight your way back to the parking garage to solve the puzzle to get the garage key card and get saved by Ada as Mr. X comes again for Leon.
Mr. X like Nemesis in the third game is immune to almost every weapon in the game and the grenades only stun him for a moment. Take the opportunity to run when he is down and gain as much distance as possible. There is a trophy for knocking off his hat with a bullet while he is stunned, but he hardly holds still long enough to get much of a shot at him. Even the enhanced guns do not have the stopping power unlike every other enemy so far, so keep running as long as you can.
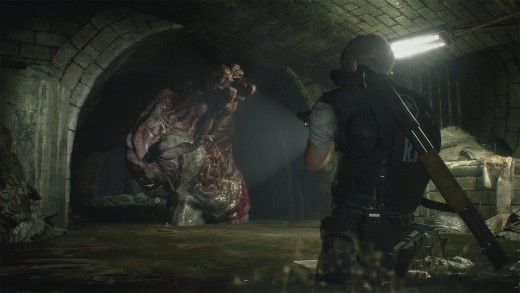
That Part With The Alligator
Promising the return of the alligator in a scenario that makes more sense to the story, Leon and Ada after escaping the garage head into the streets of Raccoon City on the way to the sewers where our reptile friend is waiting.
After a newly designed section involving the Kendo gun shop where instead of having a showdown with some zombies, Leon meets the owner and his young daughter that has been attacked and on the verge of returning as a zombie.
Ada begs the man to put the child out of her misery as she knows what is about to happen but the man won't see of it and hints that his wife is already sleeping and he will put the child to sleep too.
The little girl begins to make savage noises and Leon insists that Ada lower her weapon and let the family be even though it isn't the best they can do for them. Telling Ada that she has to reveal more, she mentions on the walk her target is Annette Burkin who is responsible for the tyrant monsters and much of the devastation of Raccoon City as a scientist for Umbrella.
In Claire's scenario much more of the story of the family is revealed as Claire is the main protector of the young daughter, Sherry who grows up to be a BSAA agent after the fall of S.T.A.R.S.
Ada urges Leon along through the sewers and after fighting the alligator in a very jaws like scene and picking up more items along the way, Leon is suddenly shot in a struggle between Ada and a stranger.
Leaving Leon to chase after the gunman, Ada's section begins.
Not having much in the way of weapons other than a small handgun, why she didn't take more inventory off Leon, it is hard to say. Ada's objective is to keep chasing after Annette and overload the electric circuits with a handy spy contraption she has with her.
Ada's little gun doesn't do much to the zombies even with a head shot so keeping your distance while solving puzzles is imperative. Eventually Ada circles back and it switches back to Leon.
In the quest to find and save Ada, Leon is presented with a complicated puzzles including plugs named after chess pieces, so explore and save often when passing the typewriter and save box and once all the pieces are in the inventory, solve the puzzle which returns Leon to the break room of the police station through a new doorway.
Here And Gone
Back in the police station, Leon can develop the new film that he has in his possession and circle back for more weapons upgrades and items that wouldn't fit in inventory the last time.
The halls are still filled with whatever was there last time, and be aware that if you haven't already killed Marvin in the main hallway after he turned that he is lurking near the save area.
Be sure to get the flamethrower before leaving the police station the final time in preparation for the next boss battle with a G Virus mutated being. As Leon is heading towards the labs, new creatures are announced again but nothing as serious as the Lickers.
These new monster do need to have a fuse shoved into their faces to keep them down though so stay on your toes.
Finding Ada at last investigate the lab area picking up items and weapons along the path. Meeting a new type of enemy that is of no surprise from the original Plant 43 is one weed you don't want to do business with so create the herbicide and take it down.
Finding the truth about the G Virus from research notes from Annette and William Burkin, you are soon confronted again with the final form of Burkin and though the monster is out of control, Annette can still see her husband inside and is upset when you try to put him out of his misery before he wrecks the place.
After his defeat, charge upstairs but beware of the final boss fight looming as you collect the last of the health and supplies.
Every Resident Evil game ends with a rocket launcher so now is your chance to blast what is left of Burkin and the hordes of zombies spilling into the area. Be careful to place a few well timed shots at your foe and avoid being chomped on by the zombies.
Finally Leon gets his ending scene and it sets up for Claire's B scenario which will be a remix of Leon's events and show where she was during his time in the police station if continued from this point. Going to the main menu and starting Claire's mission from a new file will give the original version so really there are four playable stories that alter slightly in this retelling.


