How to Make a Pop Up Birthday Card - 6 Steps with Photos

DAY 21, HUB #21


These days, store bought Birthday cards are popular and convenient but they are expensive and the printed birthday quotes may not match the feelings you want to express.
Therefore, making your personalized handmade birthday cards, especially pop up birthday cards allow you to create the designs that fits the recipient’s personality, write down or print out the birthday quotes that suits the recipient’s personality and mix match the background colors anyway you like.
Simple Steps to Make a Pop Up Birthday Card
Lately, I have stumbled upon many blogger making their own birthday cards and it seems to me that this birthday card project is not difficult at all.
In this article, I had just made a pop up birthday card for my daughter’s birthday.
Here are the Summary of the Steps
To make a pop up Birthday card, you need to make a small indent inside the card, cut out some color papers to make candles and paste them inside.
A big candle represents 10 years while a small candle represents 1 year. For example, if the birthday person is 17 years old, cut out 1 big candle and 7 small candles, as simple as that.
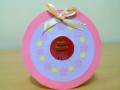
For the front cover, you can choose 4 different pictures; such as birthday gifts, birthday cakes, teddy bears or candies and make a stub at the back of each pictures.
A piece of ribbon makes the card appears to be a birthday present. Stick a small “Happy Birthday” at the right hand side corner to signify the purpose of this card.
Open up and POP! comes the birthday candles
From the outlook of the front card, the recipient would not realize this is a pop up birthday card. When she opens up the card, she will be surprise to see the pop up candles when which resembles birthday candles on the cake, waiting for her to blow them out (that is if she doesn’t have a birthday cake!)
Anyway, she will be please to know you haven’t forgotten her age yet. Some girls may not like others know her actual age. Hence, you might as well paste one big candle and lots of presents instead!

Make the Birthday Card Now!
If you want to make a quick and easy pop-up birthday card, do consider this special birthday card. This card is suitable for teenage girls, niece, daughter, girlfriend and female colleagues.
Here are the step-by-step tutorial and photos which I had taken for easy to follow guides.
Photos Guide
Click thumbnail to view full-size


Things You Need To Prepare:
A piece of white card
Gift wrapper
Some colorful construction papers
A pair of scissors
A bottle of white glue
Strings of ribbon
Double-sided tape or sellotape
Markers
A pencil
A ruler

How to Make a Pop Up Birthday card
Start with the white card. You can choose to use heavyweight or matte paper that weighs approximately 120g or more.
It has to be thicker than the construction paper so that the main card will not be too flimsy to handle.
Step 1

Photos Guide
Click thumbnail to view full-size


How to Fold The Pop Up Card
Measure the white card 6.5” x 11.5” ( height x width ) and cut it out.
Fold it in half.
At the folded crease, fold an indent 1 inch wide as shown in the photo.
Push down the front page to your left hand side so that it will resemble an opened book.
Flip over the back of the card to the front as shown in the photo.
Fold down the right hand side page down, resemble a closed book.
As you can see at the crease side, there is an indent flap pushed inwards the card.
Apply sufficient white glue onto the flap. Push down the top page so that the flap is glue tightly.
Open up the card. Now you can see a pop up flap inside the card.

Step 2

Photos Guide
Click thumbnail to view full-size


How to design the front card
Now, choose your favorite color paper. I chose blue paper.
Cut out the size of the blue paper slightly smaller than the front white card.
Apply some glue at the back of the blue paper and paste it on the front card.
Choose another piece of color paper that contrast with the background color.
I chose yellow because it is bright and appear cheerful.
Measure the height at 2 inch and the width would be slightly shorter than the blue paper.
Cut it out.
Apply some glue at the back of the yellow paper and paste it in the middle of the blue paper.

Step 3

Photos Guide
Click thumbnail to view full-size


How to make the stubs for the pictures
Cut out 4 different pictures from the gift wrapper. I had cut out 2 birthday cakes and 2 birthday gifts with different colors.
Cut out a “Happy Birthday” message from the gift wrapper or you can type the message in Wordpad, select a suitable font, print and cut them out .
With the left over white card, paste each of the 4 pictures and the birthday message onto it.
Cut them out, following the shape of the pictures as shown in photo.
Cut out 4 thin rectangles approximately 1 cm wide x 6 cm length.
Fold each rectangle into a quarter and another 2 times until it forms a small stub.
Apply a little glue at the last flap and stick it tightly.
If the stub keeps coming off, use a small piece of sellotape to bound the stub together.
Apply a small piece of double-sided tape on both sides of the stub.
Stick each stub behind each picture.
Apply some glue behind the birthday message.
Paste it at the right hand side corner, at the bottom edge of the front card.
Then, stick all the 4 pictures with stub on top of the yellow paper.
You can paste straight line or joyful depending on your creativity.

Step 4

Photos Guide
Click thumbnail to view full-size


How to paste the ribbon and bow
Cut out a string of ribbon approximately the length of the card.
Apply glue or double-sided tape behind the ribbon.
Paste it slightly below the yellow paper.
Cut out a short string of ribbon and tie a pretty bow.
Paste a small piece of double-sided tape at the back of the bow.
Paste it at the center of the straight ribbon.

Step 5

Photos Guide


How to make the candles
The number of candles depends on the age of the birthday girl.
Since my daughter is 17 years old, I need 1 big candle and 4 small candles.
Cut out 7 short rectangles with different color papers.
Then, cut 1 piece of tall rectangle ( Double the height of short rectangle ) with another outstanding color paper.
To make the flames, cut out 2 or 3 straight rectangles.
Fold them into half and another half.
Use a marker to draw the shape of a teardrop.
Adjust the size of the flame to accommodate the size of candle.
Too small flames will look funny on them.
Cut the shape of the flames out.
Now you will have 8 pieces of flames.
Paste each flame at the tip of each candle.

Step 6

How to paste the candles inside the birthday card
First, apply a little glue at the back of the big candle, near the bottom stand.
The glue should be sufficient to paste the flaps.
Then, look for the center location of the pop up flap.
Paste the big candle onto the front of the pop up flap, as if it is standing on the base of the birthday card.
Apply some glue for the rest of the short candles, just the bottom stand.
Paste 4 short candles of the left hand side and another 3 on the right hand side.
Paste the candles with different colors randomly, as shown in photo.
Leave the candles to dry.
Now try to close and open up the birthday card.
Make sure that the candles pop up nicely when the card is open.
Your pop up birthday card is done.

Other Craft Ideas
- How to make a Valentine's day Card ( Part 1 )
Valentine's day handmade card. Lots of fluttering hearts, cute and easy to make. - Father's Day Present ( Gift )- Handmade Bookmark
I love handmade gifts. Making them are easy especially when you use all the left over materials in hand. Recycle the papers, wrappers and old buttons are the best method. This handmade bookmark requires ribbon, color papers and markers. I am sure you - Easy Handmade Christmas Card- Craft Idea 2
Quick, easy and simple last minute Christmas card. Not much cuttings and gives the natural look. Lovely bows to add the cute cover. - How To Make Pop-Up Mother's Day Card
Mothe'rs Day card is not hard to do if you use just a little trick to change a simple card into a pop-up card. You don't have to give her actual flowers because this card comes with flowers too. - Special Handmade Gift- Alphabet Fabric Key Chain Holder
Key chain holder makes a perfect gift for anyone. It can be a wonderful gift for birthdays, Christmas, Valentine's day, Father's day or any other day. Handmade key chain holder brings memorable memories to both giver and receiver. - Mothe's Day Card Idea
I get many ideas on how to make Mother's Card from many bloggers and hubbers . I find that copy the same idea isn't the best way to give mom this special card. Hence, I created my very own card with Google Images as a reference. You can get many Moth - RECYCLING CRAFTS for KIDS
Earth day is a day where kids and adults celebrate this day with many activities to help to save our planet Earth and to create awareness about our damaged environment due to men greed.Although we couldn't help in a big way, we could reuse, recycle a - Unique Gifts: How to make Easy Paper Rose Flower
Make this year Mother's Day a special day by making your own handmade gifts for your mom. Handmade Paper Rose Flower is easy and can last all year. It is inexpensive and lovely too.
© 2012 peachy
")


