DIY Glitter Candle Holder Winter Craft


I love the holidays and the winter season. There is just something clean and refreshing about the cold, crisp air and a new blanket of snow. This time of year also gets my creative juices flowing. I like to have seasonal decor around the house but I don't have a money tree in the back yard. So, instead of buying finished products, I find DIY projects I can do for a lot cheaper.
This year, I decided a fun project would be some candle holders to go with a beaded cone tree I found for 1/2 price. Since I like things in odd numbers, I decided to decorate 2 vases/candle holders to go with the cone tree so I had a vignette of 3 main items.
It's simple and can be done in any color scheme but I choose blues because they remind me of winter and they will look great during the Christmas holidays at my mom's house. Her tree and Christmas decor is all red, white and blue.
Time required: 30 mins (not including drying time)
Difficulty: easy
Cost: Under $5
Materials:
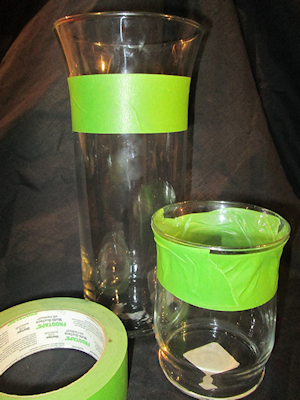
- Vase or Floating Candle Holder (I used 2 in different sizes from a local dollar type store)
- Glitter -- your choice of colors
- Mod Podge or Watered Down Elmer's Glue
Tools:
- Paint Brush (cheap)
- Paper Plate or Tray
- Painter's Tape
Instructions:
1. I used painter's tape at the top of each of the containers so I would have a pretty straight line all the way around.

2. I do the next steps over a paper plate to catch the excess glitter. It can be put back in the jar and used for another project. Saving money!
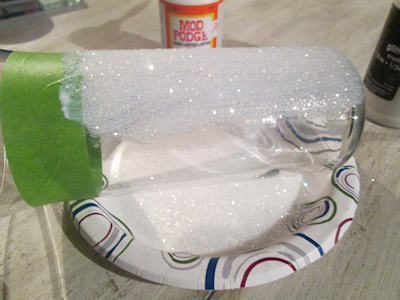
3. Working in small sections, I applied the Mod Podge with a cheap paint brush on the glass from the tape below to the bottom of the container. After I had a liberal amount spread, I sprinkled my crystal glitter over the glue until it was covered. I rotated (over the paper plate) and let any glitter that didn't adhere fall onto the plate.
Continue working all the way around the vase until it is covered with the crystal glitter. Mod Podge dries clear and I wanted to be sure it was good and dry before moving on so I let it dry overnight and started again in the morning with the next step.
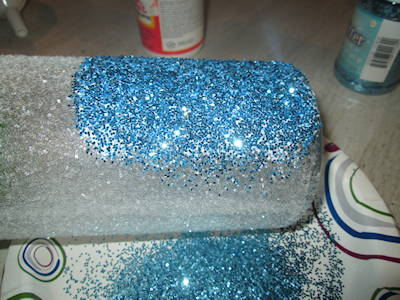
4. Holding the container over the paper plate, I started applying Mod Podge 2 1/2" below the top of the crystal glitter. I then sprinkled my lighter color of blue on the glue. Working in small sections, I finished this portion and let it dry for about 2 hours.
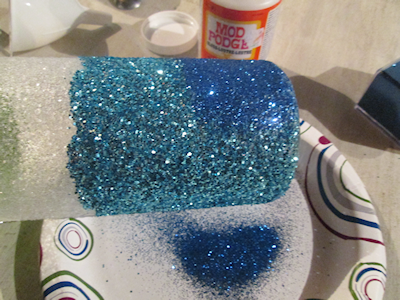
5. The last step was to add the darkest blue at the bottom of the container. Holding it over a paper plate, apply the adhesive and then sprinkle with the darkest color glitter working your way around the container.
Let dry completely. Overnight is best.
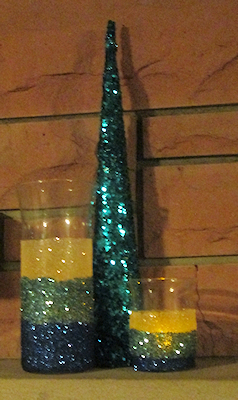
6. Remove the painter's tape, add a candle and you are finished! Here's a shot of them glowing and sparkling in the candle light.This gives you a sort of gradient or ombre effect to the colors (going from darkest at the bottom to lightest at the top.).
7. Now, to use these as holiday decor, you can add a number of little items that say "Christmas" like:
* Vintage ornaments around the base
* Christmas candy sprinkled around
* A small nutcracker or Santa
If you want to use it just for the winter season, add a faux blanket of snow underneath or a large snowflake in white (or to add a pop of color, choose a more vibrant color like fuschia, lime or red.)
Anyway you slice it, you have some decor that will take you from the day after Thanksgiving to the last day of winter.