DIY Kitchen Remodeling/Renovation - Update/Remodel Your Kitchen with New Paint


Does your kitchen need a new look?
Are you in the mood for a change in the busiest room of your house? An easy way to update and transform your existing kitchen is with some paint. It is far less expensive than the alternative of purchasing new materials like cabinets and so on. We just tackled this DIY project and we are completely pleased with the end results, not to mention the small amount of funds it cost to accomplish this task!!
Choosing the Colors
The hardest part of painting a room, in my opinion, is choosing the right colors. You don't want to get the job done and then realize you absolutely hate it. Luckily you can purchase small sample bottles of your colors choices for relatively cheap, this will allow you to apply paint to a small area of your room to be sure it is the correct choice to match your taste!
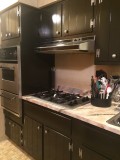
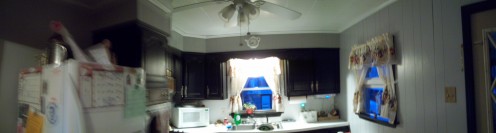
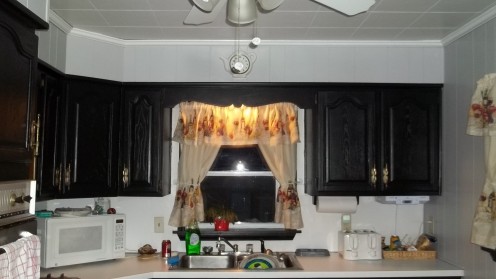
We decided on the colors onyx black, dove white, and pebble gray for our kitchen. The cabinets and trim around the door and lower trim were painted in onyx black, the ceiling and the upper trim was painted in dove white, and the walls were painted pebble gray. We also painted our radiator cover to coordinate with the rest of the room and well as the windows. We needed three gallons of paint that cost about $23.00 dollar a gallon plus brushes, rollers, tape, etc. The whole project was completed for about $100.00. But it looks like we paid alot more!!!
We had to use semi gloss paint because this works best for kitchen use.
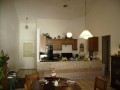
Before and After Pictures


Steps to complete the DIY project
We began by purchasing all the materials necessary. Then we started by taping off the areas that needed to be protected from the color being used. We painted all the cabinets first. We took each door off and removed all the hardware. I numbered each cabinet door on the back along with the inside of the cabinet with the same number. Then each cabinets hardware was placed in a sandwich bag with the same coordinating number written on the bag. This turned out to be quite handy because some cabinets had different sized screws and so on. We painted the hinged side of the cabinet doors first. Then we began to paint the cabinets. It took two coats of paint to cover them completely. Once dried we attached the hinges back on to the doors and reattached them to the cabinets. Once reattached the doors were then painted with two coats of paint. We used a wire wheel to shine up our existing handles bringing them back to life!! The next day we put all of the handles back onto the correct cabinet door finishing this section of the project.
The ceiling and trim around the ceiling was done next. This turned out to be a hard task. Covering wooden molding with white paint seemed to be never-ending. The molding took three coats of paint, with some areas needing a fourth coat. The ceiling itself which was previously painted white, took only two coats of paint.
The walls were done a few days after the ceiling. We painted over paneling with the pebble grey paint. The walls took two coats of paint as well, to cover completely. The hardest part of this job was moving the refrigerated out of the way to be able to paint behind it. In the end the job got done and it looks as though we purchased new cabinets and hardware.
I absolutely love my new kitchen!!! I wanted to change it for the longest time but I thought it would be impossible to afford. After much research I decided just to use paint. I am glad I made this decision and if I had to choose again I would choose the same!!