Decorating Style Without Money! Making the Best of What You Already Have!

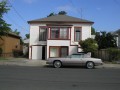
It Ain't the Taj Mahal!
I want to preface this by saying that you may very well look at these photos aghast and wonder how on earth I can live like this! Well, the answer is that, for me, living in my own home with no shared walls and no rent to pay is worth more than any amount of luxury or convenience. Having a roof over my head that doesn't leak and walls that keep out the inclement weather and having it be mine, is of the utmost importance to me.
My home is a FIXER! most emphatically, and I am a poverty stricken, yet creative, do-it-yourselfer! The ideas I am sharing here are not for everyone, but, if you are like me and are simply doing the best you can to make a home in need of repairs habitable, you may find some useful ideas here.
My home is probably about a hundred years old...
My deed says my home was build in the 1960s. After I had removed some horrendous 1970s paneling and two layers of antique wallpaper to reveal some very sturdy and smooth wood underneath, I found this hard to believe. I have recently learned that my home is one of several that were moved into town from a remote farm in the 1960s. They had been built by a rancher to house his workers. Eventually, they were brought into town and set up as rent houses.


It's old-fashioned, and it's comfortable - now!
I should have taken "before" pictures, but when I was doing all this work, it never occurred to me that I would write a HUB about it. On these walls, I removed crumbling, moldy paneling that was about 50 years old. Underneath were two layers of very old fashioned floral wallpaper. Beneath that was the wood that you see. The wall on the left is an exterior wall. The wood is smooth, and the planks are wide. The wall on the right is an interior wall, and the wood was not quite as high quality. For this reason, I painted them a solid light yellow instead of using the lighter redwood latex stain that you will see in the last picture. Since I removed the old, crumbling wall coverings, I have far less problem with dust than I used to.
The trim is furring. This is a lower quality wood than you would usually use for trim, and it is also much cheaper. Each eight foot piece cost $1.32 - about a fifth of what I might have spent on actual trim. I found it easy to work with, and I think the results are quite satisfactory. If you are going to do a contrasting trim in your home, be sure to paint the trim before you put it up. It's a lot easier that way. Then you can just touch up chips and dings with a small artists brush.
The watercolor on the left wall is one of a set given me by a friend. The other pictures are black and white family photos, and I plan to fill this wall with this sort of picture. The lamps are a thrift store find. I did buy the mirror new, but it was on sale!
The heater is an antique that my uncle had. I grew up with these, and love them (although I hate burning a petroleum product). Used correctly, these are very economical and safe. You just have to be sure to turn them off when not in use, when you are not home, and when you are sleeping and don't burn the flame too high. It really isn't necessary.
Furniture...
My furniture is entirely second-hand, donated, refurbished, reused and so on. The dresser in the photo above is one that was given to me by a neighbor. It's not grand or modern, but it is Ethan Allen, and it's got three big roomy drawers and six smaller drawers behind the doors on the sides. It's solid wood, sturdy and useful, and I'm glad to have it.

Share your great decorating ideas and make a little money!
- Join Hub Pages!
Write about your adventures in decorating and all your other interests! Make friends and make money! :)
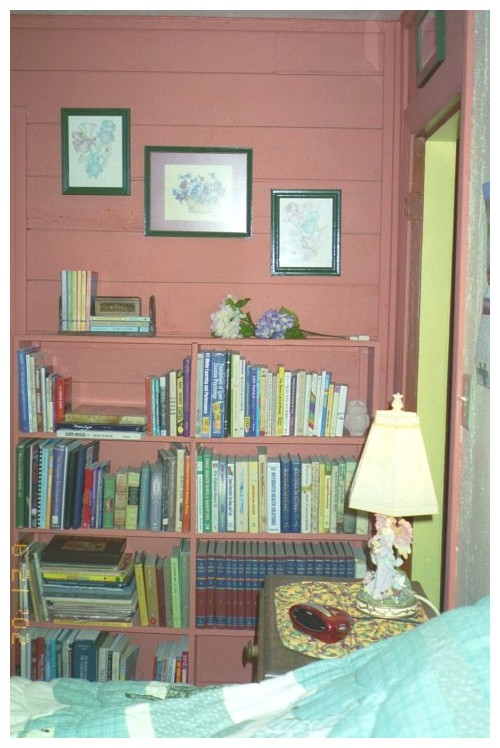
If you can't buy it, fix it! If you can't fix it, make it! If you can't make it, make do!
This is just one corner of the same room. I painted this library corner and these shelves to match the trim in the rest of the room. Paint is not cheap, but it can be a lot cheaper if you check the bargain rack at your local home improvement store whenever you are there. I got the paint for the trim and for this section of wall and the shelves for $5 for a full gallon. All of my paint was purchased in that way. I painted this entire room for under $15.
The shelves were salvaged from the old school when it was torn down. They were free. All I had to do was load them onto the top of my car, tie them down, and drive them home. They fit perfectly in this corner, and I just attached them to the wall with screws.
The set of encyclopedias you see are a complete set of 1955 World Book Encyclopedias. They don't even take up a whole bookshelf! They are just gorgeous inside, and it is interesting to compare the way people thought in those ancient times with the ideas of today. I found them neatly stacked beside a recycling bin when I took my recycling one time. I couldn't just leave them there, and I have really enjoyed them!
The pictures are some I have collected at various yard sales and thrift stores. I painted all the frames to match. When I did this room, I found that I had inadvertently been collecting and saving signed watercolors of flowers and birds for years. I unpacked them all, worked on the frames a bit, and had my decoration for the room ready. Altogether, my pictures for this room may have cost me about $15 - $20. Keep your eyes peeled for nice artwork at yard sales and thrift stores. It can pay off in the long run!

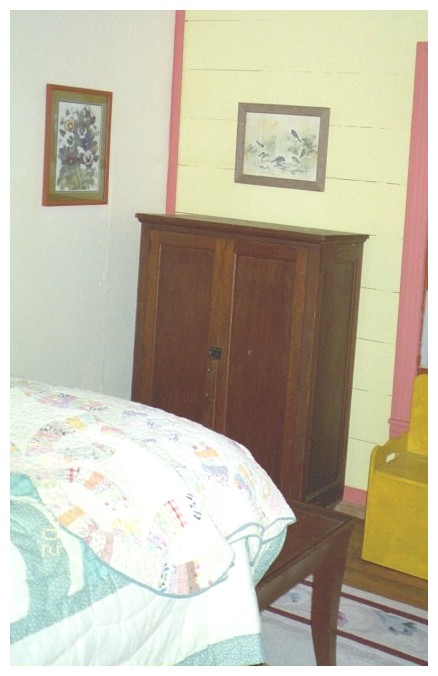
Keep or find real wood furniture whenever you can!
These days so much furniture is made of particle board, plastic, and other garbage that will fall apart with just a bit of ordinary wear. It pays to have furniture made of real wood. The little chest of drawers beside my bed is probably about 60 years old or more. It belonged to my father. It is plain and simple and solid wood. I'll probably refinish it one of these days. I expect I will have it for the rest of my life, and it will still be perfectly usable when I'm gone!
You can't really see the frame of my bed, but it is a simple antique frame that I got at a thrift store for $5! It is cherry. No telling how old it is, but again, it is sure to outlive me! The quilt at the foot of my bed was made by my grandmother and her friends. It's a bit delicate. I cheated on the other one and bought it new!
The lamps are thrift store finds. I think I spent about $8 altogether on lamps.
I found the picture on the wall discarded! It is a nice, signed watercolor and there is another one that goes with it that you will see in another photo. They had both been professionally framed and matted, but one had apparently taken a bad fall or somehow been damaged, so whoever had them had just thrown them out. I repaired the frame and painted both frames to match my trim, and I am very happy with them.
Since this picture was taken, I have added a nice, big, framed, signed watercolor of fledgling mockingbirds and two smaller bird watercolors above my bed. They are a set I found at the thrift store. The big painting had a damaged frame that needed repairing and touching up. Altogether, I spent about $6 on the set, and again, I am quite pleased with it!
These walls still have the old paneling. Since it was in pretty good shape, I decided to leave it and just paint it (with more bargain paint). I am happy with the way they turned out.
One man's trash...
This is the other corner of the same room. I found the rug, the table, and the wardrobe sitting by the side of the road! Not all in the same place, though! They were finds that I came across over a period of time. The table and rug were leftovers from a garage sale. I saw the wardrobe sitting on the curb in a nice neighborhood and knocked on the door of the house to ask about it. The elderly lady who answered the door told me that it had belonged to her father and that it had been around all her life. She was 86. However, she hadn't used it in years and decided she didn't want it. Well, I surely did, so I loaded it up and brought it home! It always pays to ask!
I also found the little yellow trunk discarded many years ago. It was banged up, but I repainted it, and it makes a nice little storage chest.
The picture on the wall on the left is the other half of the set I mentioned earlier. The one above the wardrobe is the other half of a set given to me by a friend that I mentioned in the first section of this article.


Salvage and be creative!
This is my comfy chair in my living room! It was given to me by some good friends. Actually, every bit of furniture you see here has been donated by kind friends and family. My uncle gave me the rocking chair that you can barely see in the corner (under the big pillow, which cost a dollar at the thrift store!) It's solid oak. He found it discarded with a little minor damage. He repaired it, and I have been enjoying it for about 15 years!
Since this picture was taken, I have built shelves into the corner to hold storage tubs and baskets. The tubs actually hold my extra cans of paint! I have a couple of nice baskets that I use to hold extra pillows and throws.
My uncle and I salvaged the fence paneling you see used here as a window treatment and as trim. I also used some as wainscoting on another wall. We used the rest to build a dog yard. I decided to use it as a window treatment here because this is a western exterior wall. When I had curtains on this window in the past, they got damp and musty in the winter and were simply not strong enough to keep out the heat in the summer. The fence paneling has done a nice job here. The window is old, painted shut, and not worth saving, so I didn't feel bad about tacking this fence panel up. This room has an exterior double door, so putting this up does not compromise safety. If your window is your only alternate means of escape from a room, don't do this!
Both the west and south wall in this room are exterior walls. I removed paneling and wallpaper as in the other rooms, and painted this wood with a lightweight, latex redwood stain. It is actually fence paint and very inexpensive ($11 a gallon) but I like the effect (which is really quite a bit nicer than this overexposed picture shows). Again, having an exterior door in this room played a part in my choice of material. If I had not had excellent ventilation while working, I might not have used an exterior type of paint. I would NEVER use an oil based paint indoors, and you shouldn't either. The fumes can be deadly!
I'm sorry I don't have pictures of the rest of this room. When I get some, I will add them. As with my bedroom, I left the paneling up on the other two walls and painted them a dusty tan with $5 a gallon bargain paint. Altogether, this room cost me $16 to paint.
What is "Bargain Paint"?
Bargain paint is the paint that people have left over when they finish a big painting job. Say a person goes to Lowe's or Home Depot and orders five gallons of high quality paint of a certain color to paint one room. When they have finished painting the room, they might have a full gallon of paint left. They can take it back to the store and get their money back! Then the store sells that gallon of paint on the bargain shelf for $5. That is usually a savings of about $20 or more!
It is always good quality paint. It really pays to check that bargain shelf every time you go to the home improvement center. If you see a shade you like, get it! Then be creative in how you use it. Every wall in a room doesn't have to be the same color. I always do two walls of one color and two walls of a coordinating color, even when I don't have to!
I do have some extra paint that I haven't used yet, but I will use it. Even if I don't, it didn't cost me much, and I have gotten incredible use out of most of the bargain paint I have bought.

What you don't spend in money, you will spend in elbow grease!
Doing all this work by myself took me a long time, and it was really hard! And I'm still at it! I have a kitchen and a laundry room yet to do, and then (with the help of a neighbor) I am going to start on the exterior.
But the thing is this: This is my house! I know every inch of every wall very well. I did this all myself, and while it may not be professional, and it may not be the way someone else would do it, it's mine, and I'm proud of it, and I'm glad that I was able to use my head and pinch my pennies to make this old house a little bit nicer to live in.
Home improvement isn't rocket science!
Follow these tips to start doing it yourself:
- Take the time to identify your project & think it through
- Have a plan & keep safety in mind
- Shop carefully and wisely for materials & be creative
- Look up information about how to do things you aren't sure of
- Get help with the work that is just too heavy or complicated to do alone
- Make the most of what you have & use your imagination!
- Reduce, re-use & recycle! Remember a little repairing can save a high quality item from the dump and save you a lot of money!
You'll soon see that you can do it, too, and you'll be glad you did!

All photos & text: copyright Suzanne Bennett: 2010