Seeds For Kids, The Veggie Garden

Seeds for a Vegetable Garden
Making a seed grow into a beautiful eatable plant is one of Mother Nature's master pieces. Lucky for us, the old gal does most of the hard stuff for us! But, if we want to help her get things growing from seeds in our very own garden, we need to learn a couple helpful tips on taking care of the seeds, and how to plant them for the best success. This is just what we will be learning here today!

How to Get Seeds Started
Starting Seeds in Containers
Starting your vegetable garden from seeds can be done in all kinds of containers. When planting your seeds in containers, it is important to put them in a warm sunny place when you see them start to sprout (like a windowsill). Try using any of these containers, they will work just great!
- clay flower pots
- milk cartons
- coffee cans
- paper cups
You can use just about anything that can have a few holes poked in the bottom, but will still hold soil (dirt). Oh, and those holes you will be poking in the bottom, they help the extra water drain out so the seeds don't stay too wet, for too long.

Starting Seeds in Garden Dirt
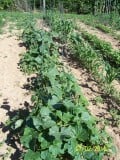
When you plant seeds directly in the soil of your garden, they need to be planted far enough apart and tucked into the dirt to the right depth. If they end up too close together, or too close to the surface, or too deep in the dirt, they just won't grow right. This is where we get to help Mother Nature a little bit. Look on the back of the seed packets, you will find all of the stuff you need to know about each type of seed. Some seeds need more space, and some need to be buried a little deeper than others. After reading the seeds packages, you will know just how each vegetable seed you will be growing must be planted. These packages even tell you what kind, and how much sunlight each seed likes!
Before Planting Your Seeds in Dirt
By soaking your seeds in water overnight, it gives them a boost and helps them to sprout faster. But, make sure you will be planting them the very next day. Once you get them wet, they shouldn't be dried out again!
What Kind of Containers Work Best for Planting My Seeds?

Thinning Seedlings
Once they are cute little seedlings, keep an eye on how they grow. If you can tell they are growing about an inch or more apart, they should turn into strong vegetable plants. If they are less than one inch apart, you will need to "thin" them out.This means you will snip off any of the smaller plants right where they pop out of the dirt. This gives the bigger stronger sprouts more room to spread their leaves and soak up the sunlight, which will keep them healthy and help them bear more edible vegetables down the road.
How To Feed Plants
Plants Need Food Too
Just like every kid and grown up needs good healthy food to grow and stay strong, plants need to have good healthy dirt, full of vitamins and nutrients to grow strong enough to make vegetables for us to eat! The stuff plants like to eat is called fertilizer. You can buy it from just about any garden supply store, or you can make your own by vermicomposting, better known as "raising your own worms". It is really easy to do, and the worms make great bait for when you go fishing!
Tending Garden Seeds
Newly Planted Seeds
When you put your seeds into the dirt, make sure you pat the dirt down with your hand. Not too hard, but enough to hold the seed in place when watered. Now, carefully water the soil, make sure there are no puddles or gooey mud. And when you water the newly planted seeds, be very careful so the water won't rinse the seeds out of their row.
Daily Garden Soil Moisture
When growing your own vegetable garden from seeds, it is important to check the soil every day. When the dirt is dry on the top, it is time to water it. The dirt should feel damp when you touch it—like a washcloth after it has been wrung-out—and never soaking wet. It is a real good idea to use a gentle spray when watering your garden.
When To Feed Garden
It is important that your garden has a good healthy meal on the very first day you put the seeds in the dirt. Another meal will be needed every three weeks or so. If you buy your fertilizer from the store, be sure to read the instructions. Sometimes you need to reduce the strength of it by adding water. This is usually the case if you buy a fertilizer called fish emulsion; where adding 3 tablespoons to a full gallon of water (then feed it to your garden) is the general rule. Otherwise, this really strong food can be bad for your plants.
Gear for the Garden
Click thumbnail to view full-size


Vegetable Planting Information Chart
VEGETABLE TYPE
| LIGHT
| ROW SPACING
| PLANT SPACING
| PLANTING DEPTH
| DAYS TO GERMINATION
| PLANT HEIGHT
|
|---|---|---|---|---|---|---|
Sweet Corn
| full sun
| 3 ft.
| 12 in.
| 1 1/2 in.
| 7 - 10
| 6 - 8 ft.
|
Japanese Cucumber
| full sun
| 1 1/2 ft.
| hills: 4 in.
| 1 in.
| 5 - 10
| under 1 ft.
|
Tricolor Zucchini
| full sun
| 1 1/2 ft.
| 6 in.
| 1 in.
| 7 - 10
| under 1 ft.
|
Brussels Sprouts
| full sun
| 2 ft.
| 1 1/2 ft.
| 1/4 in.
| 7 - 10
| 2 - 2 1/2 ft.
|
Cowpea (Blackeye)
| full sun
| 3 ft.
| 4 in.
| 1 in.
| 7 - 10
| 36 in.
|
Bush French Filet Beans
| full sun
| 1 - 2 ft.
| 4 in.
| 1 in.
| 5 - 10
| 3 -4 ft.
|
Salad Scallions
| full sun
| 6 - 8 in.
| 1 in.
| 1/2 in.
| 10 - 20
| 1 ft.
|
Fava bean
| full sun
| 2 ft.
| 6 in.
| 1 in.
| 8 - 12
| 3 - 4 ft.
|
Soy Beans
| full sun
| 2 ft.
| 3 in.
| 1 in.
| 7 - 10
| 3 - 4 ft.
|
Pea (Green Arrow)
| full sun
| 3 ft.
| 6 in.
| 2 in.
| 7 - 14
| 3 - 4 ft
|
Baby Leaf Lettuce (mix)
| full sun
| 1 ft.
| Do not thin
| Barely cover with fine-textured soil
| 7 - 10
| 4 - 6 in.
|
Information derived from seed packaging labels for each type of vegetable seed listed.
What You Think Really Does Matter
Have you ever planted a vegetable garden from seeds with your kids?
What Do I Do With The Left Over Seeds
Storing This Year's Seeds for Next Year's Garden
After you plant all of the vegetable seeds you want, a few seeds might still be left in the packages. To make sure they stay good until next year, you should keep them in the packages they came in. Make sure to roll down the tops and place them in tightly sealed containers. Store the containers in a nice cool, dry place. Next year, you can pull them out and start your garden all over again!


")
