How To Build An Inexpensive Wooden Pallet Table

SPRINGTIME MEANS OUTDOOR PROJECTS
Okay, maybe it’s not quite spring yet, but come on, let’s dream together. If you have a garage then the weather is no factor, and boy oh boy do I have a great project for you. This is another of those projects that costs practically nothing, and will leave you the envy of your neighbors.
Last week I taught you how to build a very inexpensive lawn chair made out of recycled wooden pallets. I promised we would then turn our attention to a patio table and by God that’s exactly what we are going to do today.
Are you ready?

WHAT YOU NEED
Pay attention because I’m only going to say this once.
· Two wooden pallets, both the same size
· One eight foot 4x4
· 16 wood screws
· One can of stain or paint
· Four caster wheels
· Screw gun
· One hand saw or power saw
TIME NEEDED TO COMPLETE PROJECT
I can make this table in an hour. Add painting or staining time to it. Say two hours if you are moving slowly today. I am not a carpenter. I am a guy who hates to spend money on things like patio furniture. So when I tell you that this carpenter-neophyte can build this table and two chairs in four hours you really need to pay attention. It truly is that simple.
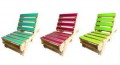
Simple chair project
- DIY Projects: How To Build A Patio Chair Using Wooden Pallets
Here is a great project that requires very little knowledge or skill, and the great news is it will cost you practically nothing to build.

HOW TO BUILD THE TABLE
I’m going to warn you again that this is ridiculously easy. Are you ready? Follow these simple steps.
1. You might want to sand down your pallets and 4x4 now before you begin. I tend to do my sanding after I have built the table, but I realize I’m kind of a backwards kind of guy.
2. Cut the 4x4 into four equal two foot sections.
3. Take one pallet and lay it on the ground, face up. Screw one section of the two foot 4x4 to each corner of the pallet.
4. Place the second pallet on top of these 4x4 sections and screw the new pallet onto the 4x4’s, thus connecting the two pallets.
5. Turn the table upside down. Drill a hole in each corner of the bottom and insert the caster wheels into each corner.
6. Turn the table back up and place it down on the wheels. You are now the proud owner of a patio table.
7. Now you can stain or paint your table. Of course, you might prefer to do the staining or painting before you build the table. Again, I’m kind of a backwards guy so this is when I do the painting.

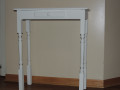
Another design idea
WOULD YOU LIKE AN ALTERNATIVE DESIGN?
If so, follow these suggestions. You will need two pallets and two eight foot 4x4’s. Caster wheels are optional depending on whether you want the table mobile.
1. Pry all of the slats off of the top of one pallet and set them aside.
2. Sand down all the slats, or wait until you have finished the table.
3. Now take the pallet that is untouched. Take the slats that you pried off of the other pallet and nail or screw them onto the new pallet, filling in the gaps with these slats. When you finish you should have a solid surface for the table top. The slats may not fit perfectly at first and you may have to pry and move slats on the table top pallet.
4. Cut the 4x4’s into four foot sections, one for each table leg.
5. Turn the table top over and screw on four foot 4x4 to each corner.
6. Add wheel casters if you want for mobility.
7. Paint or stain.
8. If you prefer a lower table then adjust the cut to your 4x4’s. instead of four foot legs you can have three foot or two foot legs.
More projects with pallets
- Frugal Tips For Used Pallet Construction Projects
Is the cost of lumber too expensive for you to do home projects? Well never fear, the trusty pallet is here!

Do you think you could do this project?
WASN’T THAT EASY?
Of course it was easy, and right now many of you are nodding your heads and thinking that you just might be able to do this yourselves….and you can!
What do you say? Are you willing? Go out and find some pallets just as we did this past weekend. We picked up ten at a lawn equipment store. They cost us nothing. Then we found some old barn lumber on Craigslist that was being given away. Then we found some free landscape rock at a dump site. During a two hour drive we spent nothing and picked up enough for several new projects which we will tackle next weekend.
I truly hope you give these projects a try. I don’t think you will be disappointed in the results.
2013 William D. Holland (aka billybuc)