How To Prepare Shrubs for a Holding Bed

Project Difficulty

Analyse the Garden Contents
If you ever find yourself in the position of getting your home repainted or possibly having new siding put on, at some point you will need to look at the gardens that reside close to your home. Begin by evaluating what plants have to be moved and approximately how large of a holding bed will be required. You should break down the evaluation even further with categories such as:
- Perennials
- Shrubs
- Trees
- Grasses
- Sun vs. Shade
This hub will deal with moving shrubs but also applies to smaller trees.
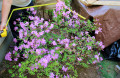
As the photo shows, the shrubs needing to be moved are about three feet high, can be in sun or part shade, and take up roughly twelve feet. Upon further consideration, one of the rhododendrons will be removed with a chain saw and the stump will be ground down. The reason for this is that the overall condition of this shrub is not very healthy. It has straggly branches, produces little to no blooms and has a weak trunk.
Prune any dead branches off each shrub that will be relocated, shape shrub if needed (never prune more than one third of the shrub off) and water well for five days before removing the shrub from the garden. Watering beforehand will give the root system a healthy beginning for the move.

Construct a Holding Bed and Remove Shrubs
Knowing that the shrubs would be placed back into a garden by the fall, I searched out an area in the yard to make a holding bed. I measured the length of all the part shade shrubs that would be placed in this particular holding bed to get an idea of the space that would be required.
To prepare the holding bed, I first made an area six inches deep by three feet wide by eight feet long. I scooped the soil all around the hole for back fill.The next step was to remove each shrub and ball them with burlap for summer storage. The shrubs I needed to move were: Azalea, Rhododendron, Ilex (holly) Andromeda (pieris japonica) and Thuja (arborvitae).
For most shrubs, you need to begin by cutting the roots with a log handled shovel out as far as the first ring of branches. If you do not hit any roots, move your shovel in three inches or less to cut closer towards the base. You need to be careful that you are not too close to the base of the shrub and cutting off all of the roots. It is essential that there is a good, well established root system for the shrub to survive the move.
Once you have made a circle around the base, push the shovel in under the plant using the cut circle, that was just made, as your guide. Slowly lift the shovel up to begin prying out the shrub. If you have pried around the shrub and it still will not move, you need to dig a bit deeper due to the shrub having tap roots at the bottom. These tap roots help secure the shrub naturally. It will be needed when the shrub is returned to the garden, so try to get as much of the tap roots as possible.


How To Wrap Shrub Roots With Burlap
After you have one of the shrubs out of the ground, wheelbarrow it over to the holding bed. Measure the width of the base by using the shovel handle. When you have the width measurement of the shrub base, cut the burlap at least four feet longer. For instance, if I measure the width base and it is two feet, I want to have a piece of burlap that is six feet long. This will give me two feet on either side of the shrub to fold up and tie off. Cut two pieces of burlap to the desired length.
- Place one piece vertically and the other horizontally on top of the first piece. This layout will create the support for the root ball.
- Place at least 2 scoops of soil, on the burlap, where the shrub will be placed. This will enable the roots or taproot something to begin to grow in, get nutrients from and also collect water for the shrub. Place the shrub on top of the soil just laid down, then gather two opposite corners of the top burlap and begin to form the ball.
- Clip these corners together with a clothespin or any other type of clip you may have on hand. This will free up your hands and keep the burlap in place. Bring up a third corner and clip this to the set you just made.
- Place two more scoops of soil into the pouch you have just built. Spread it around the pouch to cover any exposed roots. This step will help protect the surface roots so add more soil if needed. Unclip the single corner from the first set.
- Pull the two remaining corners together and clip together. Tuck any of the extra burlap around the roots and finish creating the ball before you completely tie off this piece of burlap.
To tie the burlap off, I use tie wraps. Other items that can be used are a length of good rope, wire or even Velcro tape. If the shrub has a good, sturdy trunk, take one of the set of burlap ends and use a tie wrap to secure the ends to the trunk. Repeat this process with the other set of burlap ends.
- If the trunk is multi stemmed or a bit weak, wrap the two ends around the base of the multi stems or trunk, remove the clip, and tie wrap it back to the burlap. When this is done correctly, it should look like a loop around the trunk. Take the second set of ends and repeat the process in the opposite direction around the trunk. Think of it as one set of ends goes clockwise while the other set of ends goes counterclockwise.
The piece of burlap that is left will be used to cover any gaps that may be showing from the first burlap wrap. Grab two opposite corner and tuck any excess burlap in towards the first wrap and clip it shut. Repeat this process with the two ends that are left.
Now you want to tighten this layer of burlap by taking one set of clipped ends and twisting it as if you were wringing out a towel. When you have this good and tight up by the trunk or multiple stems, use a tie wrap to seal this off. Remove the clip, and place one more tie wrap near the first one. Again, repeat this process on the last two clipped ends
- This will create a handle for easy lifting of the root ball without hurting the shrub. When twisting the burlap, keep tucking in any excess, try to smooth out any heavy bulges and then tie wrap off.


Place in Holding Bed, Mulch and Water
Now that you have done this with all of the shrubs needed to be stored, lift them into the hole. Arrange them so that the bases of the shrubs are just above the ground by two to three inches. Fill soil under any root ball that may be sitting too low in the holding bed. Start to back fill the soil, from the ring that was made, all around and on top of the burlap. You do not need to pack this in but make sure each ball is supported so it can withstand strong winds or heavy rain.
The type of shrubs being placed into the holding bed are all acid lovers. A natural way to ensure that these types of shrubs continue to get the nutrients they need without using a chemical fertilizer is to use pine needles. I collected a tarp full of pine needles and a barrel of grass clipping and shredded leaves that were in a compost pile at the local recycling center in town. Place all of the pine needles down first on top of the soil, then add the grass clippings or leaf mulch on the top of the pine needles so that every root ball has protection from the sun.
The whole idea behind this method of covering the soil is to keep these root balls cool, fed continued nutrients, and a way for the water to be kept on the holding bed so it will soak in to the root balls.
- If you do not use all of the soil in the ring that was made around the holding area, fix it up a bit and it will also help with the water staying where you want it on the holding bed.
Water this holding area daily, unless it rains, for three weeks. You could set up a soaker hose in the bed and it would disperse the water more evenly over a 15 minute period of time instead of wetting it with a hose. A hose can cause damage to the root balls if the water is running out too fast.
After three weeks, you can water as needed. To test the holding bed for dryness simply stick your finger in the soil, (past the top dressing of pine needles, grass clipping or leaves) about two inches deep and if the soil is damp, do not water.
Compost Poll
Have you thought about a compost bin in your yard?
Pros of a Composter
- A compost bin is a perfect way to recycle leaves and grass clippings. In some communities compost bins pay for themselves in one year due to not having to pay for curb side pick-up of yard waste.
- An additional way compost bins pay for themselves quickly is by the compost that is generated. The compost will be ready to use by next spring in all of your gardens. This saves you from having to purchase any type of fertilizer.
© 2013 Susan McLeish