How to Use a Compound Miter saw, Discover Safe Operation Procedures

How to Use a Compound Miter saw, Discover Safe Operation Procedures
The mere mention of using a Compound Miter Saw to the first time user, can be a bit overwhelming. With all the knobs switches and adjustments it’s hard to know where to start. As you continue reading this article you will discover how to use a compound miter saw with confidence.
How to Use a Compound Miter saw, Discover Safe Operation Procedures
What exactly is a compound miter saw? Jane asked Don the local handyman.
It is a tool I use to accurately make angled cuts to wood trim like chair rail, base board, crown molding and other building materials that I use in all my framing projects. Why do you ask anyway?
Jim wants me to get him one for his birthday.
With all the home improvement projects you guys are planning on doing yourself that would be a great investment.
Yeah, that’s what Jim keeps telling me. The thing I’m worried about is Jim has never used one before.
They are really easy and safe to use, once you have learned a few simple operating and safety instructions you and Jim will both be cutting crown molding like a professional.
You guys all sound alike, Jim has been telling me the very same thing for a month now. I tell you what, Don How about you show Jim and I just how easy they are to operate.
I would be glad to. How does Saturday morning sound? I will bring my saw and you can fix breakfast and we will get started with the lessons.
Don that would be fantastic, I will have the coffee and donuts ready.
How to Use a Compound Miter saw, Discover Safe Operation Procedures
What are all those knobs and switches anyway? Jane I tell you what let’s start with the basics. First let’s talk about the safe operation of the saw.
OK that sounds great, where do we start?
First thing we need to consider is a good stable work area where we can set up the saw. Preferably a flat and level surface about waste high that is free of all obstructions that could create a safety problem.
Don how much space do we need?
Jane that is a good question, the saw only needs to set on an area lets say, two feet deep and three feet wide. Another major concern is how long the material is that we will be cutting. Some molding comes in 12 foot or even longer custom lengths so we need enough room to accommodate the length of the material we will be working with. Before I forget, we also need something to support the length of our material we are cutting.
Ok got it, we can set up on the patio out back. What is next?
Alright, the next thing we will need is to run an extension cord to the nearest electrical outlet.
Got it, we had a new GFCI receptacle installed to replace the old worn out standard receptacle thingy on the patio when we bought the house.
Don I have an extension cord we can use, I use it all the time for my electric blower vac.
Jim, Jane what we need to use for this application is an extension cord that is rated for outdoor use and will handle a minimum of 15 amps of 120 volts of electricity.
It is a good thing you told us about the requirements for the extension cord, we had no idea there was a difference. How do we determine the rating of our extension cord?
Check the label on the cord. The manufactures label every cord made with its rating and intended use.
Let us review where we are, the saw is set up on the portable miter saw stand, we have the proper rated extension cord ran to, and plugged into a GFCI receptacle. We have the material supports that will help hold the molding level with the saw table. Are we ready to start sawing yet?
Ok Jane, for the sake of instruction purposes lets make sure the saw is unplugged. We are going to be adjusting the saw which means our hands are going to be around the blade.
Right safety first Don, I get it. What is next?
Jim did you get that scrap of trim molding out of my truck I asked you to.
Sure thing, I have it right here Don.
Super, let’s get started by setting up the molding on the saw table.
How do we do that?
First thing, we need to release the lock that allows the saw to move up and down and pivot right to left. The saw is spring loaded so be careful when you release the locking knob, the spring will hold the saw motor the blade is attached to in the raised position allowing us to put the molding on the table.
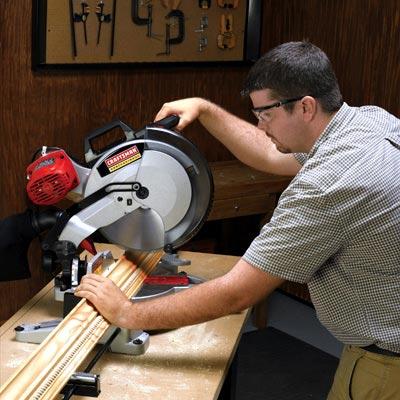
Then we want to make sure the molding is resting firmly against the fence and flat on the saw table.
The next step is to align the mark we made earlier on the molding with the leading edge of the blade.
‘An important thing to remember here is that the blade removes one eighth of an inch of material with each cut.
At this point we need to double check the blade angle settings’; to insure they are correctly set and secure. The settings are secured by tightening the locking knobs, the knob on the back and center of the saw will secure the tilt of the blade and the knob on the front center of the saw secures the table.
Got it, what is next?
Now we are ready to plug in the saw.
With the saw plugged in the thing we must do before we start the saw, we need to put on our safety glasses and sound suppressors.
I know Don, safety first.
Jane and Jim keep safety first in the front of your minds, always make sure to keep your hands away from the blade at all times, nobody wants to loose the use of a hand or finger.
Now we are ready to raise the control handle of the saw to make sure the blade is not making contact with the molding.
Start the saw by squeezing the trigger on the handle and allow the motor to get to full speed, you will be able to tell by listening to the sound the motor makes. The combination of the motor and saw blade running at top speed makes a ringing sound.
After the blade is running at full speed it is time to lower the blade to the molding and make the cut.
Wow, that really was easy,
Well Jane what do you think, is Jim going to get his birthday gift he has been asking for?
Ok Don you have convinced me, but only if he gets everything we talked about to insure him being prepared to safely set up and operate the thing.
Thanks for stopping by, have fun and build something, Mike
The author of this publication, Mike Teddleton owns the copyright to How to Use a Compound Miter Saw,Discover Safe Operation Precedures. The rights to publish this article in print or online can only be granted by contacting me the author in writing. You may use the intro and link back to the article directing the reader back to my post here at HubPages where they may find the story in its entirety
Favorite links to power tool tips
Click edit above to add content to this empty capsule.
- Chainsaws, what you should know to use a chain saw safely
- Masonry drill bits makes home repair and remodeling easy
Drilling holes in brick and concrete require a good masonry drill and ...
- How to Use a Compound Miter saw, Discover Safe Operation Procedures
Using a compound miter, sliding compound miter saw or fixed miter saw is ...
- What you should know before you buy a bosch palm woodworking router
A palm router make finishing woodwork projects ...
- How electric chainsaw chain sharpener review, save your money and your Stihl saw
Sharpening a chainsaw saves money, is easy and ...
- Reconditioned or refurbished power tools and pressure washers save you lots of money at amazon
Reconditioned power tools work as ...
- Paslode cordless finish nail gun, handyman best tools
Tired of compressor hoses and extension cord problems...
- Simply the Best Portable Table Saw
The Handyman, contractor, craftsman and homeowner alike simply need to know what the best portable table saw is to get their job ...
- What you should know to select the best 10 inch miter saw blades for crown molding
learn what you should know about compound miter saw, sliding compound miter and miter saw blades before you buy the wrong ...
- Teddletonmr on HubPages
About the author


