ArtsAutosBooksBusinessEducationEntertainmentFamilyFashionFoodGamesGenderHealthHolidaysHomeHubPagesPersonal FinancePetsPoliticsReligionSportsTechnologyTravel

How I Made my Retro-Style Bulletin Board for my Craft Room

Updated on May 8, 2014

DIY Bulletin Board in Your Style

We recently moved and for the first time -- ever -- I have a craft room/office of my very own. Sound the horns, raise the roof and celebrate along with me! Sorry, I digress...

One thing I knew I wanted was a "command center", if you will. This included a bulletin board. The ready-made ones I found were either boring, expensive or a combination board (like chalkboard - bulletin or white board - bulletin). So, I decided to make my own.

The craft room/office color scheme is -- white, off white, turquoise/aqua, lime green and black. I wanted to be sure to have some of those colors incorporated in the bulletin board I made so, off I go to find the fabric. It sets the tone for the project.

Below is the walk-thru of my creation with lots of pictures. No sewing or power tools needed. It was easy and fun!

Let's get started!

*All images belong to Mandee - DecoratingforEvents on Squidoo. Please do not use without permission.

Find a Great Fabric

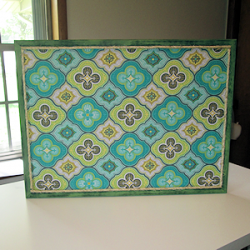
I found a paisley design in just the right colors to use for the fabric on the bulletin board. It only took about 1/2 a yard or less. That makes most all fabrics affordable for the project.

Then I choose paint colors for the frame that complemented the fabric. It was easy!

Gathering my Supplies - for making my custom bulletin board

DIY Project - Memo Board

I needed the bulletin board and fabric. I already had the rest of the supplies which is a money saver! Below is what I used.

Supplies:

* Bulletin Board (mine was 1-1/2 feet by 2 feet or 18" by 24")

* Fabric -- this is where your style comes out. Use anything from a solid to a wild print!

* Spray Adhesive

* Paint for the frame -- I used a dry brush technique to give it an aged/vintage look that requires a base and top coat color. You can use whatever color(s) you want.

* Foam Paint Brush

* 1" Chip Brush Paint Brush

* Trim -- I used a natural rope with a 1/4" diameter. You can use anything you like: ribbon, rick rack, twine, rope, etc...

Tools Needed:

* Ruler

* Scissors

* Hot glue gun and glue sticks

* Iron

I have painter's tape in the photo but I ended up using Glad Press'n Seal instead to protect the painted frame from the spray adhesive. You can see it in the photos below. Try it yourself!

You need a Plain Bulletin Board - This one is Great!

Quartet Cork Bulletin Board, Framed Corkboard, 2' x 3', Oak Wood Frame, Message Board, Vision Board (MWDB2436-ECR)
This bulletin board is a great size for almost any room in the house. Mine was a bit smaller because of where I was going to hang it. Measure your available space first and then purchase a bulletin board. That way you'll be buying the right size for your room.
 

Step by Step for my DIY Bulletin Board - Just click the photo or arrow to go through the steps

Click thumbnail to view full-size
I set the board on a basket so I could paint the frame top and sides easily. I started by painting the frame black.I didn't worry about full coverage. Remember, I wanted it to look vintage or aged so the wood peeking through was great. I let this dry completely.I didn't have the lime green paint so I mixed an apple green with white acrylic paint to get a more "yellow" or lime color.I blended the colors with another small paint brush until I liked it.I used my chip brush next. To do a dry brush technique, I dipped just the ends into the lime paint and then dabbed it on the paper plate.I dabbed until little paint was left on the uneven bristles.This is what it looks like when I just make one stroke over the black paint. Dry brushing is layering or going back over it until it looks good.Here it is after I have gone over it a few times. I liked it so I moved onto the next side. Let it dry completely.I ironed & cut my fabric about 2" larger than the inside portion of the bulletin board. I pressed my straight edge ruler against the frame...with the fabric over it and drew a line with an ink pen. I did this on all 4 sides and then cut it out. It should fit perfectly inside the frame.Here is the fabric cut and ready to be adhered to the board.I sprayed the adhesive on the board only because I wanted it to be "repositionable" until I had the bubbles worked out and it in place.I laid the fabric at the bottom edge first and worked my way up. I used my trusty ruler to push out any bubbles working from the bottom to the top.I cut my rope for the top and bottom portions first making sure it fit frame to frame. I cut my side pieces. I used my glue gun to attach the rope.I glued to top and bottom rope first and then went back to do both sides. I attached the hanging hardware that came with the bulletin board. Finished!Here's a close up of my DIY retro style bulletin board.I just love it!!! Can't wait to hang it on the wall.
I set the board on a basket so I could paint the frame top and sides easily. I started by painting the frame black.
I didn't worry about full coverage. Remember, I wanted it to look vintage or aged so the wood peeking through was great. I let this dry completely.
I didn't have the lime green paint so I mixed an apple green with white acrylic paint to get a more "yellow" or lime color.
I blended the colors with another small paint brush until I liked it.
I used my chip brush next. To do a dry brush technique, I dipped just the ends into the lime paint and then dabbed it on the paper plate.
I dabbed until little paint was left on the uneven bristles.
This is what it looks like when I just make one stroke over the black paint. Dry brushing is layering or going back over it until it looks good.
Here it is after I have gone over it a few times. I liked it so I moved onto the next side. Let it dry completely.
I ironed & cut my fabric about 2" larger than the inside portion of the bulletin board. I pressed my straight edge ruler against the frame...
with the fabric over it and drew a line with an ink pen. I did this on all 4 sides and then cut it out. It should fit perfectly inside the frame.
Here is the fabric cut and ready to be adhered to the board.
I sprayed the adhesive on the board only because I wanted it to be "repositionable" until I had the bubbles worked out and it in place.
I laid the fabric at the bottom edge first and worked my way up. I used my trusty ruler to push out any bubbles working from the bottom to the top.
I cut my rope for the top and bottom portions first making sure it fit frame to frame. I cut my side pieces. I used my glue gun to attach the rope.
I glued to top and bottom rope first and then went back to do both sides. I attached the hanging hardware that came with the bulletin board. Finished!
Here's a close up of my DIY retro style bulletin board.
I just love it!!! Can't wait to hang it on the wall.

Doesn't it Look Great?

Retro Style Bulletin Board

My motto is "If I can't find what I want -- I'll DIY it!"

DIY-ing is an adventure, fun and makes me smile, just like this bulletin board. I love the colors, the print and the vintage or retro feel of the frame and rope trim. I can't wait to get it hung and start using it.

Now all I need are some cool, coordinating push pins. Guess I'll start looking. If I don't find them, it's back to DIY-ing!

DIY Bulletin Board Supplies - Get Everything You Need to Make Yours

Krylon K07020007 10.25-Ounce Easy Tack Repositionable Adhesive Spray
I think it's important to use a spray adhesive that allows you to re-position the fabric before it sticks forever. This one will do the trick!
 
Loew-Cornell Chip Brush Set, 12/Pkg
I can never have too many Chip brushes. I find the 1" size is perfect for most of my projects but they are available in bigger widths too!
 
Wellington Cordage 11345 1/4-Inch X 100-Feet Natural Fiber Twisted Sisal Strand Rope / Twine
This is the exact rope (twisted sisal) I used for this project as the trim. You can change it up and use ribbon, twine, rick rack and more!
 

Check Back...

You'll have to check back to see finished pictures of my office/craft room "Command Center". Not quite ready to unveil that yet!

Thank you for stopping by!

Do Come Back and See Me Again!

~ DecoratingforEvents ~


back to top

Squidoo is a FREE format that offers you the opportunity to write about your favorite niche topic and make an income or donate to charity at the same time! What could be better?

Click the Squid for more information...

working

This website uses cookies

As a user in the EEA, your approval is needed on a few things. To provide a better website experience, hubpages.com uses cookies (and other similar technologies) and may collect, process, and share personal data. Please choose which areas of our service you consent to our doing so.

For more information on managing or withdrawing consents and how we handle data, visit our Privacy Policy at: https://corp.maven.io/privacy-policy

Show Details
Necessary
HubPages Device IDThis is used to identify particular browsers or devices when the access the service, and is used for security reasons.
LoginThis is necessary to sign in to the HubPages Service.
Google RecaptchaThis is used to prevent bots and spam. (Privacy Policy)
AkismetThis is used to detect comment spam. (Privacy Policy)
HubPages Google AnalyticsThis is used to provide data on traffic to our website, all personally identifyable data is anonymized. (Privacy Policy)
HubPages Traffic PixelThis is used to collect data on traffic to articles and other pages on our site. Unless you are signed in to a HubPages account, all personally identifiable information is anonymized.
Amazon Web ServicesThis is a cloud services platform that we used to host our service. (Privacy Policy)
CloudflareThis is a cloud CDN service that we use to efficiently deliver files required for our service to operate such as javascript, cascading style sheets, images, and videos. (Privacy Policy)
Google Hosted LibrariesJavascript software libraries such as jQuery are loaded at endpoints on the googleapis.com or gstatic.com domains, for performance and efficiency reasons. (Privacy Policy)
Features
Google Custom SearchThis is feature allows you to search the site. (Privacy Policy)
Google MapsSome articles have Google Maps embedded in them. (Privacy Policy)
Google ChartsThis is used to display charts and graphs on articles and the author center. (Privacy Policy)
Google AdSense Host APIThis service allows you to sign up for or associate a Google AdSense account with HubPages, so that you can earn money from ads on your articles. No data is shared unless you engage with this feature. (Privacy Policy)
Google YouTubeSome articles have YouTube videos embedded in them. (Privacy Policy)
VimeoSome articles have Vimeo videos embedded in them. (Privacy Policy)
PaypalThis is used for a registered author who enrolls in the HubPages Earnings program and requests to be paid via PayPal. No data is shared with Paypal unless you engage with this feature. (Privacy Policy)
Facebook LoginYou can use this to streamline signing up for, or signing in to your Hubpages account. No data is shared with Facebook unless you engage with this feature. (Privacy Policy)
MavenThis supports the Maven widget and search functionality. (Privacy Policy)
Marketing
Google AdSenseThis is an ad network. (Privacy Policy)
Google DoubleClickGoogle provides ad serving technology and runs an ad network. (Privacy Policy)
Index ExchangeThis is an ad network. (Privacy Policy)
SovrnThis is an ad network. (Privacy Policy)
Facebook AdsThis is an ad network. (Privacy Policy)
Amazon Unified Ad MarketplaceThis is an ad network. (Privacy Policy)
AppNexusThis is an ad network. (Privacy Policy)
OpenxThis is an ad network. (Privacy Policy)
Rubicon ProjectThis is an ad network. (Privacy Policy)
TripleLiftThis is an ad network. (Privacy Policy)
Say MediaWe partner with Say Media to deliver ad campaigns on our sites. (Privacy Policy)
Remarketing PixelsWe may use remarketing pixels from advertising networks such as Google AdWords, Bing Ads, and Facebook in order to advertise the HubPages Service to people that have visited our sites.
Conversion Tracking PixelsWe may use conversion tracking pixels from advertising networks such as Google AdWords, Bing Ads, and Facebook in order to identify when an advertisement has successfully resulted in the desired action, such as signing up for the HubPages Service or publishing an article on the HubPages Service.
Statistics
Author Google AnalyticsThis is used to provide traffic data and reports to the authors of articles on the HubPages Service. (Privacy Policy)
ComscoreComScore is a media measurement and analytics company providing marketing data and analytics to enterprises, media and advertising agencies, and publishers. Non-consent will result in ComScore only processing obfuscated personal data. (Privacy Policy)
Amazon Tracking PixelSome articles display amazon products as part of the Amazon Affiliate program, this pixel provides traffic statistics for those products (Privacy Policy)
ClickscoThis is a data management platform studying reader behavior (Privacy Policy)