Seed Starting in Soil Blocks; Part 1 of 3

JUST WHAT THE HECK ARE SOIL BLOCKS ANYWAY?
Soil blocks are basically a peat based potting mix is soaked with water and packed into a gadget, the soil block maker. You set the block maker on a steady surface and push the plunger down while at the same time you are lifting up on the block maker. A neat row of compressed soil cubes results. By using different forms in the block maker you can make different size and shaped holes in the top of the blocks.
Soil blocks are very popular in Europe where farms are small and intensively cropped. Even with short season crops the farmers can make more money by starting their seeds in soil blocks in a small protected area and transplanting them into the field at the right stage. For many vegetables this means the farmer is able to grow an extra crop (sometimes more) each year.
Soil blocks of a sort were used by the Aztecs in ancient Mexico and many old gardening books will have you turn a chunk of turf upside down and plant melon seeds on top. In the 1800's and early 1900s Holland and other European countries developed mechanical soil blockers. Today one of the most popular brands sold in the United States is the Ladbrooke, designed and manufactured in England.


WHY USE SOIL BLOCKS?
There are many reasons to use soil blocks. Some of these might be more or less important to you depending on whether you are a farmer, gardener, have a lot of space, how much time and money you have to spend on your garden, etc.
*soil blocks eliminate plastic pots from the gardening scene, reducing the pollution of manufacturing and disposal. Some European nurseries use soil blocks instead of plastic pots, customers bring their own flats to carry their seedlings home in.
*soil blocks provide almost perfect conditions for seed starting
*soil blocks can increase the amount of food harvested in a given area. This is achieved in several ways. First by setting out month old transplants instead of direct seeding, you are assured a full stand of mature plants at harvest, no skips or gaps in the rows. Secondly, if a plant matures in 3 months from seed it can spend it's first month in a soil block and only needs 2 more months in the field. This means even in a six month growing season you can grow 3 crops instead of 2.
*Soil blocks can reduce water use. Plants growing in soil blocks need much less water than plants growing in the field, they take up less space than the same number of plants direct seeded in the field.
*Soil blocks can reduce labor, tractor and herbicide costs. Plants growing in soil blocks never need thinning or weeding. By cultivating a field right before transplanting the seedlings in their soil blocks the farmer can kill a lot of weed seedlings without using herbicides.
*for large operations the block making and seed sowing process has been mechanized. Transplanting can also be at least partially mechanized to reduce labor costs.

WHAT CAN I PLANT IN A SOIL BLOCK?
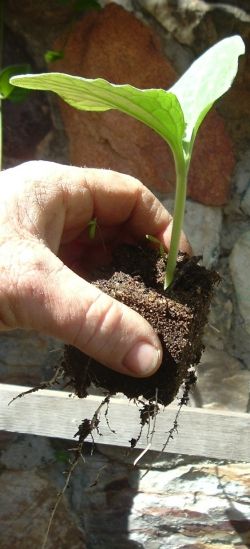
You can plant anything in a soil block that you would plant in a plastic pot and you can use soil blocks to transplant things that are not traditionally transplanted, like beets and carrots. This is because with soil blocks, there is no transplant shock. If you set your blocks over fine wire mesh then the plant roots will grow to the edge, hit the air and stay put. Instead of turning and following a solid wall, they will simply start branching out. So they are never root bound. As soon as the blocks are transplanted to moist soil in the field they are ready to grow like gang busters. And since you never have to touch the roots or pull or break them, the plant is never set back.
Since I have a terrible problem with Blue Jays, Crackles and Quail pulling up seedlings like corn, peas and beans, I often start them in soil blocks and when they are a couple inches tall I can plant them out. By then the seed itself has done it's job and disappeared and the birds don't usually bother them at this stage.
Extra large soil blocks can be made with a long thin hole in the middle, just right for rooting cuttings. There are special forms for the soil blockers that can make neat holes in the tops of larger blocks that are just the right size to take a smaller block. For instance I use a blocker that makes 20 tiny cubes, 3/4's of an inch square. I use a lot of these in early spring for starting things like tomatoes, peppers and eggplants. Using these tiny cubes to germinate the seedlings, I can pack about 200 seedlings on my heating mat. As soon as they germinate I make up larger blocks, 2" on each side. I use the 3/4 inch form in the top, so when I make the 2" block it will have a 3/4" square hole in the top, very easy to drop the little mini cube into the hole.
There is even a huge 4" cube maker. It's pretty pricey (around $100 in the fall of 2011) so it's still on my wish list. However, it can be made to accept the 2" blocks so even if the weather is not warm enough and your tomatoes are outgrowing their blocks you can shift them up. The 4" block holds the same amount of soil as a 6" plastic nursery pot but due to the cube shape you can pack a lot more of them into your space.

WHAT KIND OF SOIL DO I NEED TO MAKE SOIL BLOCKS?
Soil recipes for soil blocks are as individual as the farmer or gardener making them. They do all have some things in common, however. Most recipes are based on peat moss because of it's fibrous texture and it's terrific water holding capacity. Some people find that there may be a local material with similar properties that they can use to replace part or all of the peat moss. Fine vermiculite or perlite are also often used because in addition to absorbing and releasing water like little sponges they also help create pore space for oxygen. (Plant roots need oxygen to function properly, that is why plants that are not adapted to it die in water logged soil, the water has replaced the oxygen). Many recipes, especially for larger blocks use some fine, well aged compost. Good compost will have properties similar to peat moss and will supply some nutrition for larger seedlings. (Peat moss doesn't really have any plant food value).
The potting mix texture is one of the most important things. The soil mix should be fine, peat moss bought by the bale or bag should be rubbed through an 1/4th inch hardware cloth screen to remove lumps and sticks. Compost should be sifted through the same size mesh. For the mini blocks, since they are only three fourths of an inch on each side to begin with, the ingredients should be sifted through 1/8th inch screens. Otherwise small lumps, sticks or pebbles will interfere with the block making. In addition to a fine texture, the soil mix should be able to absorb a great deal of water. If you make up a batch and squeeze a handful of wet mix in your fist you should be able to handle it gently without it breaking up. When it dries a bit you should be able to water it with a fine mist without it dissolving into a puddle.
EASIEST SOIL BLOCK RECIPE FOR MINI BLOCKS
The very easiest thing to use, especially for the mini blocks is a commercial seed starting mix that has a very fine texture. Check the ingredients, you want one basically made of peat moss and vermiculite. These are usually ready to wet down and use right from the bag, without any sifting or mixing
Elliot Coleman Recommends
This is the recipe that Elliot Coleman gives in his book, Four Season Harvest. (p. 99)
4 buckets commercial peat-lite mix
2 cups organic fertilizer blend
3 buckets compost
Mix together thoroughly.
Elliot recommends mixing in the fall and storing over winter for the soil mix to 'mellow'. There is some evidence that some types of fertilizers should not come in contact with germinating seeds, therefore I would not recommend adding fertilizer if you are going to use the mix right away.
Elliot Coleman is a very inspirational gardening author. He just makes so much sense when he explains things, like how to work smarter by getting out of the way and letting Mother Nature do more of our work for us.


MAKING SOIL BLOCKS
To keep this page from getting way too long, I'm going to split it up into 'chapters'. After you read the rest of this page, you can go to my next article Making Soil Blocks where I will show you step by step how to make soil blocks.

I love to hear from my readers, whether it's a pat on the back or some constructive criticism, I want to hear from you!


")
")
