How to Build or Make Your Own Custom Picnic Table

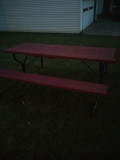
End View

Building a picnic table for your family can be a relatively inexpensive way for a weekend builder to exercise and showcase their amateur carpentry skills. I resisted the urge to build one for a long time, but finally someone asked me to make one.
I shopped around for the costs of kits, alternative materials and lumber and decided to make mine from scratch, from traditional lumber. Total costs were under $40, and the project took me less than six hours. The planning, preparation, shopping, a lunch break and even the time spent waiting for each coat of polyurethane to dry was included in that six hours.

First I looked at standard plans and was about to go with those, but I wanted to customize the picnic table to better suit the person who would use it. I took measurements of that person’s lower leg to set the scale for the table’s seat and table heights. I measured from the crease in the back of the knee to the ground and came up with fifteen inches for the height of the seat. Then I took two thirds of that amount to determine that the table’s top needed to be ten inches above the seat. From there I was able to adjust the dimensions of standard picnic table plans to better suit the person who would be using it.

I then revised the sketch of the plan I would use. The most noticeable change from a standard plan was to make the table eight feet long instead of six, partly because the price of eight foot lumber was actually cheaper than six foot lumber, and partly because the lower height added stability, which meant a longer table would still be sturdy.

Next I used my carefully drawn sketch to make templates for the angles of the braces and the frame, extending the lines from the sketch onto cereal box cardboard, cut them out, and wrote the measurements right on the templates. Next I brought out the wood and the tools and set up a boom box so I could listen to the radio while I worked. I measured and marked all the lines I wanted to cut, prudently trying to minimize the amount of scrap. After careful consideration I realized I’d have two pieces of 2”x4”x8’ lumber left over. Oh well, something for the next project…

I used a circular saw to cut all the pieces for the frames and braces and laid them one on top the other to make sure the ones that had to be the same, were the same. Then I measured and laid out the frames and re-measured to make sure they were right before screwing them together. I used 3” decking screws, ignoring the standard plan’s requirement for carriage bolts. Attaching the braces to the frames and the frame’s ends to their center support was a challenge, one I met by pre-drilling the holes for the 3” decking screws with an 1/8” drill bit. This ensured the screws would go in straight. For this step, an assistant or a set of clamps would have been helpful, but I had neither and made do without.

Finally, the frames and braces stood on their own. I re-measured everything to ensure it was right, and it was, so I proceeded with attaching the benches. I attached them using 3” deck screws, sinking their heads just below the surface. At the center of the bench seats I added a block underneath to keep the gap between the bench boards constant, to prevent the boards from pinching someone’s behind when they stood up. I chose to do this based on a story I heard about an unfortunate picnic table accident. During a summer barbeque at a lake, a person’s swimsuit bottom was pulled down when they stood up.

I used drywall screws to attach the table’s top, because I could drive them in just below the surface to make the later job of sanding easier. Attaching the table’s top was confounded by one board that wasn’t straight or flat. I put that board toward the center, and attached it last, using guile and strength to wedge it into its proper place. With the screws holding it down and the other boards pressing its sides, the board should gradually conform. I’ll wait a week and if it’s still not cooperating I’ll replace it.

The final step was sanding and sealing. I started with 80 grit paper wrapped around a block of wood, going over every top and side surface of the benches and table tops twice, then again with 80 grit sandpaper. For the final sanding with 120 grit sandpaper I didn't use the wood block, choosing to press the paper with my hand, to get into the low spots, corners, nooks and crannies. Then I brushed away the dust and wiped all the sanded surfaces with a cloth that was lightly dampened with mineral spirits. Finally I used a full spray can of polyurethane to put on three coats, waiting thirty minutes between each coat.
The last thing I did was sit at the table and drink a glass of iced tea.
Materials:
Eight, 8 foot long 2"x4" boards
Four, 8 foot long 1"x6" boards
3" decking screws
1&1/4" drywall screws.