Quickbook Tutorial : How to Enter a Bill

QuickBooks for Small Busines
If you run a small business, you will probably agree that bookkeeping and maintaining financial records is vital in having a successful and profitable business. If you own QuickBooks, you are in luck, as QuickBooks makes this process easy.
This article is a free QuickBook tutorial that will teach you how to enter a bill into QuickBooks. It’s a simple process, yet one that can seem daunting if you are new to QuickBooks,
Get Paid on Hub Pages Too!

This free online Quickbooks tutorial is made on the assumption that our readers are using Quickbooks Accounting Small Business Edition 2010-11. If you are using a different Quickbooks version is simply means that there might be a slight variation in the wording in your version. For example the term 'vendor' is also referred to as 'supplier' in some versions.
How to Enter a Bill into Quickbooks in 6 Steps
1. Select Suppliers from the menu at the top of the software navigate to Enter Bills from the pull-down menu. A pop-up box Enter Bills will appear. You will need to maximize this pop-up box to fill in details more clearly and accurately.
2. Select the Supplier from the pull-down menu. The address details of the supplier should auto-fill.
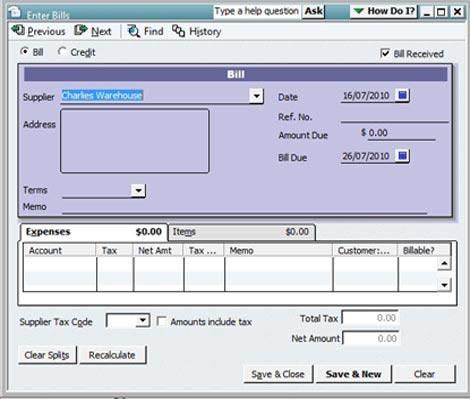
3. Next, you will need to fill in the details of the invoice such as the date, amount and due date.
4. You will notice that the Expenses tab is the default shown. You will need to enter the type of expense that this bill relates to such as supplier or marketing. If there is additional detail in regards to this expense, type it into the memo field.
5. Next, select the Items tab and enter the specific product and/or services that this invoice belongs to. You will also notice the empty fields for Description, Quantity, and Cost and Tax. Fill these in too.
6. Move down along the screen to enter any more items needed. Be sure to hit the recalculate button to get an updated total.
![QuickBooks Desktop Pro 2018 [PC Online Code] [OLD VERSION]](https://m.media-amazon.com/images/I/41VzeOcE71L._SL160_.jpg)


