My DIY Projects: The Ugly Brass Chandelier


The Inspiration
My husband and I recently bought our first home, three cheers for home-ownership! Anyway, as most married couples know, compromise is extremely important in a marriage. This DIY project demonstrates both my and my husband's willingness to compromise.
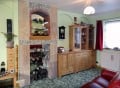
Obviously the chandelier to the right is not a brass chandelier, in fact, this is the chandelier I want to purchase. It's from JCPenny and costs $114.99 by itself, plus $34.99 for the set of 6 shades, totaling $149.98. So $150 for this chandelier, sounds good to me! Unfortunately, my husband wasn't so excited.
Becoming a homeowner has lots of new costs to worry about, including homeowner's insurance, property taxes and homeowner's association fees, not to mention the normal costs of living, car insurance, water bills, electricity... Long story short, we were more concerned about saving money and paying ahead on our bills than getting a new chandelier.
If I wanted a new chandelier, it was going to have to wait...
Our Brass Chandelier
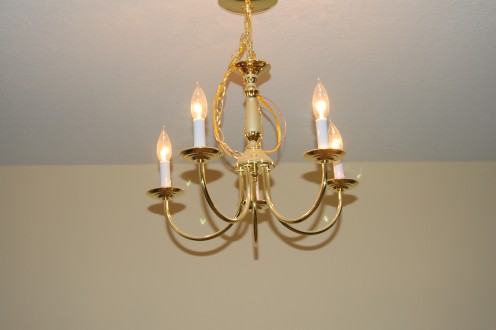

Nice right? So apparently it's required by local building codes for home-builders to put up a
light fixture in newly built homes to prove it's electrical work has
been done correctly. So as one might expect, the home-builder installs the cheapest standard fixture they can buy in bulk.
Moving on, we were pleased to find our very own 60's inspired polished brass chandelier hanging in our new dining room.
Now I know what you're thinking, "Polished brass doesn't sound so bad and at its better than nothing." Well I agree it's better than nothing, but check this thing out! I actually found an identical chandelier on Amazon and this is what the 1 and only review said:
"Cheap,cheesy and flimsy this fixture will grace my garage bays when I replace it with something more substantial. Brass plating looks fake and arms are easily moved so that it looks crooked all the time."
I couldn't have said it better myself Timothy, who gave this gorgeous dining room focal point a whopping 2 stars! I have to say, Timothy was a bit more generous than I would've been.
What You'll Need
Ugly Brass Chandelier
Medium Grade Sandpaper
1 can of Oil-Rubbed Bronze Spray Paint (Available at Lowes or Home Depot)
5 - 6 Clip-on Chandelier Shades (Number will depend on the amount of lights on your chandelier)
Black Sharpie Marker (For touch-ups)
Large piece of cardboard (For drying)
- Ceiling medallion (If desired)
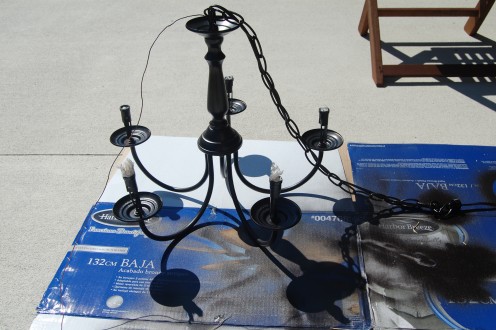
The Chandelier Makeover
As you can probably tell, I hate this ugly chandelier. If my husband didn't want us buying a new one, there was only one other alternative we could agree on was to try our hand at redoing it to look like the one I wanted from JCPenny.
The overall structures of the chandeliers were actually somewhat similar. Each had arms that curved out to a candelabra inspired socket. With shades on, the two would seem almost identical except for color, mine being brass and theirs being oil-rubbed bronze.
Last thing to do was get all our supplies and get to work!
Buy Supplies On Amazon

Step By Step Directions
- If the chandelier is currently installed, switch the power off and take the chandelier down. Make sure you take the bulbs out.
- Sand the chandelier thoroughly. It's best to do this over newspaper for easy cleanup and wear safety goggles to avoid getting debris in your eyes.
- Once you've finished sanding the chandelier, wipe of any remaining dust with a wet paper towel. Allow to air dry.
- Lay the cardboard outside on the ground. This will prevent getting any flyaway spray paint on your patio or driveway. You can also try a grassy area.
- Begin painting the chandelier. You may want two people for this part, one to hold the chandelier and
chain up, and the other to actually paint the chandelier.
- Hold the can of spray paint about 2 feet away from the chandelier to avoid paint drips. Don't forget to paint the chain or cord, as well as the bottom of the chandelier.
- Once evenly coated, continue holding the chandelier up until the bottom is dry enough to set down on the cardboard. Then let the chandelier air dry for about 30 minutes.
- Time to hang your newly bronzed chandelier back up. Make sure your hands are clean and to not get any paint on the ceiling. This is an ideal time to install a ceiling medallion if desired.
- Once installed, put the light bulbs back in and turn the power back on to make sure it's wired properly.
- Now it's time for some touch-ups. Unfortunately it's very likely that you'll miss some areas as you're spray painting, but not to worry, your black Sharpie can cover up any minor areas you may have missed!
- Finally, put on your chandelier shades, making sure they're all on straight and level.
The Final Product: Before And After

JCPenny Total Cost
Had we purchased the chandelier I wanted from JCPenny, here is the rundown of what the total cost for the JCPenny Chandelier would've been:
- Chandelier: $114.99
- Shades: $34.99
- Shipping and Tax: $17.94
TOTAL COST: $167.92
Our Total Project Cost
Both my husband and I couldn't be happier with our decision. Here's our final total for all our supplies:
- Brass Chandelier: Free
- Sand Paper: $2.00
- Shades: $34.99
- Spray Paint: $6.00
TOTAL COST: $42.99