3D Printing Top Tips; 4 Common User Pitfalls

A Collection Of Useful Tips To Help Your 3d Printing Journey
There's nothing worse than starting off with a project only to reach the mid-way point and wishing you'd spent a little more time researching the ins and outs to begin with. To help against that, here are some top tips to help your 3D printing go smoothly.
Does the idea that you can create 3d stuff on a printer interest you?
To Begin With
Before you go and spend heaps of money on a 3D printer, first ask yourself what it is you want to get from it. If it's to test new technologies, to enjoy the building of something from a kit form or to fulfil a niche in your design processes at home or at work, then do some research first as to which printer will fit your needs.
Most 3D printers available are capable of printing the basics, like smartphone cases and oddshapedde corations, but if you have something more specific in mind, you may need to hunt around for a model that's capable of producing intricate designs. Get the dimensions of the print bed, the height the printer is able to print to and how fine a level of detail it's capable of achieving. If you think you've found the perfect printer, take a moment to browse the forums of the respective device and see what kind of support is offered by the company that made it.
Also, while you're there, check out what problems tend to arise from other users, and any tips they may have for that particular model.
Remember, too, if in doubt, don't be afraid to ask a question on a forum. Most forum users are more than happy to help and will offer some useful advice. It's worth mentioning here that once you've picked the model of printer and before you commit to the purchase, check out the price of the consumables, (i.e. the plastic used to print with). Most printers are generic in their use of the plastic, but some do require a specific brand, which may cost considerably more than the competition. While the printer may be reasonably priced, the consumables could cost more than twice that of other printers. Take your time and do a little research.
If you're planning on grand schemes and building your own business based on the 3D models you're going to print, think about the type of printer you'll be using. Is it robust enough for continual, daily printing? Does it eat through consumables faster than other printers, raising the overall cost? Is the software that communicates with it capable of handling your designs?
There are undoubtedly many more questions you need to ask yourself if 3D printing is going to provide a potential income for you, so once more check out forums, ask questions and see if it's possible to find out which 3D printers the competition are using.
Finally, for this section, if you're building your printer from a kit, make sure you have all the necessary tools at hand. Check in the instruction manual, usually at the beginning, that you have everything and that it's suitable for the job. Using a wooden ruler in place of an accurate calliper isn't an option in most cases. Also, read ahead a little during each step of the building process. There's nothing worse than reading something like 'screw X into Y', and after scrolling down, seeing in big red print 'DO NOT OVER TIGHTEN!'
Designing And Printing
Although most 3D modelling software is compatible with virtually every 3D printer available, there'll be some that require a particular program to communicate with the printer. In this case, make sure your designs are compatible with the software and that they can be imported easily without too much adjustment.
Consider limiting the number of polygons your 3D model has. Make sure your design has no unnecessary polygons or internal surfaces. Eliminating these can improve the speed the design is converted to G-code, read by the printer or generated to an .STL file. Knowing your printer's limitations will help cut out a wealth of problems in the long-term. Are the model details too small? Are they too big? Remember, the width of the thread is determined by the diameter of the printer nozzle. Generally, most printers have a 0.4mm or 0.5mm nozzle, which means anything printed is always two thread widths deep: 0.8mm thick with a 0.4mm nozzle to 1mm thick for a 0.5mm nozzle. It's been said by many professionals that the smallest feature you can create is double the thread width.
Supporting your designs can be a problem. If you're not careful, your design can be subject to all sorts of warping if it's not supported correctly -if you print something with a thin or small base, for example. To help combat warping, consider using mouse ears, which are circular supports on the bottom of an object, to give the structure some foundations to build on. They're easy to snip off when complete without marking or deforming the rest of the design. Controlling the rate of flow of the plastic through the nozzle can drastically alter the result of your design. If it's possible, through your control software, consider increasing the flow to allow the maximum amount of plastic to build the design, but don't flood it. This is a fine balancing act at times.
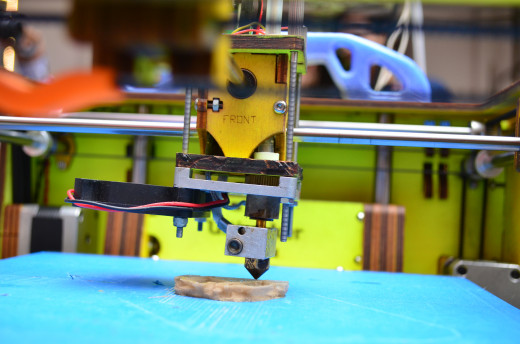
Orientation is a vital element of 3D printing that's often overlooked. An object you've designed may look great on the screen, but printing it is entirely different. Take a table shape, for example. Printing from the legs up is out of question, but turning it 180° will allow the printer to print it out correctly. Make sure your print bed is as level as possible, and the correct distance from the nozzle on all four corners and the centre. While it's may seem almost impossible to get the bed completely level, having it close allows the prints to layer up without any snagging when the nozzle moves across the bed following the design.
Additionally, some printer beds have a slight curve towards the centre, usually where the thermistor is located (if your printer has one). These are usually the kit built printers, and you can solve this by gently bending the centre bulge down, which over time will eventually
disappear. If you're printing with ABS, make sure your printer bed is thoroughly preheated to avoid edge curling in your designs.
Finally, make sure you regularly clean your printer bed with rubbing alcohol, as the oils from your hands can cause problems and stop the design from sticking to the printer bed.

3D Printing: 4 Common Pitfalls
As with any other mechanical and electrical device that requires human intervention and is subject to open conventions, in that users from around the world can contribute to it, there are inevitably going to be some pitfalls that the unsuspecting user will no doubt come to experience over time. From the building of a kit, to the design process, through to the actual printing of the object in question, there's plenty that cango wrong and many hidden problems to overcome. Let's address them now...
1. Design Pitfalls
The first pitfall that plagues many new 3D printer users is the fact that the designs they download, from various sources, simply won't print. There could be a number of issues relating to this, from a poor design in the first place, through to some hidden driver problem. More often than not, though, it's simply down to the fact that the job in question is just too much for the model of printer you have. Remember, not all free-to-use models are designed with a home 3D printer in mind; most are tested out on a commercial device, with unwavering accuracy and teams of engineers at hand to tweak it to perfection.
One of the most common of all design pitfalls relates to the objects being designed in the modelling software not being 'watertight' or solid. Solid, watertight or manifold basically means the model is a single, complete enclosure, so if it were to be filled with water, for example, nothing would come out. You can create patterns in the object, but generally speaking for the home 3D printer, every edge in a model must be bordered by two other faces.
2. Plug And Pray
First off, 3D printing, at the moment at least, isn't as easy as some would lead you to believe. Building a 3D printer from a kit is a complex affair, and understanding the instructions, rough translations and in correct images can make for a rather stressful project.
Additionally, an off-the-shelf product also has its fair share of nuances, with incomplete instructions, incompatible software and issues with feeding the plastic through the extruder. Just remember that this is a long-term project, and more often than not you won't be able to simply plug a 3D printer in and expect to design an elaborate chess set within minutes. Also, be prepared for some significant trial and error when it comes to the first half dozen or so prints you send through. As you'll soon find out, not all designs are created equally, and while some may look wonderful on the screen, when it comes to the printing of them, they can rarely resemble your idea of what it should eventually look like.
The lack of a flat printer bed or flat surface for the printer is a common issue among many users. The instructions that came with your printer should detail how to fine tune your settings and check the bed is flat and level. Beyond that, make sure the surface the printer is sitting on is also flat.
Added to all that we the fact that many 3D printers have somewhat questionable accuracy, and while the computer control program side of the printer may state that the nozzle is0.25mm from the base of the printer, it can stray from frequent use, loose bolts and poor maintenance. Therefore, it's always worth checking everything before you go and send a job through to print.
3. Printing Fail
More often than not when starting out, you'll be making some pretty critical errors, which you'll kick yourself for in time. One pitfall that most new users fall into is temperature. Although this isn't set in stone, the temperatures of PLA can differ depending on the colour. Why? We have no idea, but use trial and error here. As well as that, the ambient temperature of the room can also greatly affect the result in that draughts and a cold environment can cause lifting of edges, curling and an uneven setting of the PLA, which can solidify the top section before the lower and make the print job fall over.
Most exposed kit build 3D printers suffer from environmental temperature fluctuations, while off-the-shelf units tend to be more enclosed. The general consensus in this case is to print in a warm, evenly heated room or enclose the printer in a box. Because of the temperatures needed to melt the plastic, it also common for faulty G-Code to set the temperature to an incorrect value to begin with. So before printing, it's worth looking through the start-up section of the G-Code to check the initial temperature. G-Code issues, as already mentioned, can be a very common pitfall. Some G-Code may contain a simple mistake, in that the incorrect temperature may be set (as above) or that the bed isn't heated first. Others may have glaring problems that could even affect the motors or damage the printer. Either way, it's always best to check, before you commit the job to the printer, if you don't have software that'll check the G-Code for you first..
Finally, the problem of not reading the manual or instructions properly and going ahead with an all-out, loose cannon style approach to printing something is unfortunately all too common in this industry.
4. Keep A Level Bed
If you have significant curling, then try these steps:
• Place a sheet of paper on top of your build platform.
• Move the print head to a corner of the build platform and home the Z-axis. This should start to pinch the paper between the print nozzle and the printer bed.
• Wobble the piece of paper and adjust the height of that corner. Keep raising the bed on that
corner until you can feel a bit of tension on the paper, as the print head and bed begins to pinch. Repeat for each of the three other corners of the printer bed.


