- HubPages»
- Technology»
- Computers & Software»
- Computer Software
A Budgeted Girl's Answer to Photoshop: A Beginner's Guide to Photo Editing and Manipulation Using GIMP 2.6

Introduction
GIMP, short for GNU Image Manipulation Program, is a free, open source software available for download at www.gimp.org. This program is a great alternative to many commercially available photo editing and manipulation programs, such as Photoshop. Though I believe that this guide is applicable to the most recent versions of GIMP, this guide is based on version 2.6, which can be downloaded at http://gimp-win.sourceforge.net/old.html. Though 2.8 is the most recently available version, I have found that some people still prefer version 2.6. To explore the differences I downloaded 2.8 and made a video. This video can be found at the end of this article, but please forgive any failure to demonstrate effectively all the nuances of my article in my video. I am new to video recording. I hope this guide helps you find some foundation, regardless of which version you find more comfortable. I will update any differences between the two, if there are any of significance.

CONTENTS
- Opening an Image
- What Windows (Docks) Should Be Opened When You Begin
- Preparing Your First Layer
- Editing the Layer and Removing Backgrounds/Objects
- Opening Multiple Layers
- Reordering and Moving Layers
- Scaling an Image Layer
- Flipping an Image
- Finishing Your Image


Opening an Image
There are some who have little experience copying or saving an image, and this beginning section is for those individuals. If you are versed in this area, you might want to skip to the next section. Below covers the basics of acquiring an image from the internet or opening an image on your computer.
I used some images from Wikimedia Commons for my examples, but you could use any images that are available to you, such as personal photos from your computer. Wikimedia Commons is a great place to find images that are legally and freely distributed. I chose a great image of a mushroom, "File:Amanita Muscaria 21", from creator Huhu Uet to use for my first example. By right-clicking on the image (FIGURE 1.1), I have the option to either "Copy Image" or "Save Image".
- First, I need to select my internet image. To do this, I right-click on the image that I want to use, in this case "File:Amanita Muscaria 21" from Wikimedia Commons, and I select from the menu "Copy Image" or "Save Image". (FIGURE 1.1)
- Paste the image directly into the body of GIMP (FIGURE 1.2) or open a saved file by finding the "File" menu at the top left of the Gimp screen and choosing "Open". You can also choose "Open As Layers", if you are working on multiple images.
- If you choose to open a new file, you will be prompted to decide the height and width of your image manually or by choosing a template (FIGURE 1.3). I have found that the template 800 x 600 worked very well for me when uploading images for Hubpages.


What Windows (Docks) Should Be Opened When You Begin
Before starting your image, you should check that at least two docks (windows) are opened for easy access, the "Toolbox" window and the "Layers, Channels, ..." window (Figure 2.1). Though both of these should be opened when you start GIMP, they have disappeared on me before. If they are missing, go to the "Windows" toolbar on the top of the screen and find "Recently Closed Docks" where you can reopen either of these two missing docks. (Figure 2.2.) Another window to have around, if it is not already imbedded in your "Layers, Channels, etc..." dock, is the "Undo History" window, which can be found under "Dockable Dialogs" in the "Windows" options. (See Figure 2.2)
Preparing Your First Layer
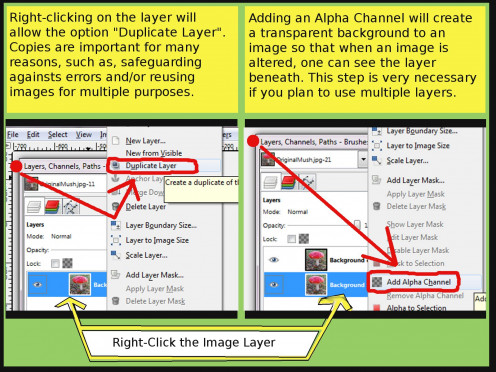
Now that you have the first image with which you are going to work, I would advise you to add an Alpha Channel to your image layer and duplicate that image.
- Adding an Alpha Channel: An Alpha Channel creates a transparency onto your image layer. Adding a transparency will allow you to cut away portions, or otherwise edit your photo, while allowing another image layer beneath to show through. If you do not add an Alpha Channel, any portion that is cut away from your image will appear as a white backdrop. To add an Alpha Channel, find the dock titled "Layers, Channels, Path...". Here, you should see a representation of your image with text written in boldface, probably titled "Background" or "Pasted Layer". Any text that is boldfaced does not have an Alpha Channel. Right-click the text to the right of the image layer and find "Add Alpha Channel". Once you click this, the text should no longer appear boldfaced and a transparency should now be added.
- Making a Duplicate Image: I don't know about you but I make a bunch of mistakes, all the time, at the worst possible moments. This in itself would be a great reason to make duplicates of your images, but it is not the only reason. Having duplicates (or backups) of your original images will allow you to do more with your final product. For instance, You may decide to use several objects from one particular image that would no longer be available to you had you cut the extraneous objects around your original focal point. Just remember to hide the visibility of your backups as you work, which I will go into later. To create a duplicate image, find the dock titled "Layers, Channels, ..." and locate the image you wish to duplicate. Right-click the text to the right of your image and click on "Duplicate Layer" from the menu.


Editing Layers and Removing Backgrounds/Objects
The image to the right of this text is an example of a merge between three image layers, all found on Wikimedia Commons. In addition to the mushroom image that has already been used in previous examples, I have also added an image of a butterfly provided by Jkadavoor and an image of Buzz Aldrin provided by NASA. (Because why shouldn't there be mushrooms and butterflies in space? As you can see, the backgrounds of the mushroom and the butterfly have been stripped away, leaving only the objects that I want to use. In the following sections, I will demonstrate how to remove a particular object from an image and then merge that object with another.
- Open Image: I have prepared my first image, as described in the previous section, by opening up the Mushroom image, adding an Alpha Channel, and adding a duplicate Image. Any image layers that I have attached to this project will show up in the Layers Window (seen in Figure 3.2:A). I have two images available to me at the moment, my original Mushroom image, which I pasted earlier, and a copy of that image.
- Control Image Visibility: You will see an "eye" icon to the left of these image layers (see Figure 3.2:B). This "eye" icon indicates which images are currently visible. For now, you will want to remove this icon from any images, such as duplicate images, that you are not currently manipulating. If I had not removed the "eye" from one of my duplicate images, anything I cut away would still appear to be there because the image underneath would show through.
- Be Aware of Layer Selection: Before editing an image layer, always make sure you have the right image layer selected. The selected layer will be a light gray or blue color viewable from your Layer Window, (see Figure 3.2:C). Many times, I have thought I was manipulating one layer, only to find out that I had accidentally edited another.
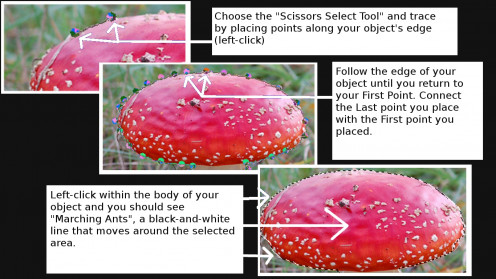
- Use tools to edit layers or remove an object: Though you will find a use for every tool in the Toolbox, to remove my object I have chosen to use the "Scissors Select Tool" from the Toolbox Window (Figure 3.2:D) to work on this project. I have chosen this tool because it has an "intelligent edge-fitting" ability that I find very useful. This feature allows me to trace around my object fairly quickly and is more forgiving of my mistakes than the "Free Select Tool", because the trace line conforms to the most likely edge of the object. (Note: To soften the edges of your cut, once the "Scissors" has been selected, choose the "Feather edges" option found on the bottom half of the "Scissors" menu.)
Selecting Objects and Separating Backgrounds
Using the Scissors Tool to Select an Object
- Now that I have selected my tool and have made sure the correct image layer is selected, I can begin. By left-clicking on the edge of my object, I can create the first point of my trace. I then follow the border of my object, left-clicking along the way, until I return to my first point. I left-click on my first point. (Note: If the "intelligent edge-fitting" feature of the Scissors tool has decided not to be so intelligent, once you have returned and clicked on your first point, you can readjust any other point by left-clicking it and dragging it to where it should be).
- If all the points are where they should be, and you have connected the last dot in your trace to your first dot, left-click within the trace of your object (anywhere inside your set points). The points around your object should disappear and a line should replace them. This line is called a "marching ants" line and it will appear to be moving with black-and-white tiny rectangles.


Separating Objects from Backgrounds
Now that an object is selected, you can choose to either remove the background or remove the object. Because of the type of project I am working on, I want to keep the object and lose the background.
- You will need to invert the image if you want to remove the background. Right-click the body of the object and find the menu option "Select". Within this menu option, find the the option "Invert". Skip this step if you are deleting the selected object and keeping the background.
- Right-click the body of the object again. Choose the option "Edit". Then choose "Cut". The background should now disappear and you should see the layer beneath (if you added an Alpha Channel). The Alpha Channel acts as a transparency so you can work with multiple image layers. If the section you removed turns white, you did not add an Alpha Channel. If you need an Alpha Channel, use the "Undo" window and add an Alpha Channel to your layer.
- Finally, right-click on the object one last time. Choose "Select" from the menu and then "None".

Opening Multiple Layers
Upon looking at my lonely mushroom, I decided that I should find some other images to keep it company. A good planner would have already had all the images they had chosen to work with already saved and opened, but I am not an excellent planner. No worries. I find a couple of other images on the internet and save them to my computer. Now all I have to do is select "File" and choose the "Open As Layers.." option (Figure 5.1). I locate my saved Buzz Aldrin and Butterfly images and open them. Now, you should see all of your opened images in the Layers Window (remember to add the "Alpha Channel" to each image layer, as discussed in an earlier section). You should notice, at this point, that the image layer that is at the top position in the Layers window dominates the image.(Figure 5.1)


Reordering and Moving Layers
I decide I do not need my butterfly visible, as of yet, because I intend to work on it later. I click the "eye" icon to the left of the butterfly and it becomes invisible. By reordering your images you can change which layer is more dominant. In my case, I need my mushroom to be above my Buzz Aldrin because otherwise I would not be able to see my mushroom. Hover over the image layer you want to move in the "Layers..." window, hold down the left mouse button, and drag the image layer up or down to reorder your image layers, releasing the image layer where appropriate (Figure 6.2).
- (Note: I have found that in some versions of GIMP or in some cases, the layer may resist being moved. If this happens to you, hover just underneath/above (depending if you are moving a layer up or down) the image in the image layer and wait to release until you see a black line appear underneath/above the layer. If the black line does not appear or if it does but still will not drop in the correct position (which can happen if you are using a screen recording program, such as CamStudio), you can usually use the green arrows just beneath the layer window section to move your image layer up or down.)
As you can see in Figure 6.1, my mushroom image is on top of my Buzz Aldrin image and the butterfly is nowhere to be seen but my mushroom is covering up all of Buzz, and I don't want that. I decide to move the mushroom by looking at my "Toolbox" window and finding my move icon (see Figure 6.2). I left-click on my mushroom layer in my "Layer" window to make sure that image is the one I am working on and then hover over the mushroom. I left-click and hold the mushroom as I drag it to the bottom left of the screen. Once I find a good place for it, I let go of the mouse button and the mushroom is placed.
Scaling an Image Layer
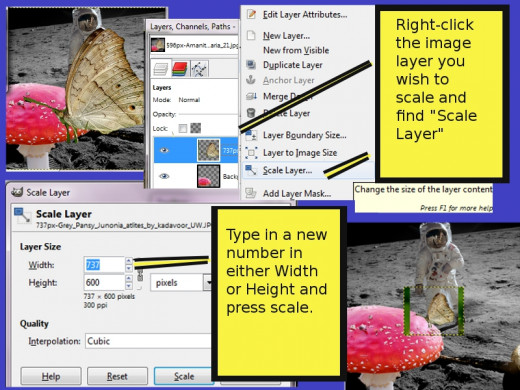
Now it is time to work on my third layer, the butterfly. I click the "eye" icon to the left of its image layer. Then, I cut around the butterfly and separate it from its background, just like I did with the mushroom. Remember to mind which image you are working on by left-clicking the correct layer in Layer Window. If you make a mistake, just use the Undo Window or press Control + Z to revert to an earlier edit. Now I should see Buzz and the mushroom beneath it, but the butterfly is way too large. To make it smaller, I right-click the butterfly layer in the Layers window and I select "Scale Image Layer". I type in a smaller number in the "Width" section of the "Scale Layer" window and select the "Scale" button at the bottom (No need to type numbers in both the Width and Height sections, one or the other will suffice).
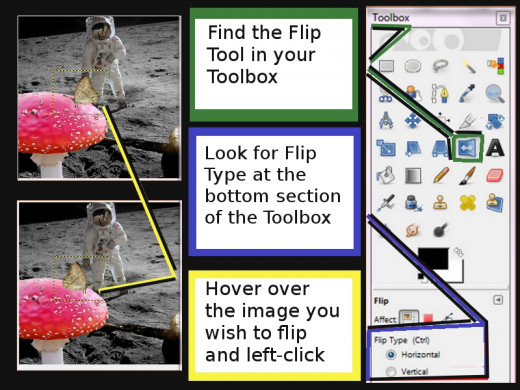
Flipping an Image
Once I have found the size I want, I move the butterfly onto my mushroom. I decide that I want the butterfly to face the opposite direction. Remember to make sure that the right image layer is selected. Clicking on the "Flip Tool" button in the Toolbox will give me a couple of options. If I look at the bottom section of the Toolbox Window, I can choose to flip my image either horizontally or vertically. I choose which way I want to flip and then move my cursor to my mushroom and left-click. If the image does not flip, make sure you haven't flipped a different image layer.
Finishing Your Image
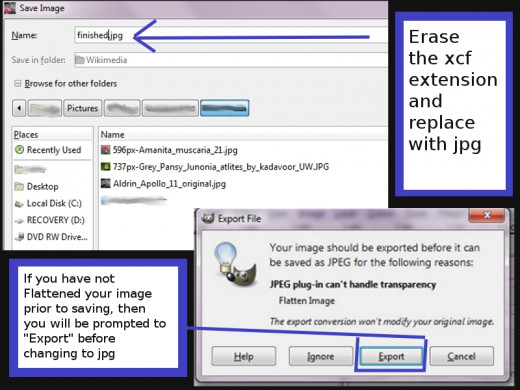
When you save your file, you will notice that the file will have an ".xcf" extension. This extension will allow you to continue working on all the layers that you have created. If, however, you are completely done with your image and ready to upload it to the internet or use it elsewhere, you will need to change the image to another extension, such as a ".jpg" extension. This can be done by clicking on the file name, erasing the ".xcf" and replacing it with ".jpg". You will then be prompted, if you have not already flattened your image, to export your file. Click "Export" and you are done.
Gimp Tutorial 1
Happy Editing
Though there is much, much more that this program can do, I hope that this information will help get you started. I intend to post more articles in the future about this program, so keep an eye out if you found this to be helpful. Explore on your own in the meantime and see what you can discover.


