How to Automatically Forward E-mails from Gmail

In this hub, I am going to explain how to automatically forward e-mails from Gmail to a primary e-mail account. This comes in really handy if you are managing several e-mail accounts and would like to be check them all at once; and best of all, it is absolutely free!
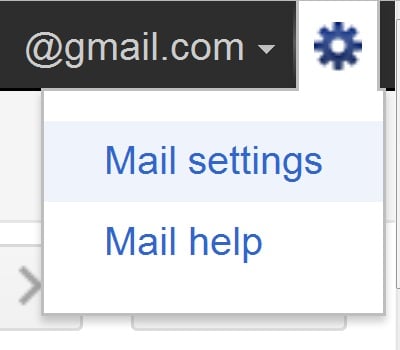
First of all, have a primary e-mail account set up. I have a primary e-mail account in Yahoo. Besides that, I have various Gmail accounts which have their messages automatically forwarded to my Yahoo account. Secondly, log into the Gmail account from which you want to forward messages. Click the circular icon in the upper-right hand corner of the screen and you should get a drop down menu which includes “mail settings”. Click mail settings.
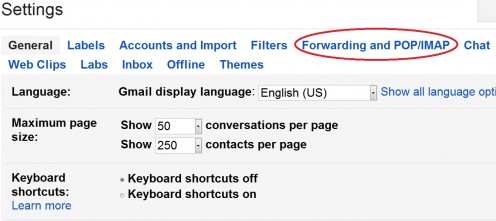
After clicking mail settings, you will bet taken to the Settings page, which will display a list of tabs in blue letters across the top of the page. Click the “Forwarding and POP/IMAP” tab. Under that tab, a few sections will appear; one of which is “Forwarding”.
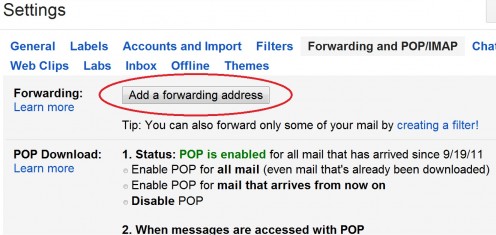
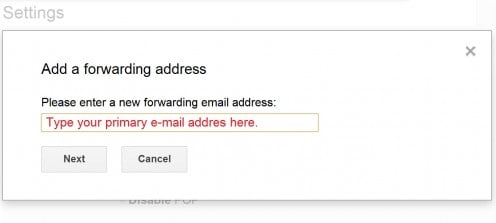
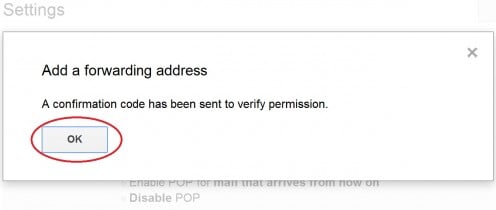
In the Forwarding section, click the “Add a Forwarding Address” button. A window with a text box will appear, asking you to input new forwarding e-mail address. Enter your primary e-mail address in the text box and click “Next”. You will then get a message indicating, “a confirmation code has been sent to verify permission.” Click “OK”.
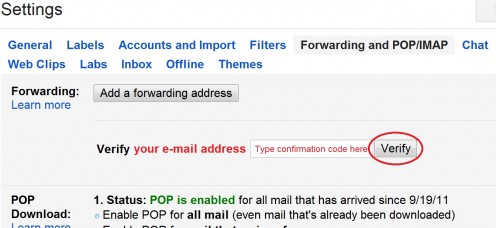
You will be taken back to the Forwarding section on the Settings page where you will now see a text box requiring your confirmation code. Retrieve your confirmation code from your primary e-mail account (a message will have been sent there from Gmail including your confirmation code), and enter it into the text box. Next, click verify.
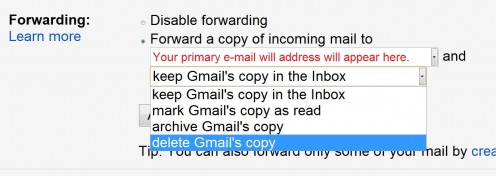
Then, some more option in the Forwarding section will appear. Click “Forward a copy of incoming mail to” (your primary e-mail will automatically appear in the adjacent text box); and then, below that, choose the forwarding option that suits you best. You can choose from:
- Keep Gmail’s copy in the box
- Mark Gmail’s copy as read
- Archive Gmail’s copy
- Delete Gmail’s copy
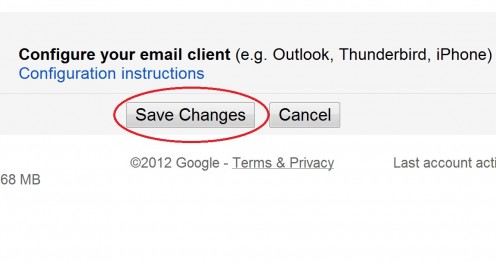
Finally, scroll down to the bottom of the Settings Page and click “Save Changes”. Congratulations! You now have automatic forwarding set up for your Gmail account. Below you will find a visual walk-through to aid you in the process.
Step 1: Click Mail Settings
Step 2: Click "Forwarding and POP/IMAP"
Step 3: Click "Add a forwarding address"
Step 4: Type your primary e-mail address in the text box
Step 5: Click "OK"
Step 6: Type the confirmation code retrieved from your primary e-mail account in the text box and click "verify"
Step 7: Click "Forward a copy of incoming mail to", and then choose your forwarding preference
Step 8: Scroll down to the bottom of the page and click "Save Changes"
More Tech Hubs by Greg Sereda
An illustrated tutorial on how to set up filters in Yahoo Mail and Gmail to block unwanted e-mail spam!
Discover which one of these free You Tube downloaders match your You Tube downloading needs best!

