- HubPages»
- Technology»
- Computers & Software»
- Computer How-Tos & Tutorials
Creating a Macro in Excel

Microsoft Excel is used for many different applications including financial reporting, tracking of personal finances, keeping track of personal assets, grade keeping, loan calculator, and to run complicated calculations. I spend most of my day at work in Excel. As an accountant, I find Excel to be an invaluable resource that makes my life easier. One of the things that I love about it is that you can you can automate repetitive tasks by the use of macros.
What is a Macro?
A macro is a task or a series of tasks that are performed all together. This includes any key presses or mouse clicks. I use macros as much as possible. Here are a few examples of how you can use a macro:
· Hide or unhide workbook tabs
· Reset a combo box to a desired selection
· Open an Excel file
· Protect or unprotect a worksheet
· Formatting
· Insert a formula (Works best with simple formulas that do not use cell references)
Enabling Macros
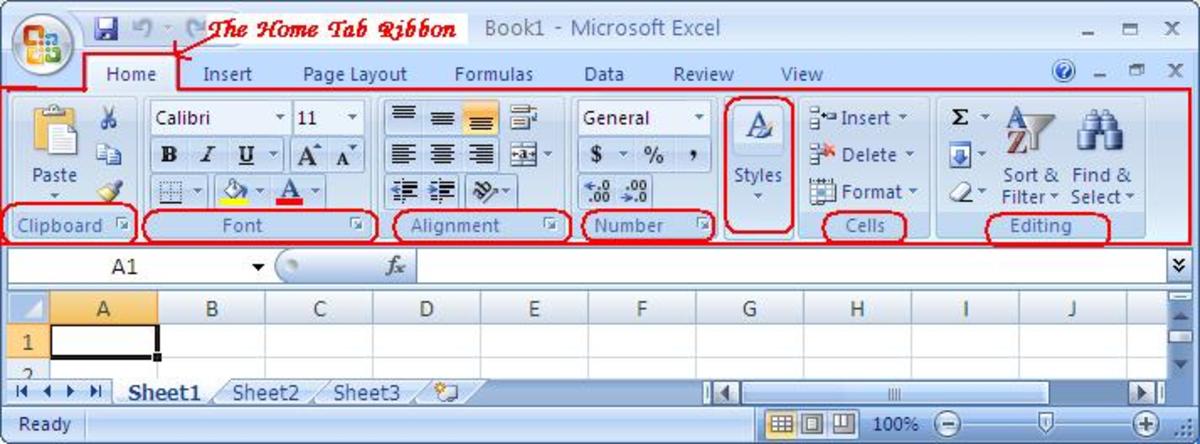
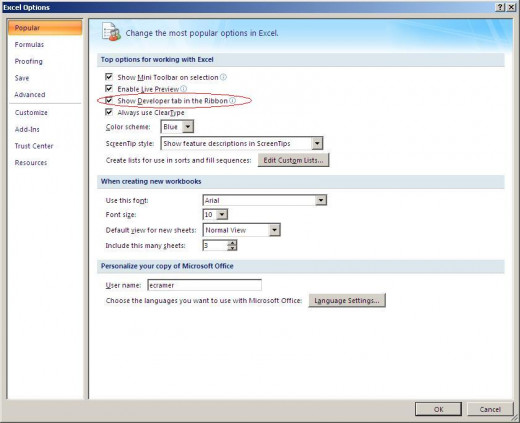
If you are using Microsoft Excel 2007, you will have to enable the “Developer” tab by clicking on the Microsoft Office button (Top left hand corner of the screen) and then select Excel Options at the bottom of the drop down menu. This will bring up a popup window where we need to activate the “Developer” tab. Start by clicking on “Popular” (left-hand side) and then find where it says, “Top options for working with Excel” and check the box next to “Show Developer tab in the Ribbon,” which is the third option down from the top. Finally, click on OK to close the window.
Changing Macro Security
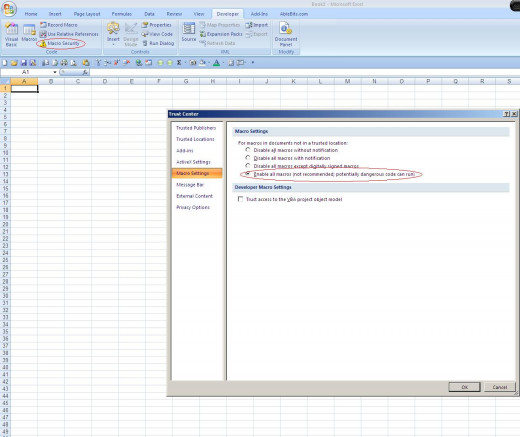
In the newer versions of Excel, macros are disenabled for security purposes. Do not let this alarm you. Macros can have dangerous code in them; however, if you only use spreadsheets that you create, you will not have an issue. I always keep my macros enabled and I have never had a problem. If you are worried, you can enable and disable macros as often as you wish. To enable macros, go to the “Developers” tab and click on the “Macro Security” button. This will bring up the macro security dialogue box. Change the selection to enable all macros.


How to Create Macros in Excel
Creating a macro in Excel is easy and does not require any advanced Excel training. Before actually starting to create a macro, it is important to spend a few minutes thinking of exactly what you want your macro to do and the order that you want it to do it. For example, the financial reporting spreadsheet that I prepare every month at work has a navigation tab along with over 100 tabs of financial data. I created a macro that causes the spreadsheet to open up on the table of contents tab and it resets the combo boxes so that they start out blank.
Once you have decided what you are going to do, follow these simple steps below:
- Save your current workbook as a macro enabled workbook or otherwise your macros will not work.
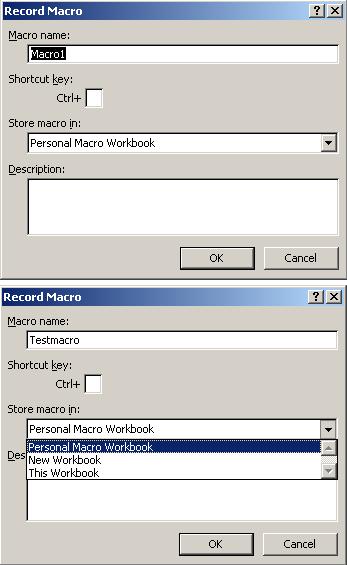
- On the “Develop” tab click on the “Record Macro” button, this will bring up a macro popup box.
- Enter a name for your macro. There are no spaces allowed in the macro name. My advice is to use a descriptive name that is easy to remember when you go to run the macro. In the example of the financial reporting spreadsheet, I named my macro “autoexec”. I will get into why I choose this name under the “Auto Executing” section below.
- Select where you want to store the macro. There are three options to choose from: Personal Macro Workbook, current workbook, or a new workbook. If you are just planning to use the macro in the current workbook, select that as your selection. If you are planning to use it in other workbooks, store the macro in your personal macro workbook. In my example of the financial reporting spreadsheet, I saved my macro in that workbook only.
- Click OK and the macro will begin recording. Anything you do past this point will be included in your macro. Go slow and take your time with each step to make sure it is exactly how you planned to do it. Once you are done, click the macro stop button.
Creating macros in Excel is just that easy. If you make a mistake that will not work in your macro, go ahead, stop the macro, and start over. Make sure to use the same macro name that you did the first time.
Running a Macro
Once you have finished creating your macro it is time to run it and see how it works. The easiest way to run a macro is on the “Developer” tab. Click on the “Macro” button, which will bring up the macro dialogue box. Select the name of the macro that you want to run and then click on the “Run Macro” button. Your macro will now run.
Assigning a Command Button
Assigning a command button is a great idea if you plan to run a macro repeatedly. On the “Developer” tab in Excel, click on the “Insert” button which will bring up the Form Controls menu. Click on the top-left button and then draw your button in your workbook. As soon as you let go of the mouse, a box will popup asking you to assign a macro. Select the macro that you want and hit enter. Do not click off the button yet. Highlight the name of the button and change it to describe your macro. Also, if you want to change the text color or formatting, highlight the name and right-click on the button. Select “Format Control. . .” from the popup menu. Once you are finished, click OK and you are ready to use your button to run your macro. You can have as many buttons that you like in a workbook.
Auto Executing a Macro in Excel
Sometimes you may want a macro to run automatically when a spreadsheet opens. It works great for my financial reporting spreadsheet to make it open to the Table of Contents tab. All that you have to do to make your macro execute automatically is to name it “autoexec”. It is vital that you save this macro to the current workbook and not to your personal macro workbook. If you do the latter, the macro will run every time that you open Microsoft Excel. Also, you may only have one macro that automatically executes per workbook. If you want your macro to do more, you have two options. If you are comfortable working in the VBA editor, you can create a second macro and then copy that logic into the auto executing macro. If you are not comfortable with that, you can always redo your macro and give it the same name (“autoexec”).
Recording a macro in Excel is easy and is a great time saver whether you are an expert in Excel or a novice. It is important to take your time while creating your macro to make sure that everything runs the way you want it.


