Designing a Home Theater - Introduction


Why I Wrote This
I wanted to build out a home movie theater in our vacation rental, since I'm fairly handy it's something that I was comfortable doing myself. This was my first movie theater project and I wanted to make sure I did it right... without breaking the bank.
Once everything was said and done I realized that it takes a lot of research in a lot of components to get the project done.
For someone like me who has never worked with surround sound or projectors before, it can be a little daunting to figure out what is best for you.
I started with writing just one article with everything and soon realized it's way too much info to put into one article.
Hopefully my articles will help you with your choices for your home theater. :)
First Things First - The Space For Your Home Theater
Before you start any research you need to have an idea of how you will layout your theater. Of course, the size and shape of the room will give you the boundaries that you will be working in.
Those boundaries will determine how many people you'll be seating, how many rows of seats, where to install your projector, what your max screen size will be and the layout of your speakers.
For my home theater, the room was a long rectangle. I was going to put the screen on one of the short walls, so that meant my screen size was limited to the size of the short walls minus the space for the left and right surround sound speakers.
I was planning on seating for 8-10 people and since my room was long I was planning on three rows of seats.
My Movie Theater Room Layout


Seating
Your seating choices are wide ranging and almost limitless. The size and shape of your room will make up a large part of your seating choice, the other is the comfort level you are looking for.
Your options range from a bunch of bean bags on the floor to traditional movie theater chairs to ultra comfortable sectionals, the only limit is the space of the room!
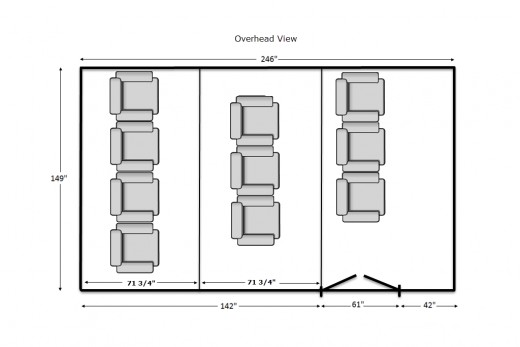
Since our room is a long rectangle we decided on doing three rows of seats. We wanted like an ubber comfortable movie theater so we opted for individual recliners and so as not to ruin the view of the screen from the back row we chose to have raised platforms for the second and third rows of seats.
For our seating we decided on Parker Living Furniture's Genesis Power Recliner. We have 10 power recliner chairs in three rows, 3 seats, 3 seats and 4 seats in the back row.
Although all our chairs are the same, there is no rule that says you can't mix and match.
In fact, if we had to do it again, we may have opted for a couple love seats in the back row instead of the four chairs.
Choosing a Projector
- Designing a Home Theater - Choosing a Projector
I recently took on the project of designing and building my home theater and discovered that it took a lot of research to do. I decided to share what I did in the hopes of helping others.
Choosing a Projector Screen
- Designing a Home Theater - Choosing a Projector Screen
Now that I chose my projector, I needed to choose a projector screen. Decisions decisions...
Choosing The Amplifiers
- Designing a Home Theater - Choosing an Amplifier and a Sub-Woofer Amp
Now that the projector and projector screen have both been chosen, it's time to figure out what amplifier to use for the surround sound.
Choosing The Speakers
- Designing a Home Theater - Step 4 - Choosing The Right Speakers
This is when it started feeling like I was in the home stretch - I've got my projector, screen and amplifiers and the speakers were the last of my core components - Exciting!
Choosing A Remote Control That Controls It All
- Choosing The Right Remote Control For Your Home Theater
Figuring out the right remote control for your home theater will drastically change your home theater experience. I'll share my experience and research in my quest for a great home theater remote.
Update
I had a problem playing 3D movies with my setup and during my process of elimination I purchased a different DVD player, the Pioneer UB900.
The DVD player was not the problem, it was a defective projector which Epson quickly addressed, but the improvement in sound quality from the Pioneer was significant enough that I kept the Pioneer.
The Pioneer UB900 was more expensive than the Samsung but it seemed worth it for me.
The Samsung was very good, and normally I wouldn't have swapped it out for a DVD player that was that much more money, but since I had it already it helped seal the deal for me. :)
Choosing The DVD Player
The criteria for a Blu-ray player was it needed WiFi, be Ultra HD (that way NetFlix from this player would have 4K content), and support HDR.
The DVD Player I chose is the Samsung UBD-K8500 Ultra HD Blu-ray Player
And because all Blu-ray players are backward compatible, if it is Ultra HD it will also play 3D movies.
I would think most of the ultra HD blu-ray players out there are pretty similar, I've added the Blu-Ray player here to remove the guess-work.
This blu-ray player works well and has everything I needed for my setup.
I use the apps on the Blu-ray player to stream NetFlix. I paid for the extra NetFlix subscription so I can stream Netflix's 4K content.


The Lighting
As far as lighting goes, I initially thought of having LED lights on the edge of each platform step, LED background lights around the projector screen, scones on the walls, high hats and I also thought about adding LED lights in a tray ceiling.
After I installed the lights on the edge of the platform, the high hats and the background lights around the projector screen I realized I had more than enough lighting.
I originally had the idea that I'd connect the platform lights and the background lights each to a dimmable light switch. Turns out they both use DC current and have a transformer, which I unfortunately I didn't think about when I bought them.
That meant that using a dimmer switch isn't possible since they are DC - so that didn't work the way I was planning it.
The lights around the projector screen have a remote control that you can set the color and brightness level.
It's a really nice effect and the controller for the lights remembers what the last setting was.
So I can set the lights to the brightness level I want as well as the color and when I turn them on using a light switch the settings are kept.
If I had to do it over again, I would not use the DC LED lights on the platform edges. Instead I would install AC LED tube lighting. That way it would be dimmable.

Update
I installed the infrared repeater before looking for a remote control, and it was a great solution for controlling devices in a different physical location since just about all the equipment is in the closet next to the theater.
I ended up buying a remote control that also addresses that problem. So a repeater is great if you don't plan on getting an all-in-one remote and have devices outside your theater.
However, if you are going to get an all-in-one remote, take a look at my article on the subject and you won't need the IR repeater.
The Infrared Repeater
The infrared repeater allows you to move all the things that would normally go into a TV console to another location.
In my case I moved the all that stuff into the hall closet right outside the movie theater.
The infrared repeater is not a very expensive device, and it gives a lot of the WOW factor. It allows the wall where the projector will be to have a clean look.
Basically there is a little receiver that you put above the screen and run the wire to where ever all your electronics are. In that space you have the repeater and all it's infrared emitters. The repeater will send all the infrared signals it receives into the space with your devices and blast the signal.
It works great, and like I said a huge wow factor.

The Speaker Connectors - Banana Plugs
The banana plugs make plugging in the speaker wires into the amplifier so much easier, I highly recommend getting some yourself.
I originally didn't think I needed them since you can connect the wires to the amplifier without them.
My opinion quickly changed when I started to hook everything up, and promptly ordered these banana plugs.
They worked really well and it's a night and day difference between having the banana plugs and not having them.
The banana plugs I chose are the Mediabridge Banana Plugs - Corrosion-Resistant 24K Gold-Plated Connectors
Building It Out
Now that I went over all the things I purchased to build the theater, I'll start going over putting it all together.
Building The Platforms
Since were were going to have three rows of seating it made sense to have each back row raised a bit higher than the row in front of it.
The difference is significant, with the raised platforms you end up with an unobstructed view of the screen from all the seats.
The platforms are made using 3/4" OSB for the flooring and 2 x 4s. Each platform is 9" higher than the platform in front of it. When deciding the width of each platform we had to take into account the reclining of each chair.
I wanted to make sure that when the seats were reclined they wouldn't interfere with the seats in the front and back. It ended up being perfect dividing the space from the doors to the back wall in half, each platform is 71 3/4" long.
The height and width of the platforms worked perfectly for our room and chairs. The dimensions would of course change depending on the seating you use and the size of your space.
If my home theater was professionally designed, I'm pretty sure they would have only put two rows of seating. Just so the first row would have been far enough back from the screen.
Honestly though with the projector we chose the picture is so crisp that sitting so close to the screen is not a problem.
In fact, the first row of seats are our favorite place to sit!
The Layout Of The Platforms and Chairs
The Post I Got My Inspiration From
I looked at countless home theater pictures to figure out what my wall colors and platform flooring were going to be.
My first thought was to have the platform carpeted with the same color carpet that was already in the room.
Luckily I came across this home theater post. I loved what they chose for their wall colors, platform flooring and the sign they put at the entrance of the theater.
http://www.the-hall-way.com/2016/01/07/home-theater-final-reveal/
The Walls and Flooring
In case you wanted to know what the flooring is or the wall colors are, I bought the paint and the flooring from Lowes.
The flooring for the platforms is Style Selections 6-in x 36-in Driftwood/Gray Peel-And-Stick Residential Vinyl Plank.
A tip if you end up doing the platforms like I did and putting down vinyl planks, make sure to prime the plywood before installing the planks. I didn't notice that the directions said you should do that until after I had installed them.
In some areas it took some real doing for the planks to stick to the plywood.
The paint for the walls is Valspar Winter Flanel in eggshell
The paint used for the speakers is Valspar Pelican in eggshell
Projector Placement
Figuring out where to place the projector on the ceiling was a little tricky. I came across a great website https://www.projectorscreen.com/projector-screen-calculators
It gives you the ability to figure out how far/close the projector needs to be based on the screen size and the projector model.
In my case based on the 135" screen and the Epson Home Cinema 5040UB the projector could be 178" from the wall.
Before making holes in the ceiling and running the electrical, I put the projector on a platform on a ladder to make sure that the 178" was correct - it was! :)
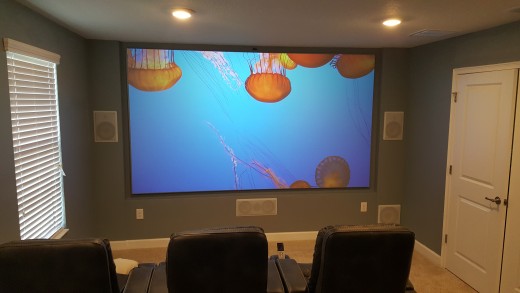
The Final Results
Unfortunately I can't show you in an article what the surround sound sounds like, I can just tell you it sounds really really nice.
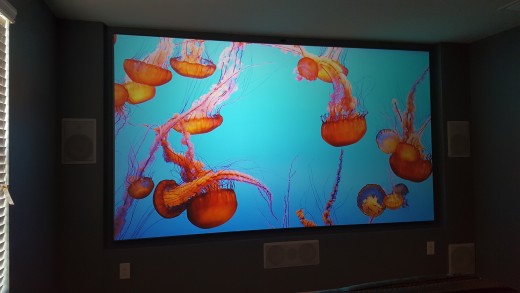
I can show you what the image looks like. Not sure if it's the projector or the projector screen or the combination of the two, but whenever playing either 4K video from Netflix or a Blu-ray DVD - the best way to describe it is breath-taking.
Hear are a couple of pictures of a 4K NetFlix video of ocean life. One without the lights on (notice there is still light coming in from the windows) and the other with the lights on in the room.

Related

Home Remodeling Improvement -15 Kitchen Design Ideas Under $10,000

Optoma HD20 1080p Home Cinema / Theater Projector Owner's Review

What Is An LED Light And How Can This Home Improvement Technology Save Me Money?

OTT Full Form: What Is the Full Form of OTT in Cinema?

15 Amazing HubPages Alternatives for Reading and Publishing


 Resolutions - What Does Resolution, Aspect Ratio, ppi Mean For Your Smartphone, Tablet, TV, or Monitor")