- HubPages»
- Technology»
- Computers & Software»
- Computer Software
Dr.Explain Product Review


Quick Links to Specific Elements
In September 2013, I was tasked with creating an HMTL Help file and PDF file as a User's Guide, for a commercial hardware/software product combination that is, as I write this (October 2013), in the process of being released into the retail market.
The end product needed was:
- a clean, complete, professional HTML Help file,
- whose source file(s) could serve to create both
1. a printed User's Guide as well as
2. a well-organized help file, - and have it be of such quality that the reader could easily find what he/she was looking for via the table of contents, as well as via a thorough index, and
- that I could connect into our VB.NET application to use for context-sensitive help.
Simple, right? Not necessarily, unless you have the right tools.
Since it had been a while since I had created my last HTML Help file, I did a fairly thorough search for what was out there in terms of productivity tools for creating HTML Help files. Of all the products I examined, Dr.Explain stood out as the one that really focused on efficiency and productivity of the overall Help-project production cycle, especially when one is documenting software, which was indeed part of what I was going to be documenting.
As I worked with Dr.Explain more and more, I could tell that the people that created Dr.Explain are very good at what they do! I actually enjoyed working with it because of how simple it was to get a lot of work done fast, yet how much flexibility it gave me regarding layout and the appearance of the final documents.
Review Details
Item
| Description
|
|---|---|
Application
| Dr.Explain
|
URL
| http://www.drexplain.com
|
Version Reviewed
| 4.10.821
|
Test System
| Microsoft Windows XP Pro (SP3); CPU: AMD x86 Family, 2GHz; RAM: 4GB
|
Supported OSes
| Windows XP, Windows 7, Windows 8
|
Basic Support Method
| E-Mail, no fee
|
Licensing
| Permanent, one-time, per user; no license required for distribution or reading of documents created
|
Minor Upgrades
| Free (e.g. 4.5, 4,6, 4.7)
|
Major Upgrades
| Free for first 12 months, significant discounts after that.
|
Time Required to Get Up and Running
| Very short: excellent help file (written with the product itself) and the website is loaded with examples and instructive videos.
|
Problem Being Solved
When I want to create a professional, well-organized HTML help file for my application, that provides a one-source stop for HTML help, a PDF User's Guide (which can be used for printing, of course), and context sensitive help for my application, I can get really tired of messy help file solutions like:
- composing individual HTML pages and putting them together with Microsoft HTML Help Workshop, for which you have to have the help file layout completely planned beforehand -- including the index -- only then to proofread it the next day and discover that certain topics need to be reordered, which, in my world, should be something simple, yet it immediately invalidates about half a dozen links per page, or
- less-messy-but-tedious solutions like taking screen-shots myself and composing my own set of callouts onto a graphic image that then gets incorporated into an HTML page, for each window of an application.
Ouch! That's a lot of time (days if not weeks), depending on the complexity of the application, and a lot of tedium, to get a clean, high-quality product.

What Is Dr.Explain?
Dr.Explain is a technical writing tool that provides a simple user interface to create a wide variety of documentation, and automates many of the tedious tasks of doing so. Dr.Explain specializes in producing tree-structured HTML help, which can be output as:
- compiled help -- a .CHM file, often used to provide general and context-sensitive help for applications on a wide variety of platforms (Windows, Mac, Linux, and others), and
- on-line help in the form of a high-quality, coordinated set of HTML pages, which can be hosted on a website, complete with table of context, index, and full text search capabilities built in.
In addition, from the same source project, it enables the author to also generate:
- a PDF file containing all of the HTML help content in sequence, with both bookmarks (tree-structure like a table of contents in a window usually on the left side of a displayed PDF document), and a table of contents with links to the specified pages, and
- an RTF file, with a structure much the same as the PDF output, providing the ability to use it directly or import it into other tools for further processing.
One of Dr.Explain's Specialties
Although Dr.Explain is far from being limited to this use, it further specializes in documenting Windows software applications. It does this by providing a great deal of automation in many of the the tasks required to produce such documentation. Specifically:
- capturing screenshots of the application,
- automatically creating named and numbered callouts on top of those screenshots that call attention to specific parts of the application (panels, buttons, text boxes, dropdown lists -- in general most types of controls commonly used in Windows applications),
- providing a means for easily editing the existing callouts, removing unneeded ones, or creating your own,
- providing sections below those screenshots, one per numbered callout, in numerical sequence, in which to provide detailed descriptions of each callout item (you can re-number them in several different ways), and
- placing all of these in a coordinated layout in a single HTML page ("topic" in HTML Help terms).

This is one place Dr.Explain really shines. This automation is a dramatic production booster for Help Authors documenting Windows software applications. As a simple example, the commonly seen "Save As..." dialog box (depicted above) used by many applications contains 10 controls. If that was a simple window in the application you were documenting, to document it would require the basic screenshot plus one named and numbered callout for each control, and one section in the page for each callout for a detailed description of that control. To do all this manually with a graphics application and manual HTML layout could easily require in the range of 60-90 minutes. Dr.Explain turns this into 5-10 minutes -- from beginning to end.
Providing a foundation under all this automation is the ability to extensively customize these pages, or develop your own independent HTML pages with a WYSIWYG editor which is as easy to use as any basic word processor, and provides most of the commonly-used layout capabilities of HTML, such as font control, text, hyperlinks, images, videos, ordered and un-ordered lists, and tables (if you are familiar with HTML, you'll already know how much power tables have, and Dr.Explain makes them quite versatile, enabling you to use a great deal of what HTML tables can provide, including the fact that cells can span multiple columns and/or multiple rows).
If you want to get really fancy, these capabilities include the ability to provide your own custom HTML code, custom CSS styles, as well as custom JavaScript.
Dr.Explain backs all this up with a well-designed method of:
- easily managing the tree structure of your documentation (each node in the tree is a "topic" in HTML Help terms -- literally an HTML page when HTML help and/or on-line help files are generated)
- automatically updating your table of contents so that it always matches this tree structure,
- controlling which parts of the tree structure will be visible from the table of contents (it is sometimes desirable to make certain help topics only available from within an application, and not visible from the table of contents, or you may want to hide work in progress until it is ready to be released),
- easily controlling which topics (HTML pages) will be output to which output formats (for example, certain topics can be output to PDF but not to HTML or vice versa)
- tracking the status of each topic (Not Started, In Progress, Completed, Waiting),
- and providing intuitive and efficient means of building an elaborate and full-featured 1-, 2- or 3-level index to help your readers easily find what they are looking for.
Actually, the depth of levels in the index is not limited, but most professional indexes (look in the back of an encyclopedia volume) rarely use more than three levels.
Dr.Explain further provides a number of useful facilities for managing documentation projects, such as variables, configurable text strings, customizable named text formatting styles (e.g. Normal, Heading 1, Heading 2, Code, Quote, add your own...), and the ability (if you want) to extensively customize how screenshots are captured and annotated.
Finally, for each output format (CHM, HTML, PDF, RTF), Dr.Explain provides the ability to customize many aspects of the output layout pertinent to each format, such as page numbering, headers and footers, and other elements making up the visual appearance of the final documents.
Feature Quick Links
- Capturing Software Application Screenshots
- Automated Previous- and Next-Page Links
- Sheer Number of Completed Pages Per Hour
- TOC Never Needs to Be Touched
- Menu to Subpages Is Provided Automatically
- Variables
- Final Page Appearance Easy and Quick to View
- Page Status Helps Me Track Where I Left Off
- Full-Featured Indexing Capabilities
- Undo Operation is Application Wide
- Pages Can Be Limited to Certain Output Types
- Powerful Copy/Paste Features Between Dr.Explain Projects
- Complete Control of Callout Styles
- No Need to Maintain External Files
- Nearly Limitless Possibilities
Features
Many times during my Help File project, I found myself simply delighted at the capabilities I found in Dr.Explain -- capabilities that helped me accomplish the task I was on at the time. Every time this happened, I took notes, and the below list are those notes.
Capturing Software Application Screenshots
It happens that in 2004, I developed some software that "inspected" certain other application's "windows" or "rectangles" for purposes of entering data into those applications as if my software were the end user user, typing it in directly. Without going into details, this was a productivity booster to prevent re-typing data that had already been entered by a customer into an application which my team authored. In doing this, however, I discovered that "inspecting" and interacting with another application's "rectangles" (e.g. panels, text boxes, buttons, etc.) in its windows was not only possible, but could be a huge productivity booster in the right context.
Thus, something really stood out for me regarding Dr.Explain: its automated screen-capture capability, which uses the "window inspection methods" I mentioned above, make it a natural productivity booster for creating help for a software application -- especially help whose central (and most time-consuming) activity was not writing the help content, but capturing screenshots, planting them in larger graphical images and adding "callouts" and text in the graphics application. Even my best graphics application is not well suited to text entry. Each bit of text has to be entered and positioned separately. Very time consuming to say the least. Then, if the application that I was documenting changed (a control moved or changed appearance or went away, or new controls were added, or even the name of a control changed), the some or all of that process has to be done over again! Being aware of this generated a LOT of excitement in my world about Dr.Explain.
Suddenly (using Dr.Explain), such a process, including creation of the text involved, sections on the page, and the descriptive text went from taking 60 minutes or more PER APPLICATION WINDOW to around 5-10 minutes, depending on the complexity of each window. With that kind of a productivity boost, who cares if the application changes!
To me, this is HUGE!

Automated Previous- and Next-Page Links
The next joy I found with Dr.Explain is a core part of its functionality (and most other help-authoring tools as well): I can often compose a complex technical document fairly quickly, and even have it turn out fairly well organized. But then I sleep on it, and read it the next day pretending I have never read it before, and I see places where the sequence could be productively changed to make it clearer, or that I need to insert a topic to give the reader orientation to something that I hadn't thought of in the original draft.
Combine this with the fact that I would always add "next" and "previous" page links to each topic because I myself, if I am new to a subject or a piece of software, like to study it IN SEQUENCE given that I expect the help author(s) to lay out the basics of a subject FIRST so that I am oriented before getting into a higher level of detail.
What happens if your help file is already created when you realize you need to insert a new page, or re-arrange the sequence of topics, and you are using Microsoft HTML Help Workshop? Well, immediately 4 or more of these "next" and "previous" page links are going to be invalidated for every page that has to be moved. How long does this take? What if you get an interruption in the middle of correcting the links? What if you make a typo?
Dr.Explain automates this whole task. This is another (in my opinion) great feature of Dr.Explain: what does it take to re-organize topic sequences in Dr.Explain? Select the topic in the table of contents and Ctrl-Up and Ctrl-Down or at most, dragging and dropping topics with your mouse to reorganize them. Done!
In the same amount of time it took me to write the above paragraph (about 30 seconds), the task would be completed already. All the internal next/previous links are taken care of.
Adding a new page? Select the parent page, click Add Topic or Capture Window to add the new topic page, and Ctrl-Up -Up -Up -Up until it is where I want it. Then type your text, or copy it from another source if there is one. Done!
Reorganizing the entirety of, say, a 30-topic help file, if you had to do this by hand, would be uninviting to say the least. In Dr.Explain: drag and drop each topic to its new location. In my estimate: this turns a 60-minute task (during which you hope you aren't interrupted) into 5 minutes!
Again, this is simple, but a well-targeted productivity booster, around these "next" and "previous" page links, which I consider core functionality of any help file -- and certainly any help file I create.
Sheer Number of Completed Pages Per Hour
It appears to me that Dr.Explain was designed from the ground up to re-focus time and energy on the CONTENT and CLARITY of the help file, by automating the tedious steps. Literally, I found myself excited and happy to use the product because of how much forward progress and how many completed pages I could produce PER HOUR. Very pleasing indeed.
There are so many facets of how Dr.Explain accomplishes this, they are difficult to enumerate.
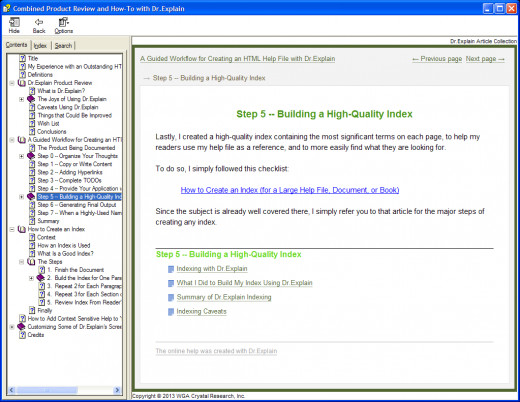
If you would like to see more about this, I created a separate article (too large to fit in this one) that is a narrative through my most recent HTML Help File project. It gives a number of insights about the many facets of Dr.Explain that increased my productivity. A link to that article is provided at the end of this one.
TOC Never Needs to Be Touched
During the whole process, of copying content from my "thought organizing tool" to my newly-created Dr.Explain pages of my project, I could see that the Table of Contents takes care of itself. If you rename or reposition topic pages, the table of contents page always reflects the current layout. Awesome! One less thing I don't have to spend time on.
Menu to Subpages Is Provided Automatically
When I am writing documents, especially in a situation like HTML Help where a higher-level topic gives an orientation to a subject, and the details are contained in lower-level topics, I really like to have the links to those topics, in sequence, at the bottom of the orientation page to help guide the reader, or allow him/her to quickly drill down to get to the details he/she is looking for. Dr.Explain did this for me -- I didn't have to do anything except write the orientation content. The links to the lower topics were already there for me. Yeay!
Variables
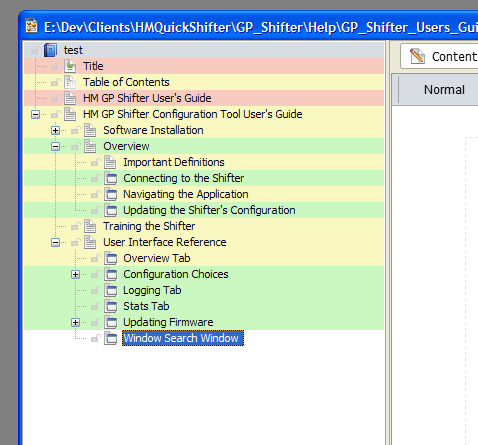
The name of the application I am documenting is:
HM GP Shifter Configuration Tool
and the name of the device is
HM GP Shifter.
Both of these names appear probably 50 times each in my help file, and they need to be identical every time they appear. Do I want to type these names 50 times each? What if the name changes slightly? Then normally I would have to go through my help file and change it in 50 places! Good luck finding them all. If I made a typo in one of them, then a "Find and Replace" operation isn't going to find it!
However, I can do it much more easily -- both for the initial TYPING and for CHANGING the names (if ever necessary).
In actual fact, it the device name DID change to "HM Quickshifter GP" which also changed the name of the Windows software application, after the help file was produced, and before the release! Boy, do I feel lucky!! Read on...
Enter Variables:
In Project settings > Variables I can create a list of variables where each variable is simply a "place holder" for the actual text. So when I am typing help content, each time I need to enter the name of the application, I type this instead: Ctrl-Shift-R (pulls up the Variable dialog), then I pick the variable I want (if it is not the first one), and hit Enter and I'm done!
If either of those names ever change (again), I simply go to Project settings > Variables and change it once, and re-generate my help file.
Another nice productivity booster! (This is a standard feature in most help-authoring tools I looked at.)
Final Page Appearance Easy and Quick to View
One feature in Dr.Explain that I used a lot is that it enables me to quickly ping-pong back and forth between a selected Preview mode and Content Editor mode so I can see how the final product is going to look before I "end off" on a page. I think this is a huge time saver because many fine points about the page's appearance can be caught and corrected as I go rather than waiting to be caught when I proofread the whole document.
This means as I "finish" with a page (and set it to have "Completed" status), that page has real shelf life. I like this a lot and use it frequently!
Page Status Helps Me Track Where I Left Off
The ability to mark each page with a status (Not Started, In Progress, Completed, Waiting) enabled me to take on interruptions, take phone calls, and return to my project and find it easy to find where I left off. This was handy and made it unnecessary to re-proof read pages that were already completed, wondering whether I had forgotten something.
Full-Featured Indexing Capabilities
I am a reader that uses indexes when a document provides them. My best reference textbooks contain excellent indexes, and that is indeed part of why I consider them my best references: because finding information that I am looking for in them is fast and accurate.
Because I know what a huge tool indexes can be for the reader, I too like to provide an excellent index when the work will be used as a reference. Thus, I was delighted to find that Dr.Explain supports the creation of a 1-, 2- and 3-level index (or more levels if needed), and not only that, but doing so with Dr.Explain is just as efficient as the best indexing software tools I have ever used.
For the reader who is interested in learning this craft, I created an entire article about how to create an index for a large help file, document or book. It is reachable through the link at the end of this article.
Undo Operation is Application Wide
Like most of us (especially in a dynamic environment like a Windows PC where the keyboard focus on windows can change while we are typing(!)), occasionally we do something we wish we hadn't have, for example deleting something that took a long time to create.
If this ever happens to you in Dr.Explain, Ctrl-Z or Edit > Undo will help you recover from this situation. I know this has come to be an "expected" feature in Windows applications, but I mention it here specifically because it indeed saved me from losing work during a long HTML Help File project. When it happened, I was really glad it was available!

Pages Can Be Limited to Certain Output Types
While selecting nodes from the table of contents, below the TOC is a series of properties that are changeable for the selected node, and among those properties are the ability to selectively NOT output certain sections of your help file to certain output types under the "Export to" section of the Properties window. For example, if you have several pages that are ONLY connected to context-sensitive help for your application, and should not show up in the PDF output for instance, then this takes two clicks: 1) select the TOC node in question, and 2) click the PDF "button". It changes appearance indicating that node will not be output to that type of output.
Powerful Copy/Paste Features Between Dr.Explain Projects
If you have a finished tree structure of pages (top page plus all its child pages) in a Dr.Explain project, and want to have a copy of it in another project, just open both projects and select the ROOT page in the TOC tree and select Edit > Copy. Then go to the other project and position the cursor on the page that will be its parent page, and select Edit > Paste.
Not only does it copy the page and all its children, it also brings all the index entries from the original document to the new document. Amount of re-work? Virtually zero.
Complete Control of Callout Styles
When you are documenting screenshots that already have callouts in them, for example I am documenting screenshots that came from Dr.Explain and they already have callouts in them -- it is HIGHLY useful to use very different-looking callouts in your document containing these screenshots to help the reader to more easily see what you're actually talking about, and not get confused by the other callouts that are already in the screenshots.
Once again, this is another place that Dr.Explain shines. Not only is this relatively well documented in Dr.Explain's Help file, but doing a little experimenting with it (e.g. making your own custom Screenshot Annotating Template) allows you to see the effects of every change.
These are controlled from the Project settings > Screenshot annotating settings. Once you are in this screen, you have an incredible amount of control on how your callouts appear: text font, size and color (for the number as well as the label), size, shapes and color of the bullets, line styles, thicknesses, borders, fill styles... and to be fair, I'm only scratching the surface here. The Dr.Explain team did a really, REALLY good job on this!
Finally, if you want to revert to Dr.Explain's default settings, doing so is literally 3 clicks away: click the "Default" template, OK, OK.
No Need to Maintain External Files
When you capture a picture or use an external file for a picture, Dr.Explain pulls a copy of the picture into the Dr.Explain project. The result is that you DO NOT NEED TO make or keep a separate copy of that image as a part of your Help source files! The only source file is the Dr.Explain project itself, and it contains everything needed to generate the CHM, HTML, PDF and RTF outputs. This is unlike HTML Help projects under Microsoft HTML Help Workshop where there are dozens or hundreds of source files, and if even 1 gets lost, it is a disaster.
Nearly Limitless Possibilities
The "screenshots" in Window Capture pages (the type of Dr.Explain page with callouts and all the excellent automation dealing with callouts) does not, in fact, HAVE to be a screenshot. It is just a bit-map image that, in the case of my project, happens to be a screenshot. This image can come from an actual screenshot that Dr.Explain captures, or it can come from a file, or it can come from the Windows clipboard, which is true for ANY image used in a Dr.Explain project.
Thus, the image can be a map, a diagram, an electrical schematic, a photograph -- literally ANY type of image that can be displayed on a computer, can be documented with or without callouts in Dr.Explain.
Given these possibilities:
- a medical instructor might want to create a callout and attach it to a portion of an X-ray image he wants to call his students' attention to;
- an Electronics Engineer might want to create callouts and attach them to specific parts of an electronics schematic diagram;
- a Mechanical Engineer might want to create callouts to call attention to (and document) specific parts on an "exploded parts" diagram; or
- a Technical Writer might want to do any or all of the above, or anything else that comes to his imagination or writing needs.
These facts make Dr.Explain an INCREDIBLY versatile documentation tool for almost any kind of documentation -- not just documentation of Windows applications, which just happens to be one of its specialties!

I created the above as examples of technical documentation that Dr.Explain makes easy.
Caveats
While I was learning to use Dr.Explain and while studying its help file, I did quite a lot of experimenting with it to better under stand the limits of its capabilities.
Me being a software developer, some of these experiments were UNUSUAL, and in doing them, I found out a few things not to do while using Dr.Explain. Two things stand out:
Be Careful Editing the .GUI File With Any Other Programs
Dr.Explain's project file, which contains everything, has a file extension of .GUI. Of course I had to look in it. It turns out, it is XML, which is human-readable text. In one instance, I thought I had the opportunity to save myself some time by editing the file with a text editor. This is when I learned that my fancy programmer's editor has a bug! I did a find/replace on a certain set of characters everywhere they appeared, and then saved the .GUI file and went back to working on it with Dr.Explain, and worked happily for about 2 more hours before I discovered that I corrupted the .GUI file with my text editor! When I investigated, I found that my text editor had actually deleted a space character about 500 characters away from where I was editing. That space character was critical to the XML format.
Fortunately, Dr.Explain made it REALLY easy to recover from this: I had been saving backup copies of my work. I try to never experiment on a production line -- I was, after all, creating a real HTML Help file for a retail product. Editing the .GUI file with my text editor was an experiment. So to protect myself from possible problems, I create backup copies of the .GUI file before I edited it. What I was able to do was open the .GUI file that I corrupted (but which now had 2 hours of additional work in it), and also open the copy of the .GUI file immediately prior to my having edited it with the text editor in another instance of Dr.Explain. Fortunately, all my new work was in creating a new set of pages (not editing existing ones). And the new pages were not corrupted. I copied the new pages by selecting the ROOT page (under which all the other new pages existed), and selected Copy from the Edit menu, hoping this would copy the entire tree of pages onto the clipboard. Then I went into the uncorrupted project and selected Edit > Paste. All the pages arrived intact! The entire tree -- the root page and all of its children and all of their children all came with it. Not only that, but it copied all the keywords and their links (indexing of these pages) along with it. Thus, the recovery from this situation only took a few minutes, and most of that was figuring out what to do. *wheezing sigh of relief*
Lesson learned: if you're going to edit the .GUI file, make sure that the program (text editor) you are using does not have bugs!
While Working on Your Index, Beware the Delete Key
When keyboard focus is on the Keywords List (which is where you build your index), if you hit the delete key, it silently deletes whatever keyword had focus (and all of its children!). Normally when you are working in Dr.Explain, this is not dangerous, as you simply hit Ctrl-Z and Undo the deletion.
The danger comes when your keyboard focus is on another application, and something (e.g. e-mail arriving, or an alert window pops up) changes keyboard focus back to Dr.Explain's Keyword List without you being aware of it -- while you are typing! This actually did happen to me during my project, and I had just hit the Delete key and then looked up to see what happened, and keyboard focus was on the Keywords List and I had no idea what I just deleted....
If this happens there are two options:
- The first and easiest option is to UNDO by hitting Ctrl-Z on the keyboard, or Edit > Undo on the menu. Thankfully, the Dr.Explain team including UNDO for the keywords list. If there is an incident such as the above, this will save a lot of work from being lost!
- The second option is to select File > Save As... from the menu and save your help project as another file name temporarily, then close it. Then re-open the original file to get your keyword (and children) back. If needed, you can open both the original and the new one and copy/paste from one to the other. This is VERY powerful in the Keywords list because it brings the links with it!
Sound advice:
- Save often.
- LOOK where the keyboard focus is before hitting the delete key.
- If you are done with the Keywords list for a while, switch keyboard focus back to some other part of the application. This way if you accidentally hit the delete key, it is much easier to recover whatever got deleted, if anything.
Things that Could Be Improved
1.
I first tried to install the program in
D:\Program Files\DrExplain\
changing the default C: to D:, but when I tried to proceed, I got this message:
"To be able to make screenshots of Windows Store apps installation folder must by inside C:\Program Files.
"Otherwise, you will be unable to make screenshots of Windows Store apps properly.
"Continue Anyway?"
I clicked NO and reverted back to C:, since I didn't want to find out at some future point when I was trying to document a Windows Store app that I couldn't do a screenshot, since this is indeed the most powerful, production-boosting part of Dr.Explain.
Fortuntely, this is very minor since I rarely need to deal with a Windows Store app.
2.
Now and then while I was experimenting with different things, I encountered a program exception, in which case the operating system forces the program to close without saving any unsaved work. (I sent each one of these to Dr.Explain's fine programmers so they will hopefully be addressed in up-coming releases.) However, on the good side, I believe because of how Dr.Explain's file management is designed, my help file was never corrupted in the process, and because I was "experimenting", in no case did I lose more than 3 minutes worth of work that I wanted to keep. I did, however, learn to save frequently, which is a good practice in any digital creative endeavor.
On the plus side of this, when I was working heavily in the MOST FREQUENTLY USED parts of the program, Dr.Explain was VERY stable. Usually I could run it all day long (one day was a 13-hour stretch with Dr.Explain open and in use during that whole time without any problems).
3.
I found the fact that you could HIDE (as opposed to DELETE) a callout bullet confusing. I could not see how I could UNHIDE the bullet once it was hidden. I did, however, discover that the Compacting Tool enables you to remove hidden bullets if you want to.
4.
This is very minor, but when I hit Ctrl-F to find text in another part of my Help project, my fingers are used to simply starting to type the string I am searching for, because most other text editors and word processors, when you hit Ctrl-F, the Find dialog box comes up with focus on the find string, and the entire PREVIOUS string that was entered is already highlighted. This provides a production booster, because since the prior string is already highlighted, you don't have to hit the Delete key -- just start typing, and what you type replaces what was highlighted. However, when I hit Ctrl-F in Dr.Explain, the Find dialog comes up, but the string isn't highlighted, and I keep forgetting that I have to delete the string that is already there. So what happens is that I hit Ctrl-F, type the string I want to find (e.g. "worth while") and then look up at the dialog box and find out that I have just added "worth while" to the string that was there from the last search (e.g. "as soon asworth while") instead of replacing it.
Having this "Find" text already selected after a Ctrl-F is pressed would be a nice production booster for me.
Wish List
1. That when you double-click on an index entry in the final documents, that the link can send you to a specific PART of the page that the link is to like you can in HTML. Example: I have a definitions page, I have the definition entries in the index (among all the other index entries). I would very much like it that my readers can double click on that index entry and go right to the definition.
2. More detailed HELP in the area of the screen capture scenario rules, filters and naming rules.
3. Callout bullets that can have multiple connector lines to the application. However, admittedly, the appearance of the "control rectangle" in the bullet paragraph for THAT area being pointed to by the bullet, makes this less important. However, I did encounter times when ONE bullet would have been best, to point out multiple parts of the screenshot. This one deserves some design thought. Possibly a special kind of "bullet"?
4. A way to select several words in text that comprise a proper noun (name of a person or entity) and cause those words to never be separated onto two different lines (this is an important grammatical rule for professional documents). I ended up accomplishing this by doing a document-wide Find for the proper nouns I was looking for and then manually replacing them with an HTML snippet that accomplished the task. Specifically:
<NOBR>whatever text needs to all be on the same line here</NOBR>
Since there weren't very many, this was, in reality, almost as quick as a "Find and Replace" where the replace option may embed a style.
Unfortunately, this text does not (yet) get output into the PDF output format. Hopefully it will in upcoming versions.
It would also be fantastic if this same style (non-line-breaking) could be applied to text in variables (sometimes variables contain proper nouns).
Further, it would also be great if there was a way to embed this style with the "Find and Replace" feature, so I could do a search and apply this style everywhere a certain proper noun existed in my document.
5. A BACK button in the Content Editor so that when you Ctrl + Click to follow a link to another page, that you don't have to remember what page you came from. This would be useful in other contexts as well, such as when you needed to fix something on another page and then "come back" to where you were working before.
6. That the index that is delivered in CHM files also be published at the end of the PDF file (with links, or if there is more than one link, listing page numbers where multiple links would have lead to, with links on each page number). Now that I think of it, if it was me, I would go one step further and do this:
index_item_with_multiple_links
{Page title}, page N <- linked to page N
{Page title}, page N <- linked to page N
{Page title}, page N <- linked to page N
{Page title}, page N <- linked to page N
{Page title}, page N <- linked to page N
This way no links would get lost! :-)
7. It would be really nice to have a logical text export of the keywords display, where the exported text would show the hierarchy as well as the connected topics. If there is a standard format for indexes, great. If not, permit exporting to a text file with hierarchy indicated by leading TAB characters, and also add the feature to import a keywords list from text file, to enable users, such as myself, to edit my index in a text editor, or to partially automate the task with another tool (which I or someone else might create).
8. The ability to have an option in the FIND dialog box that says: "Index All Occurrences of this string".
9. Microsoft HTML Help Workshop provides a way to make a "See Also" index entry jump to another keyword in the index. This capability would be nice to also have in Dr.Explain, because I encountered several places in my own project where I could have used this productively.
10. Even though the ability to alter the
Project settings > Text Strings > Headers > "The contents of:" <TOPIC>
is nice, it doesn't solve everything.
Depending on the page name and the context, the "Contents of {Page Name}", which is great for MOST of my pages, is not always an appropriate heading over the links to the subtopic pages. For this reason, it would be VERY nice to be able to specify a custom string for this heading, perhaps in the "Properties" area in the lower-left of the project. This would enable the user to specify additional types of headings for THAT PAGE ONLY, like this:
{Page Name} Details
where {Page Name} is not at the end, but could be embedded in the middle of the string, or
More Details:
or just
Details:
where {Page Name} does not appear at all. This would be very nice, and would have solved a few problems for me in creating my help file.
11. A Tasks management tab that lists every place in the text of the project where the term "TODO:" shows up (case insensitive), similar to that provided in many professional Integrated Development Environments (IDEs).
12. There does not seem to be a way (yet) to edit the custom dictionary from within Dr.Explain. I know that I can edit it with Windows Notepad, as long as I carefully keep the separation characters following each word, but it would be safer in the long run if editing it could be done from within Dr.Explain for all the reasons one might want to edit a custom dictionary (for me, I occasionally add a word that I later decide shouldn't be in the custom dictionary that I want the spell checker to start "marking" as a possibly-misspelled word again).
13. In the screen-capturing scenario rules lists and filter lists, the ability to COPY an existing rule and then modify just the part I want to change.
Conclusions
Building my help file with Dr.Explain was a pleasure to do. It is easy to tell that the producers of Dr.Explain either regularly make help files themselves, or they listen very well to their customers and add requested features that are real productivity boosters. In terms of things that boosted my own productivity, I lost count, and this article doesn't come close to listing them all. (See link below for more information on how this product helped me create a fine, professional-quality product.)
Despite a small number of things I ran into (see Things That Could Be Improved, and Wish List sections above), the productivity boost I experienced and amount of things that are REALLY RIGHT with this program FAR outweighed any annoyances.
I also found that since I studied the Dr.Explain help file in depth, once, and practiced each thing I felt weak in, that I walked away from this project with a FULL knowledge of what Dr.Explain is capable of (at least what was documented in its Help file), which means next time I need to use it (which might be in 3 months or 23 months), it won't take me long to come back up to speed with it.
And by the way, the Help file that comes with Dr.Explain was created in Dr.Explain, and I found I was able to use it to get productive using Dr.Explain in a very short amount of time. This in itself is another very nice compliment to Dr.Explain, making it that much easier for a new person to "train" themselves how to use it with the Help file. I was pleasantly surprised by this, as it is not common to find application Help that is so clear, concise, and easy to use! In addition to the high quality Help Files and technical documents Dr.Explain allows me to create, the fact that I was able to come up to speed quickly with it was one of the factors that makes it, in my opinion, an ideal pick among the Help-Authoring software packages available.
My Rating
Bottom Line
When I want to EXPLAIN something in detail in a technical document, no matter whether it is a Windows application or anything at all, Dr.Explain is my tool of choice -- no doubt about it. It's easy to use, quick to learn, and robust, and gives me (if I want to use it) in-depth possibilities for customizing my output documents.
Further Information
As I went through my HTML Help File project, I kept a narrative log of each step that I took. I did this in part because if I needed to create another help file in 6 months or 60 months from now, I could refer back to it to refresh my memory. However, I also created this log because in my searches on the web, I found very little in the way of "How to Build an HTML Help File" that was worth while. So I decided to blaze a trail and leave a map that others could follow, and published it as its own article:
Enjoy.