How to Create a Clean and Simple Desktop in Windows 7
If you use your computer a lot, you may find that a cluttered desktop can really start to annoy you. It’s even worse if you have a beautiful background that you can’t see thanks to loads of toolbars and folders. Luckily for us clean-freaks, Windows 7 allows you to make a clean, elegant, and simple desktop, free of all that annoying clutter synonymous with Windows computers.
Cleaning up your desktop is a simple, 2-step process. Read this article, then go to your desktop. I promise, you can have the simplest possible desktop in 2 minutes.
Step 1: The Taskbar
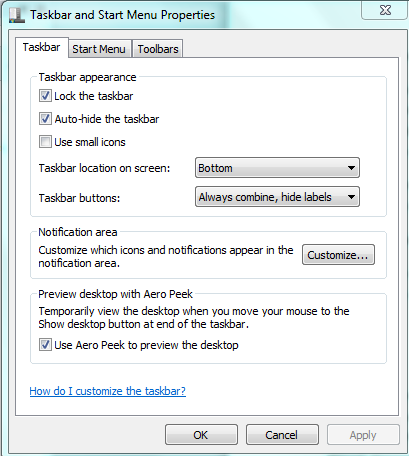
Did you know you can make the taskbar disappear? Well, you do now. Simply mouse-over the taskbar, right-click, and select “Properties”. This will bring up a box entitled: “Taskbar and Start Menu Properties”. Under the Taskbar section you need to click on the box marked: “Auto-hide the taskbar”. Voila. Now the taskbar will only be displayed when you move the mouse to the very bottom of the screen. This way you can still use it but it won’t be hanging around on the screen all the time.
Step 2: The Icons
We’ve all been there. You got a little lazy and saved a file to the desktop. Just the one. But then one became two, and three, and all of a sudden your desktop was drowning in icons. And who has the time to tidy that up? So you left it, cluttered, messy, and somewhere, in the back of your mind, almost impossibly annoying.
The thing is, you need to clear it up. I’m serious. Every single icon on your desktop has a place in one of the Windows Libraries: Documents, Music, Pictures, and Video. Get those files off your desktop and into folders somewhere – just remember where you put them, of course. Hey, if you’re not sure where to put them, just drag all the icons into documents. You can always organise them later.
There is something of an exception for program shortcuts. Maybe you open Firefox every time you use your computer, so you think you need a shortcut on your desktop. You don’t. Pin the program to the taskbar, and get that shortcut in the Recycling Bin. And speaking of the Recycling Bin…
It may have occurred to you that you can’t get rid of that particular icon. I mean, come on; putting the Recycling Bin in the Recycling Bin is rather perverse, not to mention impossible. Now, I’m something of a perfectionist, so there’s no way I’m leaving one icon on my desktop having managed to get rid of all the others. So, how does one get rid of the Recycling Bin icon?
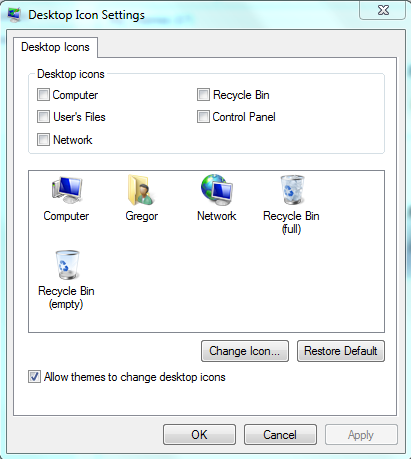
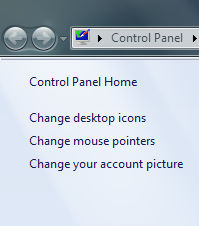
Well, in days gone by, it was a little tricky; you actually had to edit the Windows Registry to remove it. It was possible, but it was also a bit of a faff. Microsoft has been kind with Windows 7, however. All you need to do is right-click the desktop and click “Personalise”. This will open a new window with a short list of options on the top left. Selecting “Change desktop icons” from the list will open another window, with yet more options. You need to deselect all boxes under the “Desktop Icons” section, including the Recycling Bin. Close the window and return to your desktop, and you should find the only clutter on it is your mouse pointer. Not much to be done about that, I’m afraid.
I hope this tutorial was helpful and comprehensive. Please, feel free to comment should you have any questions or feedback. Thanks for reading.


