- HubPages»
- Technology»
- Computers & Software»
- Operating Systems»
- Windows
How to Edit Photos on Windows Vista
Okay you have just purchased a nice digital camera took some very nice pictures, you get back home and decide to connect your camera to your Windows Vista PC so that you can review your photos and select which one to print out.
Once connected to your Vista PC, you have a number of options:
(1) You can view your photos using the standard explorer window.
(2) Decide that you want to organise your photos
(3) Realised that one of your pictures has not come out the way you want it and would prefer to edit the photo.
In this hub we shall look at the third option in some detail.
You may wish to read..
- 5 steps to speed up Windows Vista?
Speeding up Vista can be done in a number of ways, to be honest don’t expect your PC to fly after speeding Vista up, but you can expect it to perform routine tasks a little quicker than you experience now with your system. - Blogger template generator and free professional blo...
To generate your own Blogger template you can use a tool called – Artisteer. The product allows you to generate Blogger templates using a GUI interface. - Three of my Best Bridge Cameras
In my simple layman terms, a bridge camera is targeted at people like me who want a digital camera that gives good set of functionality, ease of use (as in many automated features), at a price that won’t break the Bank. Bridge Cameras target a niche
What Photo Editing Tools are provided on Windows Vista?
Microsoft provides 3 tools ready configured on Windows Vista that can be used to edit photos and other images:
(a) Paint (although not the ideal, if you have no other option then it will work)
(b) Windows Media Centre (pretty good for automated basic level photo editing on Vista)
(c) Windows Photo Gallery (has some rather good features and can be a very good image editing tool in the right hand)
In the following section details are provided on what features are available for editing your picture using Windows Photo Gallery on a Vista PC.
Windows Photo Gallery is an image organizer, photo editor and photo sharing application that is installed with the Vista Operating System. It is a part of Microsoft's Windows Essentials software suite.
The Photo Gallery provides picture management, tagging, and searching capabilities for photos. It provides an image viewer and a photo import tool that can be used to acquire photos from a camera scanner or other removable media. Windows Photo Gallery on Vista also allows sharing of photos by uploading them to Flickr or Facebook.
Windows Vista - Windows Photo Gallery Tutorial
Photo Gallery Features in Brief:
Photo editing - Photo Gallery allows photos or images to be edited for exposure or colour correction. It also provides other basic image editing functions, such as resizing, cropping photos, and red-eye reduction function. Some advanced features like viewing a photo's colour histogram, which allows the user to adjust the photo's shadows, highlights and sharpness.
Photo Gallery has other editing tools such as blemish remover and noise reduction. Panoramic stitching, Photo Fuse, and AutoCollage are also included in Windows Photo Gallery for those who want that extra functionality. It comes free so why not test the features out with your photos on your Vista.
Photo management - Photo Gallery delivers the ability to organize photos in its Gallery view, by adding titles to photos, rating, putting in captions, and customised meta-data tags to photos.
It uses the concept of hierarchical tagging for example for People you can use a tag ‘Persons Name’ which could be Jimdo, Janedo or another name, you can tag where the photo was taken like Bangladesh, Syria, New York or another place this provides the ability to organise photos based on specific tags.

To Open Windows Photo Gallery click the Start button, click All Programs, and then click Windows Photo Gallery
The best option for beginners is to follow the workflow method in Photo Gallery; this provides certain editing features in sequence. The term workflow is used by professional photographers to indicate to the order in which photos are edited for perfection. By using the correct workflow method can improve the quality of your edited photos.
The ‘Fix pane’ in Photo Gallery is arranged so you can make changes and edit your images in the best order, starting with photo exposure adjustments, colour adjust, crop/resize and finally remove red-eye. You can go free-flow and make changes to your photos in any order, but as a beginner I recommend that you follow the workflow to make things easy.
Once you have started Photo Gallery from your Windows Vista Start menu. Here's a brief look at how to use it:
ADDING PHOTOS
Click the File menu - Click the "Add Folder to Gallery..." option.
Navigate to the folder's location on your computer where your photos are stored.
Click OK. The folder will be added to the folder list on the left side of the Photo Gallery window.
If the photos are on your camera, or if you have one ready to scan, Photo Gallery can take care of that, if you have photos stored on a USB storage device just connect it and navigate to the folder on the device where the photos are stored.
IMPORT PHOTOS USING PHOTO GALLERY
Connect your camera or scanner to the Vista computer and power it on.
Click the File menu - Click the "Import from Scanner or Camera..." option (if it has not auto started).
A list of attached devices is displayed. Click the one you want to use, and then click the Import button.
If you decide to scan an image, you'll see a dialog box that lets you choose the image type, specify the colour format and resolution, and so on. Click Preview to make sure everything's okay, then click Scan. Photo Gallery gives you the option to add a tag to the photos you're importing.
RATE & TAG PHOTOS
Tagging your photos will make it simpler to categorize and separate them. Photo Gallery on Vista gives you some default choices, but for convenience, you can create your own labels.
How to create a tag:
Click "Create New Tag", Tags is on the left side of the window; type the name of the tag you want created. It will appear on the list.
To tag a photo:
Drag the photos onto the tag or select the photo - click the name of a tag in the info panel to add it.
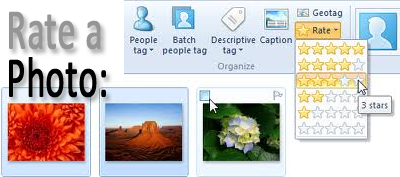
Rate a photo:
Simply select the required photo - click the appropriate stars in the info panel to rate the photo.
Sort photos:
To sort based on tag or rating - Click the tag name or star rating on the left side of the screen to see all the photos with that tag or rating.
If you want to view photos across multiple tags, ratings, or a mixture of the two, you can do that by holding down the Ctrl key while selecting them.
Photo-Editing Functions
Not always do we get award-winning shots with the digital camera. Photo Gallery provides some basic tools for correcting the appearance of your pictures. Click the photo you want to edit, and then click the Fix button on the menu ribbon, and you're ready to start.
Auto Adjust:
The easiest way to clean up the exposure and colour. Click the ‘Auto Adjust’ button, and Photo Gallery automatically enhances your picture's colour and sharpness.
Adjust Exposure:
Provides you with two sliders for changing picture brightness or contrast. Sliding the brightness adjuster in either direction will lighten or darken your entire image; the contrast slider on the other hand lets you control the difference between the lightest and darkest areas in the image.
Adjust Colour:
Want to change the temperature (cool or warm), red-green tint, or overall saturation of colour in your photo then use this feature and you can change the photo to some rather nice colours.
Crop Picture:
To reduce the size of your photo, you can use the Crop function which lets you trim off excess portions of the image you don't need to see. When you click this option, a selection box appears on your photo image, which you can drag and adjust with the handles to be exactly the size you want. When you've selected the portions of the image you want to keep, click Apply to delete everything else.
Fix Red Eye:
This feature removes the red-eyes look that sometimes creeps into photos when using a flash. To use click and drag the mouse cursor around the eye or eyes that need adjusting and the colour will correct itself.
If you’re not happy with your changes - Click on the Undo button to undo the change or changes made. By Clicking the Revert button will return your photo to its starting state.
Share Photos:
You’ve taken some really wonderful holiday snaps which you want to share with family and friends. Photo Gallery makes this easy, too. Just select a photo or photos, and then choose your sharing options.
Slide Show:
Click the Play button at the bottom of the screen to start a slide show that includes all photos you've selected. You can even select different themes to change the way the show looks. Very good feature if you have hundreds of holiday snaps which you want to view with guests.
Print Photo:
Simple and easy to use feature - Click the Print button, then click Print to bring up the Print Pictures window. Select printer you want to use, paper size, the required print resolution, the orientation of the photos on the page, the number of copies you want, and then click Print.
Order Photo Prints online:
Using "Order Prints..." option. You'll be given a list of online photo printing services where you can send your images for printing, and either view them or pick them up in person. Just make sure you select one close to you if you opt for the option to pick-up.
E-mail Photos:
Click the E-mail button, and then specify size you want the picture to be (make sure it is not too big otherwise it may not leave your Outbox). Click Attach, a blank e-mail is created with the photo attached.
Burn Photo to CD or DVD:
Select the photos required - Click Burn, then click on the "Data Disc..." or "Video DVD..." options to save your photos to a blank CD or DVD.
Create a Movie:
Make a Movie option will open up Windows Movie Maker, giving you ability to combine photos, video, and audio into an exciting feature suitable for distribution via DVD or on YouTube.
For additional information on editing photos using Windows photo Gallery on Windows Vista a good book to read is - Digital Pictures Basics 2012. The book will teach you the skills for using Windows Photo Gallery for managing, enhancing and sharing pictures.
This book features large print and an easy layout, the book is organized into twelve lessons for effective self-study. Written in easy steps, with detailed exercises and plenty of illustrations, this manual will help you gain the skills and become comfortable in managing your pictures on your computer.

