ArtsAutosBooksBusinessEducationEntertainmentFamilyFashionFoodGamesGenderHealthHolidaysHomeHubPagesPersonal FinancePetsPoliticsReligionSportsTechnologyTravel

How to Automatically Lock Windows Computer When You Walk Away

Updated on October 9, 2017
Max Dalton profile image

Max holds a B.S. in mass communications from SIU, an M.A. in communications from U of I, and is pursuing an MBA from Webster University.

Introduction

As part of the Creator's Update rollout for Windows 10 in April 2017, Microsoft is releasing the Dynamic Lock feature. With Dynamic Lock enabled and a smartphone paired with their Windows computer via Bluetooth, the computer will automatically lock 30 seconds after the connected phone is out of range for Bluetooth connectivity. And don't panic if you forget to bring your smartphone back to your computer with you and the machine doesn't unlock automatically. You can always log in with your password, pin, or another login option you have enabled. The Dynamic Lock feature is a great security option for individuals who are bad about locking their Windows computer. This article walks through the steps to turn on the Dynamic Lock feature on a Windows computer. However, don't forget that before you can turn on Dynamic Lock, you must have a Bluetooth smartphone paired with your Windows computer.

With Dynamic Lock enabled, Windows will automatically lock your computer after a smartphone connected via Bluetooth moves out of range of the computer.
With Dynamic Lock enabled, Windows will automatically lock your computer after a smartphone connected via Bluetooth moves out of range of the computer. | Source

Pair Smartphone with Windows Computer

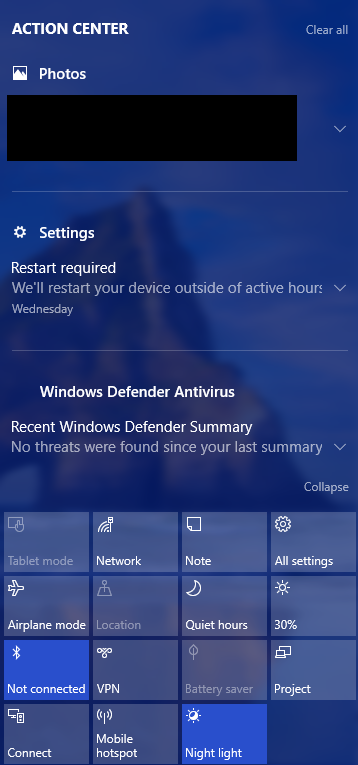
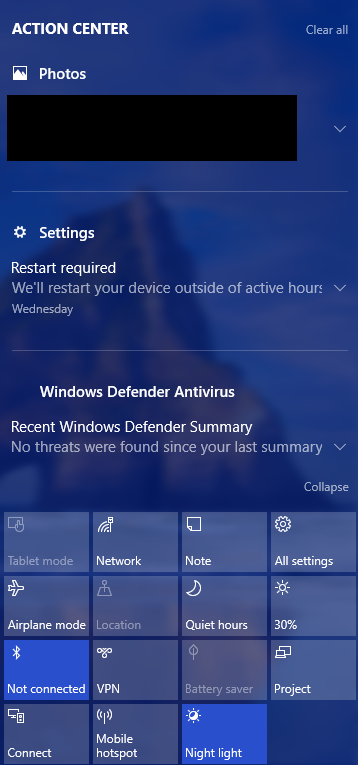
  1. Press the "Windows" and "A" buttons to open the Action Center along the right side of your Windows computer. The Action Center displays system notifications, and also notifications associated with individual applications. Additionally, at the bottom of the Action Center, you'll see a variety of shortcuts for some important features, such as Airplane Mode, Quiet Hours, Night Light, connecting a wireless device, connecting to an external monitor, and more
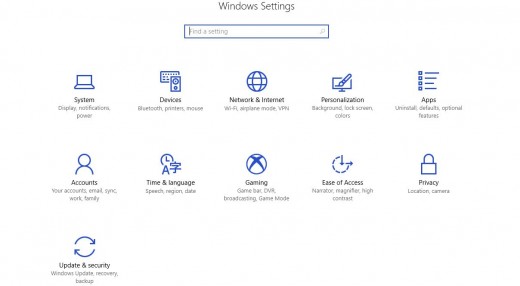
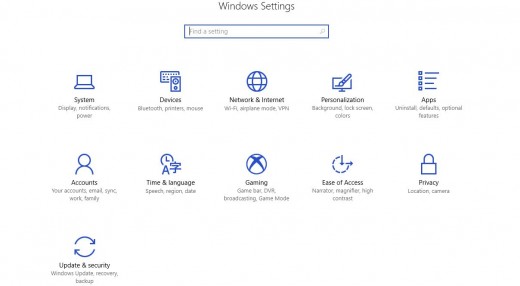
  2. Click "Settings." The Windows Settings screen opens. The Settings screen is where you can access your system information, connected devices, uninstall applications, adjust date, time, and language settings, and more.
  3. Click "Devices."
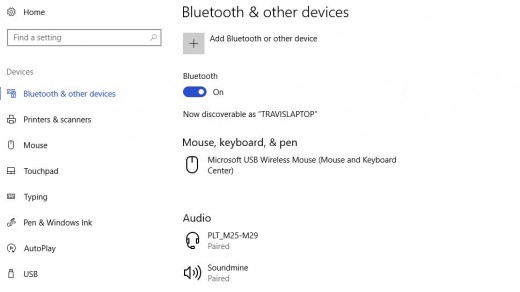
  4. Choose the "Bluetooth & Other Devices" option along the left side of the screen.
  5. Ensure that Bluetooth is enabled on the right side of the screen. If Bluetooth is already enabled and there are connected devices, you'll see the full list of connected devices in their respective sections, such as Audio and Other Devices.
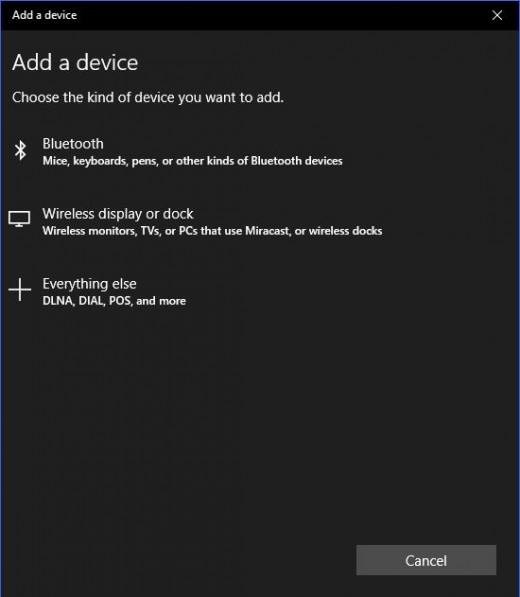
  6. Click the "+" box to the left of Add Bluetooth or Other Device. The Add a Device window opens.
  7. Choose "Bluetooth." The list of detected Bluetooth devices populates.
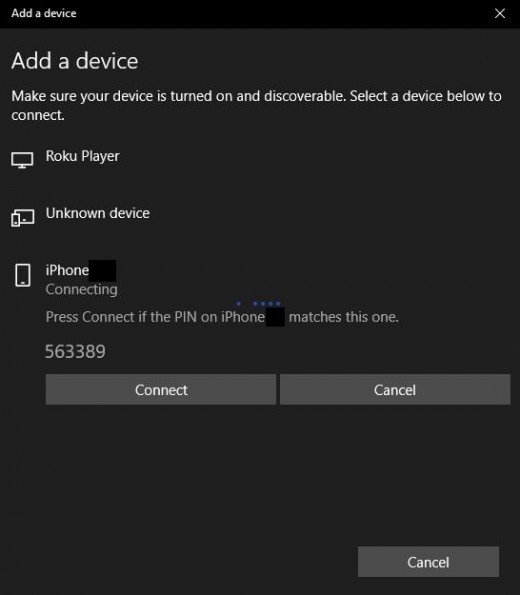
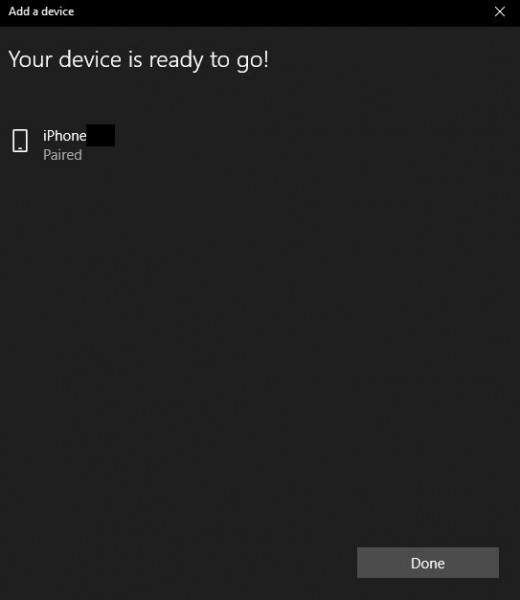
  8. Click the name of your smartphone in the list of detected devices. A PIN number appears directly beneath the name of your device. A window appears on your smartphone screen with a PIN in it as well.Ensure that the PIN number is the same on each device, and then click "Connect" in the Add a Device window on your computer, and tap "Pair" on your smartphone. A message appears on the Add a Device screen telling you when the devices are successfully paired.

Click thumbnail to view full-size
Click "Windows" and "A" at the same time to open the Action Center on the right side of the screen. Click "Settings."Click "Devices."Enable Bluetooth. The Add a Device screen opens.Click "Bluetooth" in the Add a Device screen.Click the name of your smartphone that appears in the list of available Bluetooth devices. Click "Connect" in the Add a Device screen, and also tap "Pair" on your smartphone.A message will appear when the smartphone has been successfully paired with your computer.
Click "Windows" and "A" at the same time to open the Action Center on the right side of the screen. Click "Settings."
Click "Windows" and "A" at the same time to open the Action Center on the right side of the screen. Click "Settings." | Source
Click "Devices."
Click "Devices." | Source
Enable Bluetooth. The Add a Device screen opens.
Enable Bluetooth. The Add a Device screen opens. | Source
Click "Bluetooth" in the Add a Device screen.
Click "Bluetooth" in the Add a Device screen. | Source
Click the name of your smartphone that appears in the list of available Bluetooth devices. Click "Connect" in the Add a Device screen, and also tap "Pair" on your smartphone.
Click the name of your smartphone that appears in the list of available Bluetooth devices. Click "Connect" in the Add a Device screen, and also tap "Pair" on your smartphone. | Source
A message will appear when the smartphone has been successfully paired with your computer.
A message will appear when the smartphone has been successfully paired with your computer. | Source

How to Enable Windows Picture-in-Picture Feature

Enable Windows Dynamic Lock

  1. Press the "Windows" and "A" buttons at the same time to open the Action Center on the right side of your computer screen.

  2. Click "Settings." The Windows Settings screen opens.

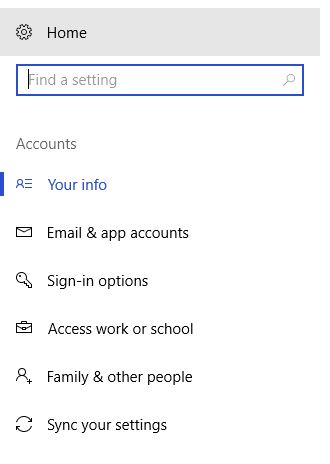
  3. Click "Accounts." The Accounts section is where you can change the settings for both your's and other users accounts. This is also where you can add and remove email accounts set up on your computer, change your account password, create a PIN to use rather than a password, enable Windows facial recognition, and more.

  4. Click "Sign-in Options" along the left side of the screen. The Sign-in Options window opens on the right side of the screen.

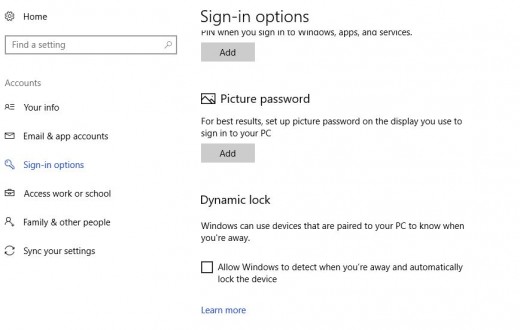
  5. Scroll down to the Dynamic Lock section.

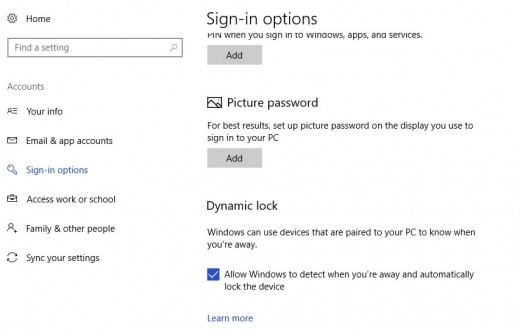
  6. Click to place a check mark to the left of the option that says "Allow Windows to detect when you're away and automatically lock the device." You have now successfully enabled the Dynamic Lock feature.

Click thumbnail to view full-size
Open the Action Center and click "Settings" again.Choose "Accounts."Select "Sign-in Options."Navigate down to the Dynamic Lock section.Click to enable the Dynamic Lock feature.
Open the Action Center and click "Settings" again.
Open the Action Center and click "Settings" again. | Source
Choose "Accounts."
Choose "Accounts." | Source
Select "Sign-in Options."
Select "Sign-in Options." | Source
Navigate down to the Dynamic Lock section.
Navigate down to the Dynamic Lock section. | Source
Click to enable the Dynamic Lock feature.
Click to enable the Dynamic Lock feature. | Source

© 2017 Max Dalton
working

This website uses cookies

As a user in the EEA, your approval is needed on a few things. To provide a better website experience, hubpages.com uses cookies (and other similar technologies) and may collect, process, and share personal data. Please choose which areas of our service you consent to our doing so.

For more information on managing or withdrawing consents and how we handle data, visit our Privacy Policy at: https://corp.maven.io/privacy-policy

Show Details
Necessary
HubPages Device IDThis is used to identify particular browsers or devices when the access the service, and is used for security reasons.
LoginThis is necessary to sign in to the HubPages Service.
Google RecaptchaThis is used to prevent bots and spam. (Privacy Policy)
AkismetThis is used to detect comment spam. (Privacy Policy)
HubPages Google AnalyticsThis is used to provide data on traffic to our website, all personally identifyable data is anonymized. (Privacy Policy)
HubPages Traffic PixelThis is used to collect data on traffic to articles and other pages on our site. Unless you are signed in to a HubPages account, all personally identifiable information is anonymized.
Amazon Web ServicesThis is a cloud services platform that we used to host our service. (Privacy Policy)
CloudflareThis is a cloud CDN service that we use to efficiently deliver files required for our service to operate such as javascript, cascading style sheets, images, and videos. (Privacy Policy)
Google Hosted LibrariesJavascript software libraries such as jQuery are loaded at endpoints on the googleapis.com or gstatic.com domains, for performance and efficiency reasons. (Privacy Policy)
Features
Google Custom SearchThis is feature allows you to search the site. (Privacy Policy)
Google MapsSome articles have Google Maps embedded in them. (Privacy Policy)
Google ChartsThis is used to display charts and graphs on articles and the author center. (Privacy Policy)
Google AdSense Host APIThis service allows you to sign up for or associate a Google AdSense account with HubPages, so that you can earn money from ads on your articles. No data is shared unless you engage with this feature. (Privacy Policy)
Google YouTubeSome articles have YouTube videos embedded in them. (Privacy Policy)
VimeoSome articles have Vimeo videos embedded in them. (Privacy Policy)
PaypalThis is used for a registered author who enrolls in the HubPages Earnings program and requests to be paid via PayPal. No data is shared with Paypal unless you engage with this feature. (Privacy Policy)
Facebook LoginYou can use this to streamline signing up for, or signing in to your Hubpages account. No data is shared with Facebook unless you engage with this feature. (Privacy Policy)
MavenThis supports the Maven widget and search functionality. (Privacy Policy)
Marketing
Google AdSenseThis is an ad network. (Privacy Policy)
Google DoubleClickGoogle provides ad serving technology and runs an ad network. (Privacy Policy)
Index ExchangeThis is an ad network. (Privacy Policy)
SovrnThis is an ad network. (Privacy Policy)
Facebook AdsThis is an ad network. (Privacy Policy)
Amazon Unified Ad MarketplaceThis is an ad network. (Privacy Policy)
AppNexusThis is an ad network. (Privacy Policy)
OpenxThis is an ad network. (Privacy Policy)
Rubicon ProjectThis is an ad network. (Privacy Policy)
TripleLiftThis is an ad network. (Privacy Policy)
Say MediaWe partner with Say Media to deliver ad campaigns on our sites. (Privacy Policy)
Remarketing PixelsWe may use remarketing pixels from advertising networks such as Google AdWords, Bing Ads, and Facebook in order to advertise the HubPages Service to people that have visited our sites.
Conversion Tracking PixelsWe may use conversion tracking pixels from advertising networks such as Google AdWords, Bing Ads, and Facebook in order to identify when an advertisement has successfully resulted in the desired action, such as signing up for the HubPages Service or publishing an article on the HubPages Service.
Statistics
Author Google AnalyticsThis is used to provide traffic data and reports to the authors of articles on the HubPages Service. (Privacy Policy)
ComscoreComScore is a media measurement and analytics company providing marketing data and analytics to enterprises, media and advertising agencies, and publishers. Non-consent will result in ComScore only processing obfuscated personal data. (Privacy Policy)
Amazon Tracking PixelSome articles display amazon products as part of the Amazon Affiliate program, this pixel provides traffic statistics for those products (Privacy Policy)
ClickscoThis is a data management platform studying reader behavior (Privacy Policy)