How to Install Free AddThis Social Media Sharing Widget in Blogger Blog


Introduction
The easier it is for people to share your blog on social media, the more likely it is they will share your blog on various social media channels. From there, there's the increased opportunity that those people share, link to or reference your blog as well, which increases your clout with search engines and the Internet as a whole. AddThis.com offers a free, professional looking, customizable social media sharing widget that you can easily install on your Blogger blog that lets people quickly share your blog through various social media channels, such as Facebook, Twitter, Google+, Pinterest, Reddit and more. You can set up an account with AddThis, customize your widget and have it up and running in a matter of minutes.
Instructions
1) Open your Web browser and navigate to the AddThis website by clicking here.
2) Click "Sign In" in the upper right corner, and then go through the process to create an account if you don't already have one.
3) Select "Tool Gallery" in the upper left corner of the AddThis website after logging in.
4) Click the "Sharing Sidebar" option in the Share Tools section with the FREE banner in the upper left corner of it. The Sharing Sidebar dialog box pops up on your screen. The top part of the dialog box displays a preview of what your sharing widget will look like and will change as you make modifications to it.
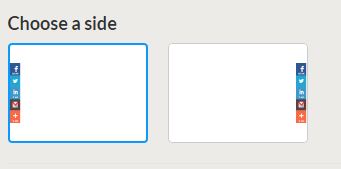
5) Scroll down to the Choose a Side section. Click to choose whether your AddThis sharing sidebar flies in from either the left or right side of your Blogger blog.
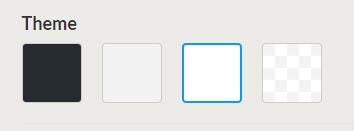
6) Next, scroll down to the Theme section and choose the background color associated with your sharing widget. If selected, the background color at the end that looks like gray and white blocks will actually blend in with whatever its laying over on your Blogger blog.
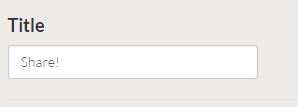
7) Next, scroll down to the Title section. The text you input in this box will appear directly above your widget that flies in.
8) Next, scroll down to the Services section and then click to select the social media services you want to be available in your widget in the Available Services section and then drag them over to the Selected Services section.
9) Scroll up to the top of the Sharing Sidebar window to preview your preferences. Modify your options accordingly until you're happy with the setup of your AddThis sharing widget sidebar.
10) Scroll down to the bottom of the Sharing Sidebar window and then click inside of the Get the Code box to highlight all of the code in that box. Right-click over the highlighted code to open a context menu and then click "Copy."
11) Navigate to your Blogger dashboard and then click "Layout" on the left side of the screen.
12) Scroll down to the bottom of the Layout screen and then click the long "Add a Gadget" option at the bottom of the screen. This will prevent the blank space that will be associated with this box from affecting other widgets that will actually display items in the designated space.
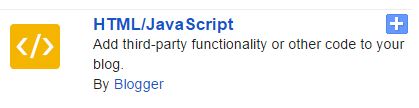
13) Click "HTML/JavaScript."
14) Right-click inside of the Content section and then click "Paste" to paste the code you copied from the AddThis site into the Content field. Click "Save." The AddThis widget will now fly-in from the designated area on your screen.
© 2014 Max Dalton