- HubPages»
- Technology»
- Computers & Software»
- Computer Science & Programming
How to Use and Design Excel Macros - Part 3: Macro Basics

Back to Part 2

Starting a Macro
- Open Microsoft Excel
- Click the “View” tab
- Select Macros (far right icon)
- Either create a blank macro or record a macro
Creating a Blank Macro
- Press the Macro icon (Alternatively, select the word “Macros” beneath the icon and then “View Macros”)
- Type a name in the blank (Do not use spaces)
- Select “Create”
To add a hotkey later, come back to this screen and select “Options…”
Recording a Macro
- Select the word “Macros” beneath the icon
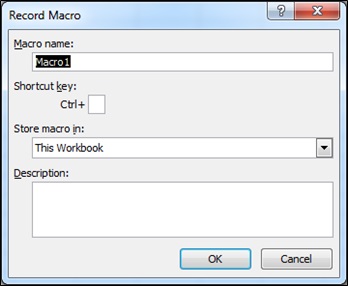
- Choose “Record Macro…”
- Type a name and a shortcut key and press “OK”
- Do whatever actions you want recorded
- Select the word “Macros” again and click “Stop Recording” (Alternatively, press the blue square icon in the bottom left of the screen)
Macro Editing Screen
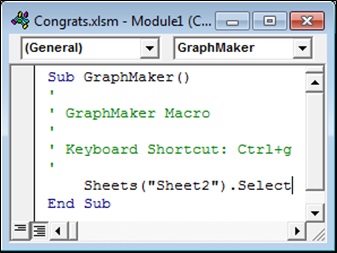
- In the “View Macros” box, the “Create” or “Edit” options will open the Macro Editing Screen, called Microsoft Visual Basic for Applications (VBA)
- A blank macro will only contain Sub MacroTitle() and End Sub
- A recorded macro will contain the code to perform the actions recorded
Macro Code Colors
- Black – standard code
- Blue – function Code that stands for a specific action
- Green – text that does not affect the code (Place an apostrophe (‘) at the beginning of a line to write text)
Pre-Made Macros
- There are many pre-made macros available online
- If you are looking for a macro with a specific function, try finding an already made one with a simple Google search
- You can also ask people on an Excel forum to help you make a macro, and they will provide you with a code
- To use a pre-made macro, copy and paste the given code into your blank macro in the Macro Editing Screen
Using a Macro
To run a macro:
The long way
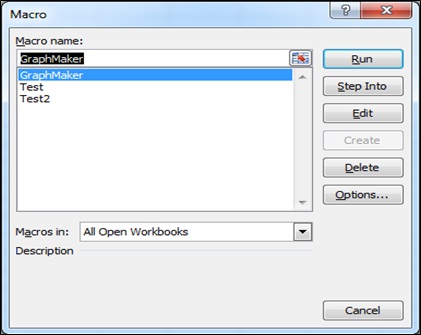
- Go to the “View Macros” screen
- Select the desired macro
- Click “Run”
The short way
- Use the shortcut key assigned to the macro (Ctrl + …)


