- HubPages»
- Technology»
- Internet & the Web»
- Social Networking
How to organise your Facebook friends using lists

Many of us are on Facebook today and it is an awesome tool that can be used to reconnect with old friends and to make new ones. While we are able to share snippets of our lives with our friends on Facebook, sometimes we do want to keep certain stuff privy to certain groups only via this online social networking site. It can get a little troublesome, not - if we utilise the Facebook "list" feature to our advantage. In this article, I will be sharing with you tips on how you can take full advantage of this feature and organise your privacy settings.
Facebook Lists
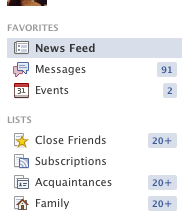
The Facebook list feature can be found on the left hand side panel of your Facebook page. How lists work is that you are able to add your friends into particular lists. A person can be part of more than one list.
For example - My best friend can be my cousin, so I can add her to "Family" as well as "Close Friends".
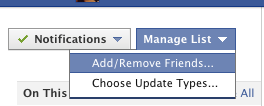
To add a friend to a list:
- Click on the name of the category - for e.g. family
- On the right hand panel, there is a drop down menu that says "Manage List"
- Click on it to add/remove the relevant people to the list.
Tips on categorizing people into lists
First you need to think through how you want to broadcast your social information to your network. What are the categories of people that you would like to segregate them into?
For myself, I have a few:
- Family
- Co-Workers
- High School Classmates
- BFFs
- Close Friends
- Acquaintances
- Restricted (Restricted list is a default one provided by Facebook that you can add people into. People in this list cannot see your posts unless you have tagged the posts public)
This current list works great for me as my updates are usually in the form of - private thoughts (for close friends), day-to-day life (for most friends except acquaintances), sharing of findings online and certain photo-albums (extends to acquaintances) and lastly generic thoughts (public). This way I can safely post on Facebook, knowing that my information broadcast is somewhat within my control.
So think through how you want to organise your broadcast on Facebook and create lists which suit your purposes.
Controlling Privacy of Posts
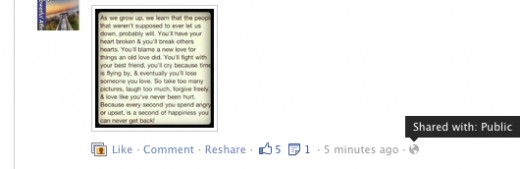
So once you have gotten your lists categorized and organized, you can know control the privacy settings of individual status updates / photo albums. How you do so is everytime before you post, look at the bottom right hand side of the post, you can click on it and select the level of privacy that you wish. The screenshot on the right shows that this post is public so people, including those on your restricted list can see.
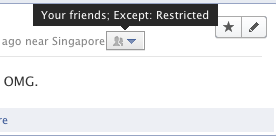
The screenshot below shows that this particular status update has been extended to friends but anyone who is on the restricted list will not be able to access it. I did not restrict acquaintances so my acquaintances can still view this update.
Click on "custom" to control exactly how you would like to share your status updates. Do note that when you set a certain level of privacy for your latest post/updates, the subsequent posts will have the same settings until you change it.
In other words, if your status update for today is set to public, the next update will still be public unless you change it. Once you change it to say, only friends can view, the next update after this change will only be visible to people on your friends list.
Well, it does seem daunting at first to reorganize the list and customize the settings on your Facebook account. But trust me, the little investment in time now, will definitely reap far more advantages in the future.


