- HubPages»
- Technology»
- Computers & Software»
- Computer Software»
- Office Software Suites»
- Microsoft Office
How to print a table in the center of the page from Microsoft Excel
Even if we are wishing to have the table to be printed on the center from an Excel worksheet, we get the printed in weird alignment almost always. The good news is, we are here to show you the process with which you can finally print your table in the center of the page from Excel so easily.
Get yourself ready
For doing the process, you have to work on a computer which has Microsoft Excel installed in it. In here- we are working on Excel 2010 to show you the process.
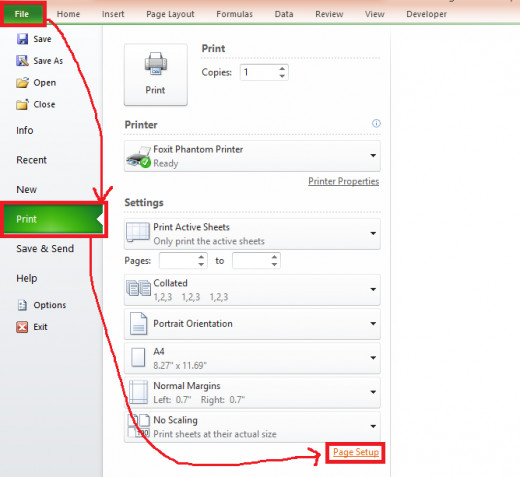
Step 1: Select File tab from the Excel Ribbon. It is the green tab on the extreme right side of the ribbon.
Step 2: From the left side of the page, Click on Print.
Step 3: Click on the Page Setup from the appeared Print settings page.
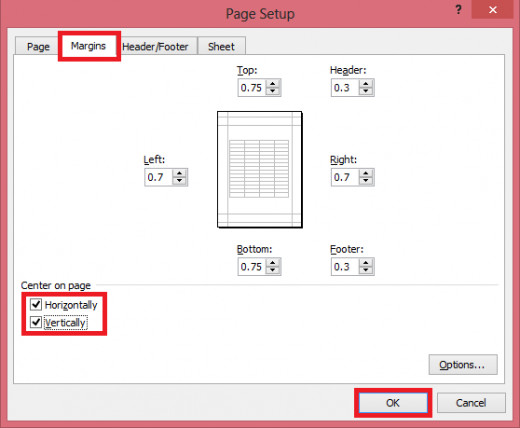
Step 4: After the Page Setup box appears Select the Margin tab (Second tab) of the box.
Step 5: Look on the lower middle part of the box, you will find the Checkbox of Horizontally and Vertically under the option of Center on Page. We have to Tick both of the checkboxes.
Step 7: Click on OK from the bottom of the box.
If you give the print order now, you will find the document printed in the center of the page.
Think more
From the margin box, you can control the placement of the table to be printed practically anywhere of the page itself. Increase or decrease the values of the margin areas as you wish and keep an eye on the page preview on the box to understand how the values are going to affect the printout in the page.


