Laptop Hard Drive Data Recovery How-To

Foreword and a warning: Putting a screwdriver to your laptop and pulling out the hard drive will often void the warranty, if you still have one. Actual, hands-on laptop hard drive repair (meaning you open the drive and poke around in it) can't be done without a considerable amount of expertise and access to the proper tools. In this article we'll instead take a look at other things that you can try to recover data from a failing or broken hard drive. Even these methods can be risky though, so if you use the tips described below, you do so at your own risk. So, with that said let's move on to the tips.
Prevent Data Loss Before it Happens
Yes, I know you've heard it before, but the best thing you can do to keep your data safe is to make backups often. The hard drive is usually the first thing to break in your computer - desktop and laptop alike - as it's the most fragile component with lots of moving parts (you get around this problem when switching to an SSD). Unfortunately few of us actually get around to it--I've managed to lose a few hard drives myself over the years. However most of the time I've at least been able to recover data--some or even all of the it using the methods outlined below.
1: Scan and Recover Data Using a Bootable Live CD
The usual symptom of a failing or broken hard drive is that your operating system (i.e., Windows/Mac OS X/Linux) won't start. If you're lucky and just have a small amount of corrupted files on it you might be given the option to scan the drive for errors and repair them automatically. After a successful scan and repair your system will hopefully start. But don't relax just yet--once the drive has started to mess up your files it's only a matter of time before it happens again. Take a full backup right away and start looking for a replacement drive.

If scanning and auto-repairing the hard drive doesn't work, or the boot process doesn't reach that point, there's another data recovery trick you can try. However, you'll need to borrow a friend's computer to download and burn a "live CD". In this context "Live" means that you can boot an operating system without installing it first. There are plenty of free live CDs available for download--nearly all Linux install CDs are bootable in a fully functional live environment. Common Linux distributions like Ubuntu or Fedora are easy to use but also large downloads. A more lightweight alternative is SystemRescueCD, which is only 236MB.
Step-by-Step
- Download the live CD image file (.iso) and burn it using a dedicated CD/DVD burning application. If you don't have one, try the free and lightweight ImgBurn.
- To be able to boot from the CD, you may have to change the settings in your system's BIOS to allow it to boot from the optical drive. You can access it by pushing F2/F3/Del at bootup, or whatever key your system uses (it's usually stated on the very first screen you see when you turn it on). Change the boot sequence to CD/DVD first.
- With the live CD up and running, it should detect your hard drive unless it's broken beyond repair. Now insert a thumb drive or external hard drive and copy all the important files from your failing drive to the healthy one.
2: Hard Drive Data Recovery Tool #1: The External Hard Drive Case
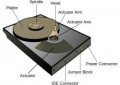
This method is actually easier, but it requires a couple of tools; most notably an external hard drive case. This is a very useful gadget and usually not expensive at all - you should be able to find one for about $10 online or at your local retailer. However, before you buy an external case, you need to know what type of drive you have. If your laptop is less than five years old it's most likely a 2.5" SATA drive, as opposed to the older IDE interface. It's easy to find out by looking at the connectors once you unscrew the drive.
Remove and Identify the Hard Drive: SATA or IDE (Parallel-ATA)?


Again you will also need access to a second computer to copy the drive's contents to a healthy one. Once you have the external case hooked up to a second computer, you can also attempt to scan and repair the drive using the Checkdisk utility (chkdsk.exe) in Windows:
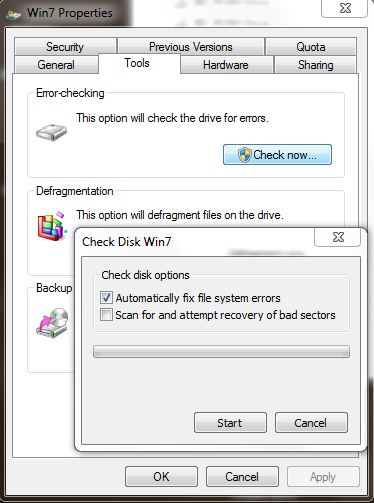
Right-click the drive via Explorer/My Computer, click Properties and choose the Tools tab. Under Error-checking, click Check now. If you tick the box to try and recover potential bad sectors the process will take a long time depending on the size of the disk. Note that this will not recover accidentally deleted files, for this you have to use a third-party app such as Recuva (freeware).
Step-by-Step
- Unscrew the cover on the bottom of your laptop and remove the hard drive carefully (may void warranty).
- Identify the type of drive and insert it in a suitable external USB-powered case.
- Run Scandisk (Windows), Disk Utility (Mac) or a third-party tool and attempt to repair the disk.
- Backup all of your important files to a healthy drive.
- Again, even if you manage to restore it to working order, don't trust a drive that has already failed you once. It's probably at the end of its rope and needs a replacement.
3. Hire a Professional
If all else fails and you desperately need your data back, you'll just have to bite the bullet and get professional help. There are plenty of competent companies that work exclusively with restoring data from broken drives. Unfortunately there are no guarantees and it's often really expensive. In other words it's a good idea to give it a try it yourself first. Just be careful and don't touch the circuitry on the hard drive. Pick up an antistatic wrist wrap along with that external enclosure if you want to play it safe.

 computer")