- HubPages»
- Technology»
- Computers & Software»
- Computer Software
Outlook 2010 Tips: How to Setup Auto Archive

If you are using Outlook 2010, don’t just assume that it is running optimally, or that it is automatically making the most of the available space. Instead, consider activating the Outlook 2010 AutoArchive settings, an option which is turned off by default, so that Outlook can manage your mailbox more efficiently.
What is AutoArchive?
AutoArchive is a feature of Outlook which automatically moves items into an archive file, or deletes items, depending on which settings are selected. Archived items are still accessible through the archive folder, located on the left side of the screen in the email navigation pane.
If you opt for items to be deleted, they will not be archived, so please select this option with care. Additionally, any archived items that you want to delete will need to be deleted manually.
How to Setup AutoArchive in Outlook 2010
To setup AutoArchive in Outlook 2010, click on File at the top of Outlook, go to Options, and then select Advanced. Click on the AutoArchive button, located on the right side of the screen. The AutoArchive settings screen will appear.
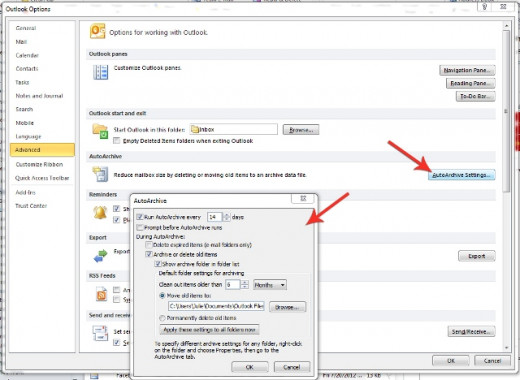
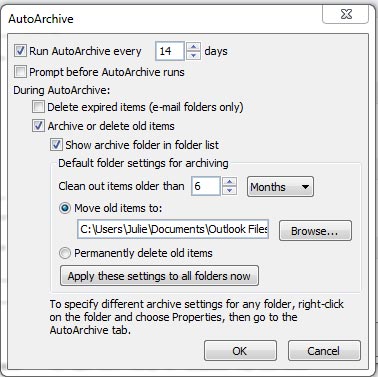
(Note: I selected for Outlook NOT to prompt me before archiving, but you may wish to select this option so that you can opt not to archive if you're in the middle of something important.)
AutoArchive Settings
Below is an explanation of the available options on this screen.
Run AutoArchive every X days: Allows you to select how often AutoArchive runs. By default this is set to 14 days, but you can schedule the cycle to be shorter or longer, depending on your needs.
Keep in mind that archiving a lot of items at once can reduce your computers performance (only during archiving). Additionally, if you receive a large volume of email, you may want to consider shortening the AutoArchive cycle, so that archiving occurs more frequently.
Prompt before AutoArchive runs: Select this option if you want Outlook to notify you before archiving. The advantage to this is that you can delay archiving if needed, by selecting no on the prompt.
Delete expired items (e-mail folders only): Use this option to delete expired items that have passed their aging period.This option is off by default. Deleted items are deleted, and not archived, so use this option with caution.
Archive or delete old items: This setting should be selected only if you would like access to the settings underneath. If this option is not selected, AutoArchive will operate using default settings.
Show archive folder in folder list: Select this option if you want your Archives to show up in your email navigation pane, which allows you to access archived items, if needed.
Clean out items older than X months: This option allows you to schedule how often you would like your folders cleaned. The default is 6 months.
Move old items to: When items are archived, a secondary archive.pst file is created for Outlook to manage this data. This setting allows you to specify where you would like your archive.pst file to be stored, such as on your local machine, or on a folder on your server. By selecting this option, you cannot select the ‘Permanently delete old items’ option.
Permanently delete old items: This option allows you to delete any expired items. If this option is selected, items will not be archived, and will instead be permanently deleted.
Apply these settings to all folders now: Pressing this button will apply your settings to all folders.
If Outlook does not start archiving immediately after pressing this button, you can manually activate archiving by going to File > Info > Cleanup Tools > Archive and select Archive all folders according to their AutoArchive settings, then click on OK.
AutoArchive helps Outlook 2010 run faster.
Once you activate, set, and apply the AutoArchive settings in Outlook 2010, you should find that your email program runs faster than before because it is now running more efficiently and using available mailbox space more effectively.

