Screen Optimizing Firefox 3 Hacks And Tweaks

Firefox 3, the best browser. I'm very happy to use it because of it's performance and ease of use. People use Firefox. The default screen of Firefox i.e. the default display of Firefox has five (05) bars at the top of the application window. Then the website's content is showed. The default five bars are the title bar, the menu, the navigation toolbar, the bookmarks and the tabs. All of them take place about 132 pixels height. So, it's take much space of the screen. If your screen is 1024×768 then it takes one eight part of your window. So, it's a lots of free space there which are wasted. But you can use the wasted space. This page will provide the hacks and tweaks for using the space and you can save upto 60% of that space. You don't need to apply all the tactics. Just read and choose which is suitable for your content window. However, this page will provide several options to use minimal screen estate in Firefox. To do this, you just need to customize the Firefox toolbars and to install several add-ons. So, to optimize Firefox 3 screen just go through the lines.

Firefox Related Topics
Steps for Screen Optimizing Firefox 3 Hacks And Tweaks
Step 1. Installing "Tiny Menu"
Tiny Menu replaces the standard menu bar with a tiny menu popup. If you install it then the menu will contain File, Edit, View etc. entities into one menu item. All of the items can be displayed as text or as one icon. To install Tiny Menu just click here for the link. From this link, install tiny menu and increase content screen.
Step 2. Navigation Toolbar merging with the Menu bar.
Here, some toolbars will be merged. Right click on the blank space in the Menu toolbar and select Customize option. Later, drag and drop all elements ( such as Reload, Home, Stop, Address Bar and Google Search etc.) that are necessary for you. So, all the things will be located right to the menu bar.
Step 3. Removing Navigation Toolbar
Now right click on the blank space and uncheck Navigation Toolbar to remove it from the context menu. You will see that the navigation toolbar is disappeared now.
Step 4. Disabling Bookmarks Toolbar
Again, right click on the blank space and uncheck Bookmarks Toolbar to remove it from the context menu. You will see that the bookmarks toolbar is disappeared now.
Step 5. Bookmarks Toolbar merging with the Menu Bar
Right click on a free space of the Menu Bar again and select customize. Then drag and drop the Bookmarks Toolbar Items to the Menu Bar and click on Done. This is done to clear the Bookmarks Toolbar from any items.
Step 7. Title bar disabling and move the captions to the menu bar
This is another add-ons. It's an extension to hide the caption of
Firefox, displays Minimize, Maximize/Restore and Close buttons on the
menubar/nav-bar.To install this add-ons, click here.
Step 8. Install autoHideStatusbar add-ons
This add-ons hides the statusbar.The statusbar is shown back when hovering a "sensitive zone" with the mouse and can be shown back when a page loads or when hovering a link, according to the preferences. Additionally, a statusbar icon and/or a toolbar button can be used to quick enable/disable. To install the autoHideStatusbar, click here.
Pictorial effect of step 1 - step 8
The default lookout of Firefox 3 looks like the following:

Now applying step 1 - step 8, Firefox 3 looks like the following.
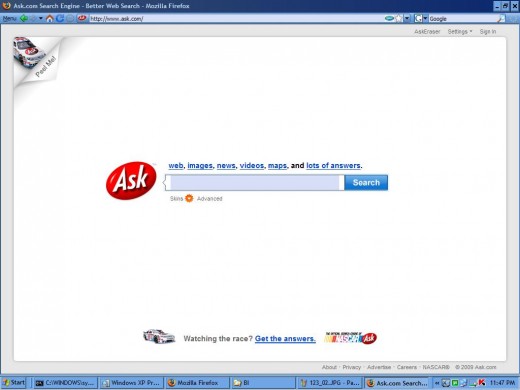
From the above pictures comparison, it's easily noticeable that if you apply step 1 to step 8, there will be more space to the screen. The main benefit will be that your context area's screen will be increased.
© Written by rancidTaste
If you are enjoyed this post, please consider to leave a comment at the comment section of this page or Subscribe to rancidTaste's RSS feed to get new pages which will be delivered to your feed reader. You can also read more hubs by rancidTaste.


