- HubPages»
- Technology»
- Computers & Software»
- Computer Software
Using Rules to assist with Outlook 2007 housekeeping
Introduction
Welcome to my second hub on Outlook 2007. My previous hub investigated how to housekeep Outlook 2007 by determining the size of your mailbox, concentrating on deleting or archiving your largest emails, working with the Mailbox Cleanup tool and cleaning up old meeting invites. That hub can be found here:
Today’s hub will look at creating rules to not only assist with housekeeping Outlook, but also in organising emails into sub folders to assist in keeping your mailbox tidy. Rules are very powerful in Outlook 2007, but care must be taken when creating them as incorrectly created rules can play havoc with your email. Before we start creating rules to tidy up your email, let’s go through an introduction to rules as well as some best practice.
Introduction to rules
Before we start with rules, let’s define what a rule is. Even if you have never created a rule, chances are you have used one. The Out of Office assistant which many of us use when going on holiday is a rule!
A rule is simply a set of instructions that Outlook 2007 will carry out based on criteria you specify. For example, when an email from John Smith arrives, move it to a folder called John
Best Practice
As rules can create havoc if configured incorrectly, so care should always be taken when creating them. As long as you exercise care when creating them, they can massively assist in keeping your Outlook 2007 mailbox tidy and organised.
- Use descriptive names so that rules are easier to troubleshoot
- Perform one action per rule
- Test rules thoroughly
- When starting out with rules, create them slowly (don’t create 30 in one day, add them gradually to your Outlook)
- If Outlook begins to behave strangely, disable any rules that are related to the emails that are not behaving as expected to ensure they are not at fault
- When moving emails normally sent to a distribution list you are a member of from a specific mailbox, using the exception except if sent only to me ensures that you don’t miss emails you may have to action
- Never create a rule that permanently deletes an email, use delete instead
Creating our first rule
We are now ready to create our first rule. We are going to create a rule so that all emails sent to me by my manager Neil go into a special folder called imaginatively Neil.
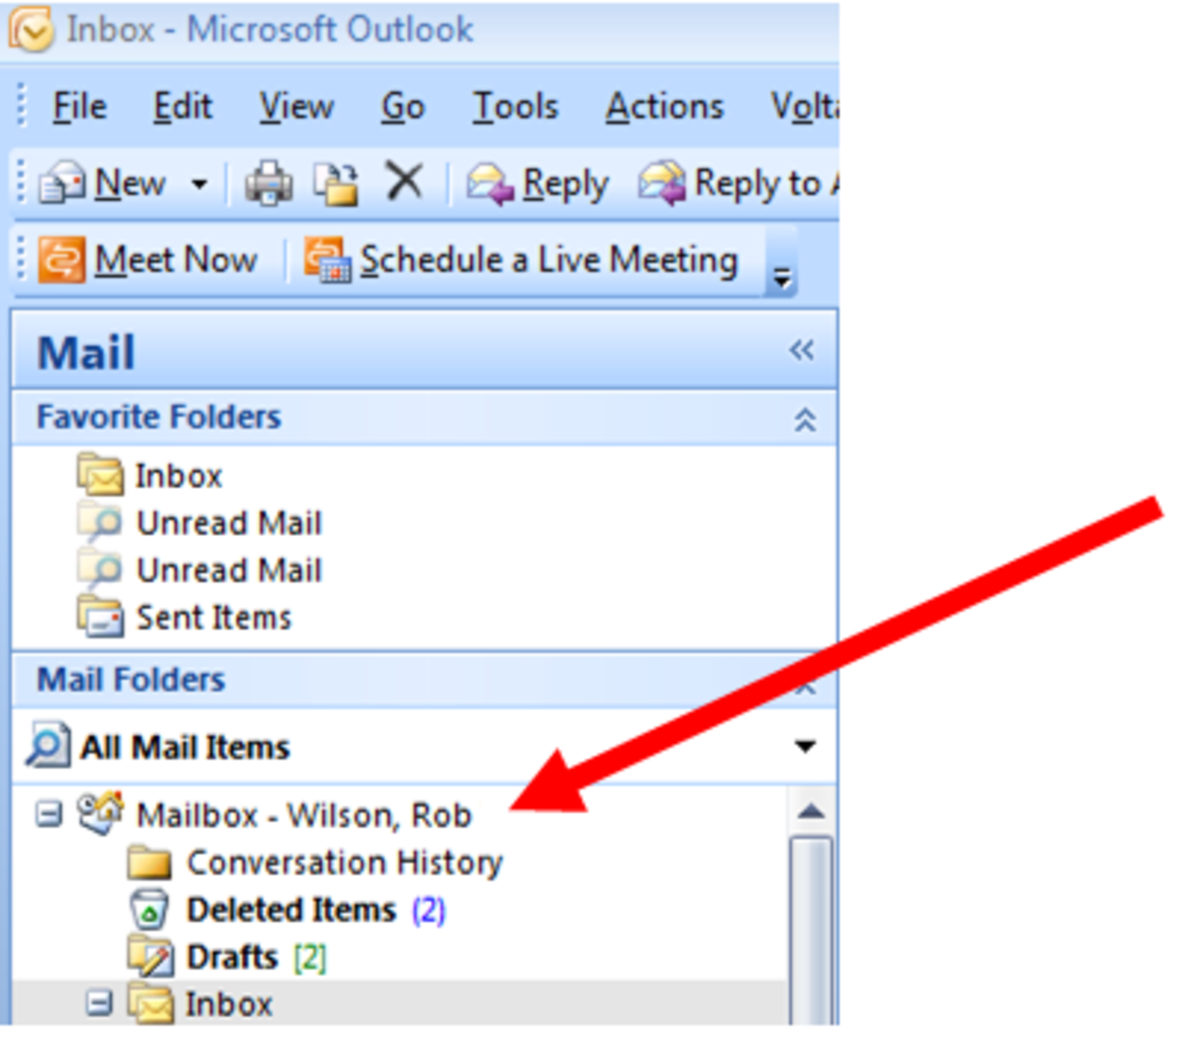
To create a folder, right click on where you want the folder to be created and select New Folder and give it an appropriate name.
To begin creating the rule, go to Tools and then Rules and Alerts.
- Click New Rule and the Rules Wizard will start.
- We are going to select Move messages from someone to a folder as this best fits what we need to do
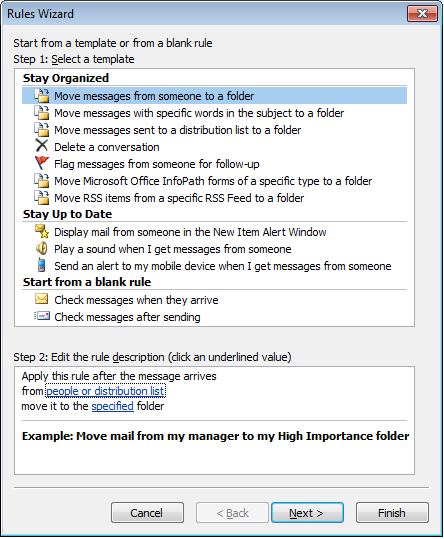
- Click Next, Outlook has kindly pre-selected from people or distribution list which is the option we want.
- The next step is to click on people or distribution list and select the person you are basing the rule on (you can see below, I have selected my manager Neil Brown
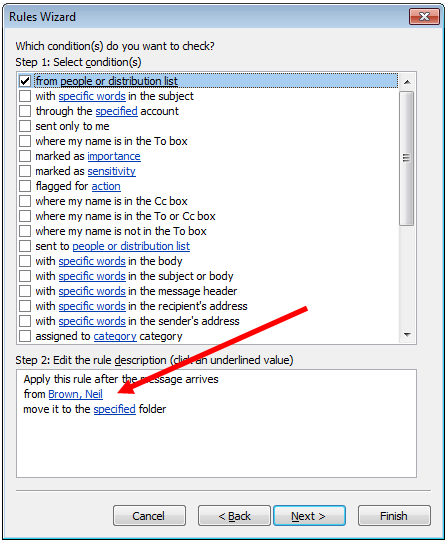
- Once I click Next, I am asked what action to take with the message. In this case I want to move it to the specified folder as pre-selected agan bu Outlook.
- Now, I have to specify the folder. I click on specificed and browse to the folder I wish the emails to be stored in.
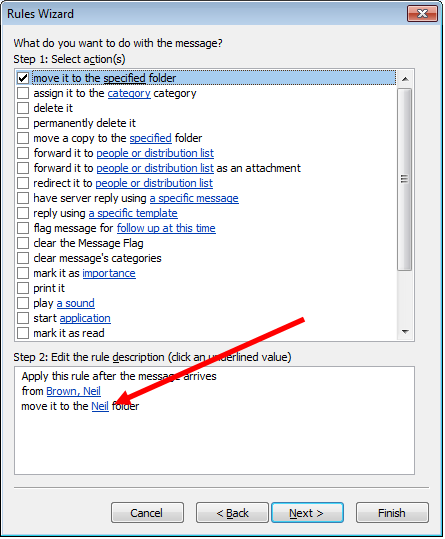
- As we don’t have any exceptions, we click Next which takes us to the final screen before creating the new rule.
- Select Run this rule now on messages already in “Inbox” before clicking Finish
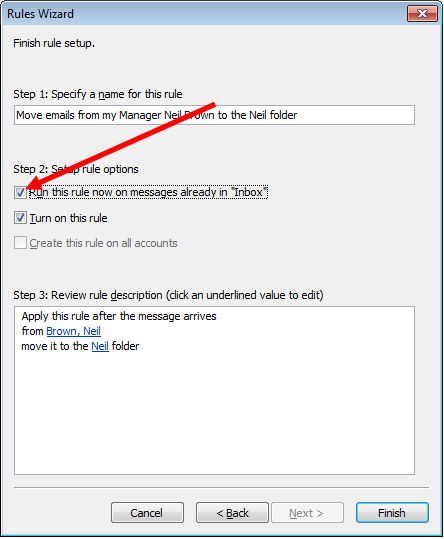
Our new shiny rule will now run. Check your new folder to ensure that the rule has done exactly what you want it to do.
Creating a rule to delete emails containing key words
Suppose you work in a job where someone sends you daily or hourly status reports. You are really only interested in them when something goes wrong. We can create a rule to delete an email when it contains certain words.
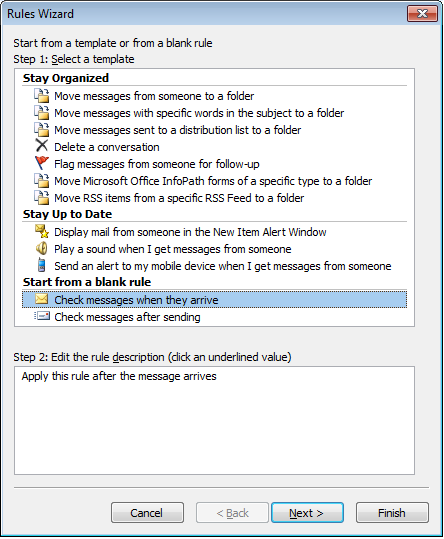
For this example, we will start from a blank rule, so start up the Rules Wizard as before and select Start from a Black Rule and then Check messages when they arrive as below.
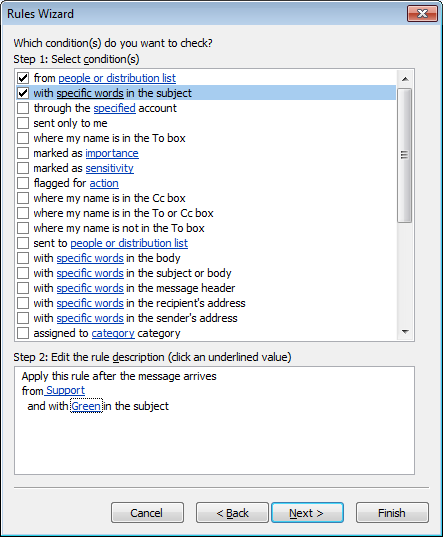
The status reports I receive come from a specific mail address and have the RAG (Red / Amber / Green) status in the subject. The emails that report that the status is Green (in other words normal or Business as Usual) are of no interest to me, so it is those I want to delete. So I select
- From people or distribution list and
- With specific words in the subject
- Then, click on people and distribution list and select the mailbox the emails come from
- Next, click on specific words and enter in the word you are interested in
On the next screen, select delete it.
You may be tempted to select permanently delete it, but I would recommend that you do not. The reason for this is that this process may be automatic and if it fails and you permanently delete it, you may not be aware of it. If you simply delete it, you will have a certain number of unread emails in your deleted items and if this number suddenly decreases you should investigate to ensure that everything is normal.
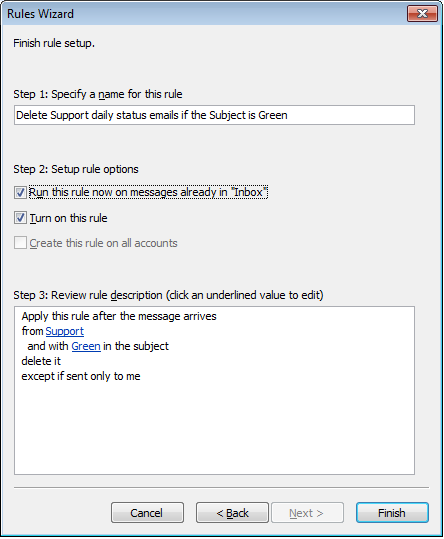
The last option to select is another safety net. Suppose that the Support team that sends me the status report sends me an email requiring me to do something. It happens to have the word Green in the subject. My rule would normally delete it which would not be good in this case. To avoid this, I use an exception.
I select except if sent only to me on the screen asking if there any exceptions. The below picture illustrates how your rule should look.
Conclusion
Outlook 2007 rules used correctly can greatly assist you in keeping your mailbox clean and allowing you to concentrate on only the emails you have to action. In this hub I have shown how to move emails based on sender to specific folders and also how to delete emails from a particular sender containing specific keywords. Using the knowledge you have gained from those two examples you will now be able to create pretty much any rule you need to organise your mailbox better and to keep it tidier. I hope you have enjoyed reading this hub and that you have found it useful and informative. Please feel free to leave a comment below.


