- HubPages»
- Technology»
- Computers & Software»
- Computer Software
How to Make an Image Smaller using Photoshop Elements
Photoshop Elements
Photoshop Elements has now become very popular for some of the following reasons:
- Price, it does not cost as much as Photoshop CS.
- For the amateur photographer and even some pros prefer it?
- The learning curve is not so steep, good results can be obtained very quickly.
- There are many tutorials available both step by step and video.
I have now purchased a copy of Photoshop Elements 10 and will post an update on this hub shortly!
I feel that if you are familiar with the User Interface of Photoshop CS it will not be any problem at all to change over to Photoshop Elements!
if you have been following along from my 'digital photography Hubs you will know that I would prefer to use Photoshop as my preferred image manipulation program.
At the moment I'm using Photoshop cs2 and after a fairly long self taught learning curve I am able to do most editing tasks that are required.
I have heard some people are having trouble with images so I would like to pass on some of my experiences to help make image manipulating a fun and happy task that anyone can perform.
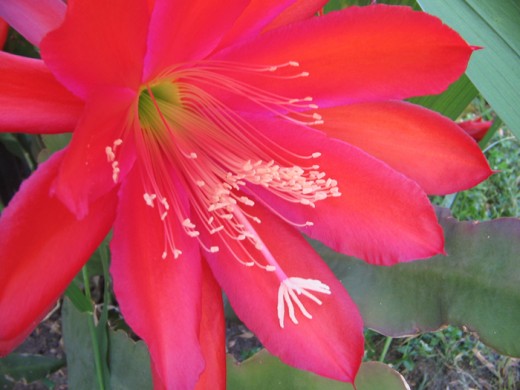
The flower image is one of my own photographs and it started out as a massive 9 megapixels file size. Much too large for displaying on the Internet
The image you see here has been downsized to about 1 megapixels, without much loss of quality.
Some tips from my experiences whith Photoshop
Based on the questions I get asked, I'm just going to give you some tips on playing around with Photoshop cs2.
The most asked question I get asked is :
"My pictures take too long to upload or I'm told they are too large to upload, what do I do ?"
Ok, this one is not all that hard to fix!
I'll do it in steps so that if you have a query or I've got it wrong (Me get something wrong Hmmm very unlikely) just pop a comment in below and I'll reply.
Important First things First
A word of warning from someone who has ruined (read lost) some good images.
Before you start playing around with your images it is always good practice to make a duplicate of the image and work on the duplicate. It is very easy to do this in Photoshop.
Click on the "Image" button on the menu bar , when the drop down menu opens click on "Duplicate" when the duplicate dialog box opens you will see a suggested name , usually the original name with 'copy' following. Press OK.
When the 'copy' image opens, you can close the original image and it is safe to work on the copy image.
Resizing Images
Ok lets assume that you have taken a beautiful shot of a flower and you want to show it off in a Hub.
Here is one I prepared earlier.
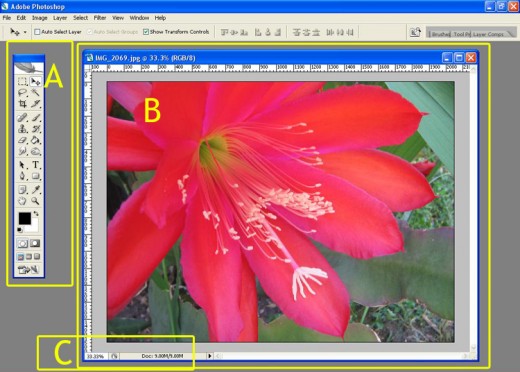
In (diag. 1) you will see that I have opened an image of a flower in Photoshop. The bounding boxes (not part of photoshop) indicate:
A Toolbox
B The opened Image
C The size of the opened image (according to photohsop). You will notice that this image is 9.0meg in size. Way too large for uploading.
Finding the true dimensions
So we have decided that our image is too large to upload. By the way there is another reason for not uploading a large image. They are easy to steal and use on other sites but that is another subject to do with copyright or copyleft depending on which way you lean ;-).
To ascertain just how big your image is I would like you to open up the "Image Size" dialog box.
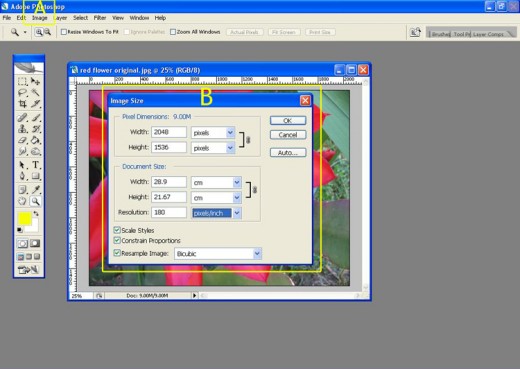
To do this look up at the menu bar and click on the button that read "Image" (A in image (Diag 2) when the drop down menu appears click on "image Size" . If the PS god's are smiling on you the Image Size dialog box will open (bounding box B) in the diagram (Diag 2)
When you have got the "Image Size" box open study the information for a minute.You will notice in Diag 2 the following info:
Pixel dimensions : a massive 9.0 megapixels ( this will change as you alter the other dimensions)
- Width: 2048 Pixels
- Height: 1536 pixels
Document Size:
- Width 28.9 cm
- Height 21.67
Resolution: 180 pixels / inch
Resolution
The first thing that we consider for this exercise is the "Resolution".
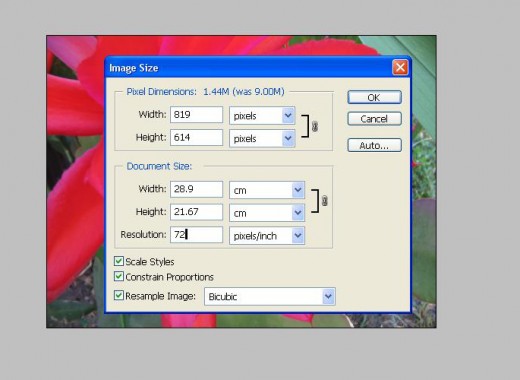
I have found through research and experience that it is a waste of space to have any images with a resolution of more than 72 pixels per inch. So go ahead and change that to 72 psi.
I have put another screenshot up (diag 3) and you will see what effect it has had on the file size just by changing the resolution, sizes are now:
Pixel dimensions ( this will change as you alter the other dimensions)
- Width: 819 Pixels
- Height: 614 pixels
Document Size:
- Width 28.9 cm
- Height 21.67
Resolution: 72 pixels / inch.
More importantly, our file size has dropped to a respectable 1.44 megapixels some 6 times smaller than the original file.
Optimising Image
In my own personal opinion, this file is still just a bit too large to upload, but this would depend on the sort of impression you want to make with your image.
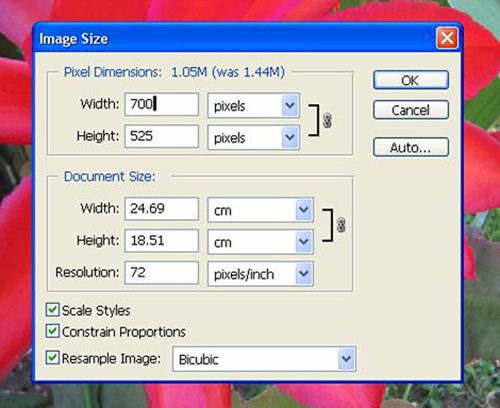
I feel that the important dimension on a monitor screen is the Width and in my personal experience, a width or 700 pixels is fine for most images, especially on HubPages.
I have now modified my original image to have the following dimensions:
Pixel dimensions ( this will change as you alter the other dimensions)
- Width: 700 Pixels
- Height: 525 pixels
Document Size:
- Width 28.9 cm
- Height 21.67
Resolution: 72 pixels / inch.
Leave all other boxes as checked. We do not want our proportions being disturbed. Do we?
Save your Image
After you have made you final choices you need to save your new file.
Just click on the 'File' button on the menu bar and click 'save' . If prompted save at the maximum JPEG resolution. JPEG is what is called a 'lossy' file format , which means that every time you open and save the image it is compressed with some loss of quality.
You will be given a choice where to save and rename the file.
My rule of thumb is to just change the word 'copy ' to 'small' and leave it in the original file.
This means that it will be saved next to the original large file.
Questions
If you have any questions at all on Photoshop or other image manipulation programs , such as GIMP or Paint.net, please leave a comment below and I will try my best to answer your queries.
© 2009 Peter


